HP Deskjet Ink Advantage F700 User Guide - Page 137
Scan fails, Cause, Solution, Digital Imaging Monitor, Display Status
 |
View all HP Deskjet Ink Advantage F700 manuals
Add to My Manuals
Save this manual to your list of manuals |
Page 137 highlights
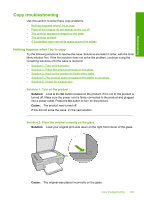
Troubleshooting Chapter 12 Cause: The computer system resources may have been low. Scan fails Try the following solutions to resolve the issue. Solutions are listed in order, with the most likely solution first. If the first solution does not solve the problem, continue trying the remaining solutions until the issue is resolved. • Solution 1: Turn on your computer • Solution 2: Connect your computer to the product with a standard USB cable • Solution 3: Install the HP Photosmart Software • Solution 4: Start the HP Photosmart Software • Solution 5: Make sure you have sufficient computer memory Solution 1: Turn on your computer Solution: Turn on your computer. Cause: The computer was not turned on. If this did not solve the issue, try the next solution. Solution 2: Connect your computer to the product with a standard USB cable Solution: Connect your computer to the product with a standard USB cable. For more information, see the Start Here guide. Cause: Your computer was not connected to the product by a USB cable. If this did not solve the issue, try the next solution. Solution 3: Install the HP Photosmart Software Solution: Insert the product installation CD and install the software. For more information, see the Start Here guide. Cause: The HP Photosmart Software was not installed on your computer. If this did not solve the issue, try the next solution. Solution 4: Start the HP Photosmart Software Solution: Open the software you installed with the product and try scanning again. NOTE: To check to see whether the software is running, right-click on the HP Digital Imaging Monitor icon in the system tray at the far right of the Windows taskbar. Pick a device in the list, and then click Display Status. 134 Troubleshooting
-
 1
1 -
2
-
3
-
4
-
5
-
6
-
7
-
8
-
9
-
10
-
11
-
12
-
13
-
14
-
15
-
16
-
17
-
18
-
19
-
20
-
21
-
22
-
23
-
24
-
25
-
26
-
27
-
28
-
29
-
30
-
31
-
32
-
33
-
34
-
35
-
36
-
37
-
38
-
39
-
40
-
41
-
42
-
43
-
44
-
45
-
46
-
47
-
48
-
49
-
50
-
51
-
52
-
53
-
54
-
55
-
56
-
57
-
58
-
59
-
60
-
61
-
62
-
63
-
64
-
65
-
66
-
67
-
68
-
69
-
70
-
71
-
72
-
73
-
74
-
75
-
76
-
77
-
78
-
79
-
80
-
81
-
82
-
83
-
84
-
85
-
86
-
87
-
88
-
89
-
90
-
91
-
92
-
93
-
94
-
95
-
96
-
97
-
98
-
99
-
100
-
101
-
102
-
103
-
104
-
105
-
106
-
107
-
108
-
109
-
110
-
111
-
112
-
113
-
114
-
115
-
116
-
117
-
118
-
119
-
120
-
121
-
122
-
123
-
124
-
125
-
126
-
127
-
128
-
129
-
130
-
131
-
 132
132 -
 133
133 -
 134
134 -
 135
135 -
 136
136 -
 137
137 -
 138
138 -
 139
139 -
 140
140 -
 141
141 -
 142
142 -
143
-
144
-
145
-
146
-
147
-
148
-
149
-
150
-
151
-
152
-
153
-
154
-
155
-
156
-
157
-
158
-
159
-
160
-
161
-
162
-
163
-
164
-
165
-
166
-
167
-
168
-
169
-
170
-
171
-
172
-
173
-
174
-
175
-
176
-
177
-
178
-
179
-
180
-
181
-
182
-
183
-
184
-
185
-
186
-
187
-
188
-
189
-
190
-
191
-
192
-
193
-
194
-
195
-
196
-
197
-
198
-
199
-
200
-
201
-
202
-
203
-
204
-
205
-
206
-
207
-
208
-
209
-
210
-
211
-
212
-
213
-
214
-
215
-
216
-
217
-
218
-
219
-
220
-
221
-
222
-
223
-
224
-
225
-
226
-
227
-
228
-
229
-
230
-
231
 |
 |
