HP Deskjet Ink Advantage F700 User Guide - Page 90
Cause, Solution, To start the installation from a Windows computer, Start, d:\setup.exe
 |
View all HP Deskjet Ink Advantage F700 manuals
Add to My Manuals
Save this manual to your list of manuals |
Page 90 highlights
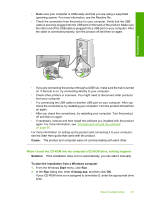
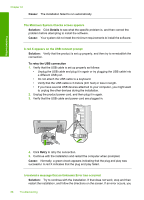
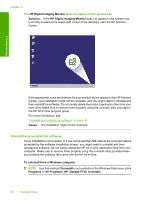
• Make sure your computer is USB ready and that you are using a supported operating system. For more information, see the Readme file. • Check the connection from the product to your computer. Verify that the USB cable is securely plugged into the USB port on the back of the product. Make sure the other end of the USB cable is plugged into a USB port on your computer. After the cable is connected properly, turn the product off and then on again. Troubleshooting • If you are connecting the product through a USB hub, make sure the hub is turned on. If the hub is on, try connecting directly to your computer. • Check other printers or scanners. You might need to disconnect older products from your computer. • Try connecting the USB cable to another USB port on your computer. After you check the connections, try restarting your computer. Turn the product off and then on again. • After you check the connections, try restarting your computer. Turn the product off and then on again. • If necessary, remove and then install the software you installed with the product again. For more information, see "Uninstall and reinstall the software" on page 90. For more information on setting up the product and connecting it to your computer, see the Start Here guide that came with the product. Cause: The product and computer were not communicating with each other. When I insert the CD-ROM into my computer's CD-ROM drive, nothing happens Solution: If the installation does not run automatically, you can start it manually. To start the installation from a Windows computer 1. From the Windows Start menu, click Run. 2. In the Run dialog box, enter d:\setup.exe, and then click OK. If your CD-ROM drive is not assigned to drive letter D, enter the appropriate drive letter. Setup troubleshooting 87
-
 1
1 -
2
-
3
-
4
-
5
-
6
-
7
-
8
-
9
-
10
-
11
-
12
-
13
-
14
-
15
-
16
-
17
-
18
-
19
-
20
-
21
-
22
-
23
-
24
-
25
-
26
-
27
-
28
-
29
-
30
-
31
-
32
-
33
-
34
-
35
-
36
-
37
-
38
-
39
-
40
-
41
-
42
-
43
-
44
-
45
-
46
-
47
-
48
-
49
-
50
-
51
-
52
-
53
-
54
-
55
-
56
-
57
-
58
-
59
-
60
-
61
-
62
-
63
-
64
-
65
-
66
-
67
-
68
-
69
-
70
-
71
-
72
-
73
-
74
-
75
-
76
-
77
-
78
-
79
-
80
-
81
-
82
-
83
-
84
-
 85
85 -
 86
86 -
 87
87 -
 88
88 -
 89
89 -
 90
90 -
 91
91 -
 92
92 -
 93
93 -
 94
94 -
 95
95 -
96
-
97
-
98
-
99
-
100
-
101
-
102
-
103
-
104
-
105
-
106
-
107
-
108
-
109
-
110
-
111
-
112
-
113
-
114
-
115
-
116
-
117
-
118
-
119
-
120
-
121
-
122
-
123
-
124
-
125
-
126
-
127
-
128
-
129
-
130
-
131
-
132
-
133
-
134
-
135
-
136
-
137
-
138
-
139
-
140
-
141
-
142
-
143
-
144
-
145
-
146
-
147
-
148
-
149
-
150
-
151
-
152
-
153
-
154
-
155
-
156
-
157
-
158
-
159
-
160
-
161
-
162
-
163
-
164
-
165
-
166
-
167
-
168
-
169
-
170
-
171
-
172
-
173
-
174
-
175
-
176
-
177
-
178
-
179
-
180
-
181
-
182
-
183
-
184
-
185
-
186
-
187
-
188
-
189
-
190
-
191
-
192
-
193
-
194
-
195
-
196
-
197
-
198
-
199
-
200
-
201
-
202
-
203
-
204
-
205
-
206
-
207
-
208
-
209
-
210
-
211
-
212
-
213
-
214
-
215
-
216
-
217
-
218
-
219
-
220
-
221
-
222
-
223
-
224
-
225
-
226
-
227
-
228
-
229
-
230
-
231
 |
 |
