HP Deskjet Ink Advantage F700 User Guide - Page 65
HP Digital Imaging Monitor, To scan to a computer, Accept, Related topics, HP Photosmart Software.
 |
View all HP Deskjet Ink Advantage F700 manuals
Add to My Manuals
Save this manual to your list of manuals |
Page 65 highlights
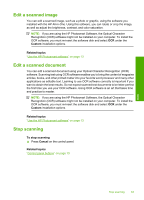
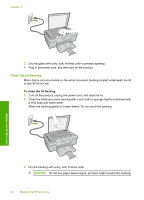
Chapter 9 computer, look for the HP Digital Imaging Monitor icon in the system tray at the lower right side of the screen, near the time. Scan NOTE: Closing the HP Digital Imaging Monitor icon in the Windows system tray can cause the HP All-in-One to lose some of its scan functionality. If this happens, you can restore full functionality by restarting your computer or by starting the HP Photosmart Software. The HP Photosmart Software that you installed on your computer has many tools that you can use to edit and print your scanned image. You can improve the overall image quality by adjusting the brightness, sharpness, color tone, or saturation. You can also crop, straighten, rotate, or resize the image. When the scanned image looks just the way you want it, you can open it in another application, send it through e-mail, save it to a file, or print it. To scan to a computer 1. Load your original print side down on the right front corner of the glass. 2. Press Scan. A preview image of the scan appears on your computer, where you can edit it. Any edits that you make apply to the current scan session only. The HP Photosmart Software has many tools that you can use to edit your scanned image. You can improve the overall image quality by adjusting the brightness, sharpness, color tone, or saturation. You can also crop, rotate, or resize the image. 3. Make any edits to the preview image, and then click Accept when you are finished. Related topics "Control panel buttons" on page 10 62 Use the scan features
-
 1
1 -
2
-
3
-
4
-
5
-
6
-
7
-
8
-
9
-
10
-
11
-
12
-
13
-
14
-
15
-
16
-
17
-
18
-
19
-
20
-
21
-
22
-
23
-
24
-
25
-
26
-
27
-
28
-
29
-
30
-
31
-
32
-
33
-
34
-
35
-
36
-
37
-
38
-
39
-
40
-
41
-
42
-
43
-
44
-
45
-
46
-
47
-
48
-
49
-
50
-
51
-
52
-
53
-
54
-
55
-
56
-
57
-
58
-
59
-
 60
60 -
 61
61 -
 62
62 -
 63
63 -
 64
64 -
 65
65 -
 66
66 -
 67
67 -
 68
68 -
 69
69 -
 70
70 -
71
-
72
-
73
-
74
-
75
-
76
-
77
-
78
-
79
-
80
-
81
-
82
-
83
-
84
-
85
-
86
-
87
-
88
-
89
-
90
-
91
-
92
-
93
-
94
-
95
-
96
-
97
-
98
-
99
-
100
-
101
-
102
-
103
-
104
-
105
-
106
-
107
-
108
-
109
-
110
-
111
-
112
-
113
-
114
-
115
-
116
-
117
-
118
-
119
-
120
-
121
-
122
-
123
-
124
-
125
-
126
-
127
-
128
-
129
-
130
-
131
-
132
-
133
-
134
-
135
-
136
-
137
-
138
-
139
-
140
-
141
-
142
-
143
-
144
-
145
-
146
-
147
-
148
-
149
-
150
-
151
-
152
-
153
-
154
-
155
-
156
-
157
-
158
-
159
-
160
-
161
-
162
-
163
-
164
-
165
-
166
-
167
-
168
-
169
-
170
-
171
-
172
-
173
-
174
-
175
-
176
-
177
-
178
-
179
-
180
-
181
-
182
-
183
-
184
-
185
-
186
-
187
-
188
-
189
-
190
-
191
-
192
-
193
-
194
-
195
-
196
-
197
-
198
-
199
-
200
-
201
-
202
-
203
-
204
-
205
-
206
-
207
-
208
-
209
-
210
-
211
-
212
-
213
-
214
-
215
-
216
-
217
-
218
-
219
-
220
-
221
-
222
-
223
-
224
-
225
-
226
-
227
-
228
-
229
-
230
-
231
 |
 |
