HP Deskpro ap250 Compaq Deskpro Workstation AP250 Hardware Reference Guide - Page 17
Installation Sequence
 |
View all HP Deskpro ap250 manuals
Add to My Manuals
Save this manual to your list of manuals |
Page 17 highlights
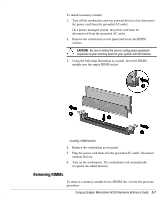
Installation Sequence .ollow this sequence of steps to ensure the proper installation of any optional equipment. Before you begin, observe the following precautions: ! WARNING: To reduce the risk of personal injury from hot surfaces, allow the internal system components to cool before touching them. ! WARNING: To reduce the risk of electrical shock, fire, or damage to the equipment, do not plug telecommunications/telephone connectors into the network interface controller (NIC) receptacles. 2-2 Hardware Upgrades CAUTION: Static electricity can damage the electronic components of the workstation or optional equipment. Before beginning these procedures, ensure that you are discharged of static electricity by briefly touching a grounded metal object. 1. Turn off the workstation and disconnect the power cord from the grounded AC outlet and the back of the workstation. 2. Disconnect the keyboard, monitor, network cable, and other external equipment connected to the workstation. 3. Open the workstation by removing its workstation access panel. See the section, “ Removing the Workstation Access Panel,” in this chapter for instructions. 4. If you are installing or removing drives in the front bays, see the section, “ Removing the .ront Bezel,” in this chapter for instructions. 5. Install any optional equipment, such as memory, drives, expansion boards, processors, or batteries. See the appropriate sections in this chapter or the appendices for installation instructions. Also refer to the documentation provided with the optional equipment. 6. Replace the front bezel and the workstation access panel, if necessary. 7. Reconnect the keyboard, monitor, network cable, and other external devices. 8. Reconnect the power cord to the back of the workstation and plug the power cord into a grounded AC outlet. 9. Turn on the monitor, workstation, and any devices you installed. 10. Reconfigure the workstation, if necessary. 11. Test the workstation (optional) using the TEST utility.
-
 1
1 -
2
-
3
-
4
-
5
-
6
-
7
-
8
-
9
-
10
-
11
-
 12
12 -
 13
13 -
 14
14 -
 15
15 -
 16
16 -
 17
17 -
 18
18 -
 19
19 -
 20
20 -
 21
21 -
 22
22 -
23
-
24
-
25
-
26
-
27
-
28
-
29
-
30
-
31
-
32
-
33
-
34
-
35
-
36
-
37
-
38
-
39
-
40
-
41
-
42
-
43
-
44
-
45
-
46
-
47
-
48
-
49
-
50
-
51
-
52
-
53
-
54
-
55
-
56
-
57
-
58
-
59
-
60
-
61
-
62
-
63
-
64
-
65
-
66
-
67
-
68
-
69
-
70
-
71
-
72
-
73
-
74
-
75
 |
 |
