HP EVA P6550 HP P6000 EVA Updating Product Software Guide (XCS 11001100) (5697 - Page 57
Upgrading firmware on all disks, Open and log in to HP P6000 Command View. - disk replacement
 |
View all HP EVA P6550 manuals
Add to My Manuals
Save this manual to your list of manuals |
Page 57 highlights
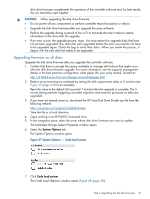
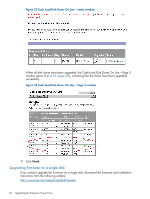
disk drive firmware complements the operation of the controller software and, for best results, the two should be used together. CAUTION: When upgrading the disk drive firmware: • Do not power off any components or perform controller resynchronization or reboot. • Upgrade the disk drive firmware after you upgrade the array software. • Perform the upgrade during a period of low I/O to minimize the time it takes to restore information to the drive after the upgrade. • If an error occurs, the upgrade process stops. You must restart it to upgrade disks that have not yet been upgraded. Any disks that were upgraded before the error occurred do not have to be upgraded again. Check the logs to verify their status. When you restart the process, it begins with the next disk that needs to be upgraded. Upgrading firmware on all disks Upgrade the disk drive firmware after you upgrade the controller software. 1. Confirm that there is enough free space available to manage disk failures that might occur after the disk drive firmware upgrade. For more information, see the capacity management details in the best practices configuration white paper (for your array model), located at: http://h18006.www1.hp.com/storage/arraywhitepapers.html 2. Reduce array maintenance overhead by setting the disk replacement delay to 5 minutes (see Figure 25 (page 52) for an example). Reset the value to the default (60 seconds/1 minute) after the upgrade is complete. The 5 minute setting prevents triggering unwanted migration and reversion processes as disks are upgraded. 3. If you have not already done so, download the HP Hard Disk Drive Bundle zip file from the following website: http://www.hp.com/support/evadiskfirmware Store the file in a local directory. 4. Open and log in to HP P6000 Command View. 5. In the navigation pane, select the array whose disk drive firmware you want to update. The Initialized Storage System Properties window opens. 6. Select the System Options tab. The System Options window opens. Figure 27 System Options - Code load system 7. Click Code load system. The Code Load Selection window opens (Figure 28 (page 58)). Step 6. Upgrading the disk drive firmware 57
-
 1
1 -
2
-
3
-
4
-
5
-
6
-
7
-
8
-
9
-
10
-
11
-
12
-
13
-
14
-
15
-
16
-
17
-
18
-
19
-
20
-
21
-
22
-
23
-
24
-
25
-
26
-
27
-
28
-
29
-
30
-
31
-
32
-
33
-
34
-
35
-
36
-
37
-
38
-
39
-
40
-
41
-
42
-
43
-
44
-
45
-
46
-
47
-
48
-
49
-
50
-
51
-
 52
52 -
 53
53 -
 54
54 -
 55
55 -
 56
56 -
 57
57 -
 58
58 -
 59
59 -
 60
60 -
 61
61 -
 62
62 -
63
-
64
-
65
-
66
-
67
-
68
-
69
-
70
-
71
-
72
-
73
 |
 |
