HP IQ804t Getting Started Guide - Page 45
Adding photos to your photo library, Viewing your photo collection, Viewing a photo slideshow, Photo
 |
UPC - 734846101330
View all HP IQ804t manuals
Add to My Manuals
Save this manual to your list of manuals |
Page 45 highlights
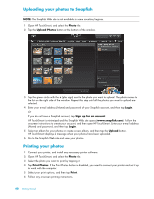
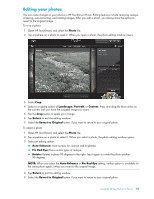
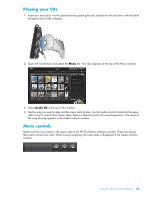
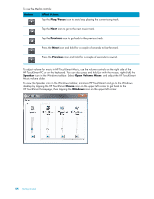
Adding photos to your photo library When you connect an external device to the computer, such as a digital camera, Microsoft Windows Vista detects the device and displays a message asking if you want to view, copy, or transfer your images to the computer. Add photos to your photo library on the computer in several ways. Use the memory card reader on the side of the computer to transfer photos from your digital camera to the computer. HP TouchSmart can also display photos directly from the memory card reader. Download photos from the Web to your hard disk drive. Insert a CD or removable storage drive, and then move photos to the Windows Explorer Picture folder, or any other folder on your hard disk drive. Connect a digital camera or digital video camera to the HP TouchSmart PC by using the transfer cable that came with the device. Follow instructions that came with the device. Viewing your photo collection View all of your photos from the hard disk drive, a removable drive, or a memory card. HP TouchSmart Photo scans your hard disk drive and all available drives to find photos that you can view in the HP TouchSmart Photo window. 1 Open HP TouchSmart, and select the Photo tile. 2 Navigate to the group of pictures you want to view: Tap Dates. Select the date of your picture. If necessary, use the scroll bar on the right to view all of the photos. Or Tap Folders. Select a folder, and then select the photos you want to view. When you select a folder, the other names of folders appear at the top of the screen. Or Tap All Photos. Scroll to a photo you want to view. Or Tap Removable Disk. Scroll to view photos from your memory card reader. 3 Use the scrollbar to find your pictures. They are listed by the date they were added to your hard disk drive. 4 Tap the House icon to return to the HP TouchSmart homepage. Viewing a photo slideshow 1 Open HP TouchSmart, and select the Photo tile. 2 Choose Folders, or All Photos, or Removable Drive. 3 Tap the Play Slideshow button. 4 Adjust slideshow settings by tapping the Settings button, selecting your settings, and then tapping Save. HP TouchSmart Photo Settings include: Slideshow Transition: Fade, Motion (default), None Slideshow Timing: increase or decrease the timing. The default is 5 seconds per picture. Using the HP TouchSmart Software 39
-
 1
1 -
2
-
3
-
4
-
5
-
6
-
7
-
8
-
9
-
10
-
11
-
12
-
13
-
14
-
15
-
16
-
17
-
18
-
19
-
20
-
21
-
22
-
23
-
24
-
25
-
26
-
27
-
28
-
29
-
30
-
31
-
32
-
33
-
34
-
35
-
36
-
37
-
38
-
39
-
 40
40 -
 41
41 -
 42
42 -
 43
43 -
 44
44 -
 45
45 -
 46
46 -
 47
47 -
 48
48 -
 49
49 -
 50
50 -
51
-
52
-
53
-
54
-
55
-
56
-
57
-
58
-
59
-
60
-
61
-
62
-
63
-
64
-
65
-
66
-
67
-
68
-
69
-
70
-
71
-
72
 |
 |