HP Integrity cx2600 HP Integrity cx2600 Operations and Maintenance Guide - Page 122
Removing and Replacing the Front Grill, Removing the Front Grill
 |
View all HP Integrity cx2600 manuals
Add to My Manuals
Save this manual to your list of manuals |
Page 122 highlights
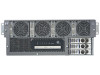
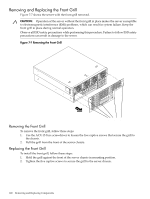
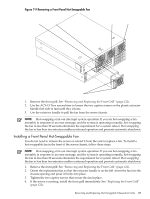
Removing and Replacing the Front Grill Figure 7-7 shows the server with the front grill removed. CAUTION: Operation of the server without the front grill in place makes the server susceptible to electromagnetic interference (EMI) problems, which can result in system failure. Keep the front grill in place during normal operation. Observe all ESD safety precautions while performing this procedure. Failure to follow ESD safety precautions can result in damage to the server. Figure 7-7 Removing the Front Grill chasfrntoff Captive Screws Removing the Front Grill To remove the front grill, follow these steps: 1. Use the ACX-15 Torx screwdriver to loosen the five captive screws that secure the grill to the chassis. 2. Pull the grill from the front of the server chassis. Replacing the Front Grill To install the front grill, follow these steps: 1. Hold the grill against the front of the server chassis in mounting position. 2. Tighten the five captive screws to secure the grill to the server chassis. 122 Removing and Replacing Components
-
 1
1 -
2
-
3
-
4
-
5
-
6
-
7
-
8
-
9
-
10
-
11
-
12
-
13
-
14
-
15
-
16
-
17
-
18
-
19
-
20
-
21
-
22
-
23
-
24
-
25
-
26
-
27
-
28
-
29
-
30
-
31
-
32
-
33
-
34
-
35
-
36
-
37
-
38
-
39
-
40
-
41
-
42
-
43
-
44
-
45
-
46
-
47
-
48
-
49
-
50
-
51
-
52
-
53
-
54
-
55
-
56
-
57
-
58
-
59
-
60
-
61
-
62
-
63
-
64
-
65
-
66
-
67
-
68
-
69
-
70
-
71
-
72
-
73
-
74
-
75
-
76
-
77
-
78
-
79
-
80
-
81
-
82
-
83
-
84
-
85
-
86
-
87
-
88
-
89
-
90
-
91
-
92
-
93
-
94
-
95
-
96
-
97
-
98
-
99
-
100
-
101
-
102
-
103
-
104
-
105
-
106
-
107
-
108
-
109
-
110
-
111
-
112
-
113
-
114
-
115
-
116
-
 117
117 -
 118
118 -
 119
119 -
 120
120 -
 121
121 -
 122
122 -
 123
123 -
 124
124 -
 125
125 -
 126
126 -
 127
127 -
128
-
129
-
130
-
131
-
132
-
133
-
134
-
135
-
136
-
137
-
138
-
139
-
140
-
141
-
142
-
143
-
144
-
145
-
146
-
147
-
148
-
149
-
150
-
151
-
152
-
153
-
154
-
155
-
156
-
157
-
158
-
159
-
160
-
161
-
162
-
163
-
164
-
165
-
166
-
167
-
168
 |
 |
