HP Integrity cx2600 HP Integrity cx2600 Operations and Maintenance Guide - Page 28
Installing the Front Grill and Top Cover, Removing the Front Grill
 |
View all HP Integrity cx2600 manuals
Add to My Manuals
Save this manual to your list of manuals |
Page 28 highlights
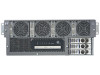
13. Install the terminal barrier strip cover (removed in step 11). Hang the cover on the upper tabs and snap the cover into place. 14. Route the power cable through the power supply cable clamp and tighten the two knurled knobs to secure the cable in place. 15. Connect the power cable to the DC power source. Installing the Front Grill and Top Cover CAUTION: Operation of the server without the front grill and top cover in place makes the server susceptible to electromagnetic interference (EMI) and overheating problems, which can result in system failure. Keep the front grill and top cover in place during normal operation. Observe all electrostatic discharge (ESD) safety precautions while performing this procedure. Failure to follow ESD safety precautions can result in damage to the server. Figure 3-6 Removing the Front Grill Removing the Front Grill You must remove the front grill for access to the front mounted fans or the optical drive. To remove the front grill, perform the following steps: To remove the front grill, follow these steps: 1. Use the ACX-15 Torx screwdriver to loosen the five captive screws that secure the grill to the chassis. 2. Pull the grill from the front of the server chassis. Installing the Front Grill To install the front grill, follow these steps: 1. Hold the grill against the front of the server chassis in mounting position. 2. Tighten the five captive screws to secure the grill to the server chassis (Figure 3-6). 28 Installing Additional Components
-
 1
1 -
2
-
3
-
4
-
5
-
6
-
7
-
8
-
9
-
10
-
11
-
12
-
13
-
14
-
15
-
16
-
17
-
18
-
19
-
20
-
21
-
22
-
 23
23 -
 24
24 -
 25
25 -
 26
26 -
 27
27 -
 28
28 -
 29
29 -
 30
30 -
 31
31 -
 32
32 -
 33
33 -
34
-
35
-
36
-
37
-
38
-
39
-
40
-
41
-
42
-
43
-
44
-
45
-
46
-
47
-
48
-
49
-
50
-
51
-
52
-
53
-
54
-
55
-
56
-
57
-
58
-
59
-
60
-
61
-
62
-
63
-
64
-
65
-
66
-
67
-
68
-
69
-
70
-
71
-
72
-
73
-
74
-
75
-
76
-
77
-
78
-
79
-
80
-
81
-
82
-
83
-
84
-
85
-
86
-
87
-
88
-
89
-
90
-
91
-
92
-
93
-
94
-
95
-
96
-
97
-
98
-
99
-
100
-
101
-
102
-
103
-
104
-
105
-
106
-
107
-
108
-
109
-
110
-
111
-
112
-
113
-
114
-
115
-
116
-
117
-
118
-
119
-
120
-
121
-
122
-
123
-
124
-
125
-
126
-
127
-
128
-
129
-
130
-
131
-
132
-
133
-
134
-
135
-
136
-
137
-
138
-
139
-
140
-
141
-
142
-
143
-
144
-
145
-
146
-
147
-
148
-
149
-
150
-
151
-
152
-
153
-
154
-
155
-
156
-
157
-
158
-
159
-
160
-
161
-
162
-
163
-
164
-
165
-
166
-
167
-
168
 |
 |
