HP KY617AA HP DreamScreen Wireless Connected Screen - User's Guide - Page 15
Key Features, Initial Setup, Initial configuration from factory default settings
 |
UPC - 884420871583
View all HP KY617AA manuals
Add to My Manuals
Save this manual to your list of manuals |
Page 15 highlights
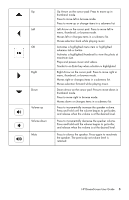
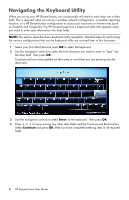
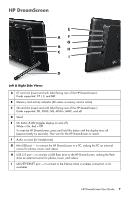
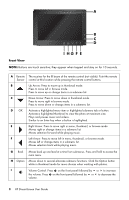
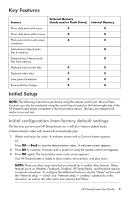
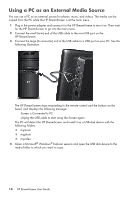
Key Features Feature External Memory (Cards and/or Flash Drives) Internal Memory Photo slide show with music X X Photo slide show without music X X Photo auto-rotation with screen X X orientation Add photos/videos/audio X files to memory Delete photos/videos/audio X files from memory Playback music/audio files X X Playback video clips X X View photo thumbnails X X Browse photos/images X X Initial Setup NOTE: The following instructions are shown using the remote control unit. Most of these functions can also be conducted using the control keys located on the bottom-right side of the HP DreamScreen (when orientated in the horizontal position). The keys are labeled with similar icons and text. Initial configuration from factory default settings The first time you turn your HP DreamScreen on, it will be in factory default mode. A demonstration video with sound will automatically play. 1 Watch and enjoy the video. A welcome screen with a Continue button appears. Or Press OK or Back to stop the demonstration video. A welcome screen appears. 2 Press OK to continue. A screen with a guide for using the remote control unit appears. 3 Press OK again. The home (main menu icon) screen appears. Your HP DreamScreen is ready to show videos, show photos, and play music. NOTE: There are other setup tasks that you should do to enable other features. Many features (such as Weather, Facebook, Snapfish, HP Smart Radio, and Pandora) require a network connection. To configure the additional features, see the "Setup" section and the "Network setup - wired" and "Network setup - wireless" subsections in this document, as well as the other menu item sections that follow. HP DreamScreen User Guide 9
-
 1
1 -
2
-
3
-
4
-
5
-
6
-
7
-
8
-
9
-
 10
10 -
 11
11 -
 12
12 -
 13
13 -
 14
14 -
 15
15 -
 16
16 -
 17
17 -
 18
18 -
 19
19 -
 20
20 -
21
-
22
-
23
-
24
-
25
-
26
-
27
-
28
-
29
-
30
-
31
-
32
-
33
-
34
-
35
-
36
-
37
-
38
-
39
-
40
-
41
-
42
-
43
-
44
-
45
-
46
-
47
-
48
-
49
-
50
-
51
-
52
-
53
-
54
-
55
-
56
-
57
-
58
 |
 |
