HP KY617AA HP DreamScreen Wireless Connected Screen - User's Guide - Page 24
Set Manually, Set IP, Static, Enter, Set Proxy, Proxy On, Password, Continue
 |
UPC - 884420871583
View all HP KY617AA manuals
Add to My Manuals
Save this manual to your list of manuals |
Page 24 highlights
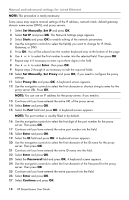
Manual and advanced settings for wired Ethernet NOTE: This procedure is rarely necessary. Some cases may require manual settings of the IP address, network mask, default gateway, domain name server (DNS), and proxy servers. 1 Select Set Manually, Set IP and press OK. 2 Select Set IP and press OK. The Network Settings page appears. 3 Select Static and press OK to enable editing of the network parameters. 4 Use the navigation controls to select the field(s) you want to change for IP, Mask, Gateway, or DNS. 5 Press OK. You will be placed into the number keyboard strip at the bottom of the page. 6 Use or to select the first number to enter into the selected field. Then press OK. 7 Repeat step 4 if necessary to enter up to three digits in the field. 8 Use or to select Enter. Then press OK. 9 Repeat steps 2 through 6 as necessary to edit the required fields. 10 Select Set Manually, Set Proxy and press OK, if you need to configure the proxy settings. 11 Select Proxy On and press OK. A keyboard screen appears. 12 Use the navigation controls to select the first character or shortcut string to enter for the proxy server URL. Press OK. NOTE: You can use an IP address for the proxy server, if you need to. 13 Continue until you have entered the entire URL of the proxy server. 14 Select Enter and press OK. 15 Select the Port field and press OK. A keyboard screen appears. NOTE: The port number is usually filled in by default. 16 Use the navigation controls to select the first digit of the port number for the proxy server. Then press OK. 17 Continue until you have entered the entire port number into the field. 18 Select Enter and press OK. 19 Select the ID field and press OK. A keyboard screen appears. 20 Use the navigation controls to select the first character of the ID name for the proxy server. Then press OK. 21 Continue until you have entered the entire ID name into the field. 22 Select Enter and press OK. 23 Select the Password field and press OK. A keyboard screen appears. 24 Use the navigation controls to select the first character of the Password for the proxy server. Then press OK. 25 Continue until you have entered the entire password into the field. 26 Select Enter and press OK. 27 Select Continue and press OK. 18 HP DreamScreen User Guide
-
 1
1 -
2
-
3
-
4
-
5
-
6
-
7
-
8
-
9
-
10
-
11
-
12
-
13
-
14
-
15
-
16
-
17
-
18
-
 19
19 -
 20
20 -
 21
21 -
 22
22 -
 23
23 -
 24
24 -
 25
25 -
 26
26 -
 27
27 -
 28
28 -
 29
29 -
30
-
31
-
32
-
33
-
34
-
35
-
36
-
37
-
38
-
39
-
40
-
41
-
42
-
43
-
44
-
45
-
46
-
47
-
48
-
49
-
50
-
51
-
52
-
53
-
54
-
55
-
56
-
57
-
58
 |
 |