HP KY617AA HP DreamScreen Wireless Connected Screen - User's Guide - Page 18
Browse mode, Thumbnail mode, Managing Photos
 |
UPC - 884420871583
View all HP KY617AA manuals
Add to My Manuals
Save this manual to your list of manuals |
Page 18 highlights
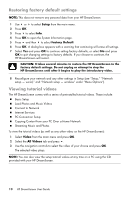
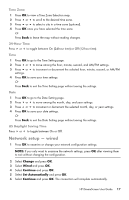
Browse mode 1 From the menu, select Photo. Then press OK. 2 Highlight the tab labeled for the source of the photos you want to browse. Depending on whether you have any other inputs connected, such as a PC, memory cards, or a USB flash drive, different tabs will appear. The default tab, All Photos, represents the photos stored in the internal memory. 3 Press OK. The thumbnail list of photos appears. 4 Use the navigation controls to select the first photo you wish to view in full size. 5 Press OK. The and move to the right in the photo browser. The and move to the left in the photo browser. 6 Press and hold Back to return to the main menu. Thumbnail mode 1 From the menu, select Photo. Then press OK. 2 Highlight the tab labeled for the source of the photos you want to browse. Depending on whether you have any other inputs connected, such as a PC, memory cards, or a USB flash drive, different tabs will appear. The default tab, All Photos, represents the photos stored in the internal memory. 3 Press OK. The thumbnail list of photos appears. 4 Press and hold Back to return to the main menu. Managing Photos Rotate a Photo: If desired, photos that are stored in internal memory can be rotated 90 degrees to the right. 1 Select Photo in the main menu and press OK. 2 Select the All Photos tab and press OK. 3 Press . 4 Use the navigation controls to select the photo that you want to rotate. 5 Press Option and then use or to select Rotate and press OK. The photo will be rotated 90 degrees clockwise. To rotate the photo another 90 degrees, repeat step 5. Auto Rotation: During a slide show or while browsing, photos will rotate automatically to match the orientation of the HP DreamScreen. 12 HP DreamScreen User Guide
-
 1
1 -
2
-
3
-
4
-
5
-
6
-
7
-
8
-
9
-
10
-
11
-
12
-
 13
13 -
 14
14 -
 15
15 -
 16
16 -
 17
17 -
 18
18 -
 19
19 -
 20
20 -
 21
21 -
 22
22 -
 23
23 -
24
-
25
-
26
-
27
-
28
-
29
-
30
-
31
-
32
-
33
-
34
-
35
-
36
-
37
-
38
-
39
-
40
-
41
-
42
-
43
-
44
-
45
-
46
-
47
-
48
-
49
-
50
-
51
-
52
-
53
-
54
-
55
-
56
-
57
-
58
 |
 |
