HP Kayak XA 05xx HP Kayak XA Series 05xx, Accessories Installation Guide For D - Page 4
Replacing the Cover
 |
View all HP Kayak XA 05xx manuals
Add to My Manuals
Save this manual to your list of manuals |
Page 4 highlights
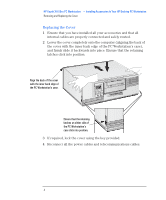
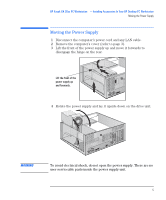
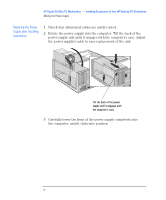
HP Kayak XA 05xx PC Workstation - Installing Accessories In Your HP Desktop PC Workstation Removing and Replacing the Cover Replacing the Cover 1 Ensure that you have installed all your accessories and that all internal cables are properly connected and safely routed. 2 Lower the cover completely onto the computer (aligning the back of the cover with the inner back edge of the PC Workstation's case), and firmly slide it backwards into place. Ensure that the retaining latches click into position. Align the back of the cover with the inner back edge of the PC Workstation's case. Ensure that the retaining latches on either side of the PC Workstation's case click into position. 3 If required, lock the cover using the key provided. 4 Reconnect all the power cables and telecommunications cables. 4 English
-
 1
1 -
 2
2 -
 3
3 -
 4
4 -
 5
5 -
 6
6 -
 7
7 -
 8
8 -
 9
9 -
 10
10 -
11
-
12
-
13
-
14
-
15
-
16
-
17
-
18
-
19
-
20
-
21
-
22
 |
 |
