HP Kayak XU 04xx HP Kayak XU Series 04xx, Familiarization guide
HP Kayak XU 04xx Manual
 |
View all HP Kayak XU 04xx manuals
Add to My Manuals
Save this manual to your list of manuals |
HP Kayak XU 04xx manual content summary:
- HP Kayak XU 04xx | HP Kayak XU Series 04xx, Familiarization guide - Page 1
specific only to the repair of the HP Kayak XU Series 0441 PC Workstation. For information on the installation of accessories, refer to the paper User's Guide and the online documents that are supplied with the PC. To access the HP World-Wide Web support site: http://www.hp.com/go/kayaksupport - HP Kayak XU 04xx | HP Kayak XU Series 04xx, Familiarization guide - Page 2
® is a registered trademark of Intel Corporation. Xeon is a trademark of Intel Corporation. Microsoft®, Windows® and MS-DOS® are registered trademarks of the Microsoft Corporation. Windows NT® is a registered trademark of Microsoft Corporation. Hewlett-Packard France 38053 Grenoble Cedex 9 France - HP Kayak XU 04xx | HP Kayak XU Series 04xx, Familiarization guide - Page 3
PC Workstation Overview 5 Identifying the Latest Kayak XU PC Workstation 7 HP Kayak PC Workstation Package 8 System Board Layout 9 to the LAN/SCSI Combination Board 18 LAN/SCSI Combination Board 18 HP MaxiLife Utility 19 Error Messages 20 Running the MaxiLife Diagnostics Program 23 - HP Kayak XU 04xx | HP Kayak XU Series 04xx, Familiarization guide - Page 4
Mixing Memory Modules 27 Installing 10krpm Hard Disk Drives on a Kayak XU 28 Flashing the Latest Version of the System BIOS 29 Complete the Questionnaire to Check Your Understanding 30 Answers and Explanations 32 Electrostatic Discharge Warning 35 4 English - HP Kayak XU 04xx | HP Kayak XU Series 04xx, Familiarization guide - Page 5
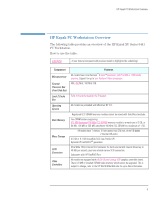
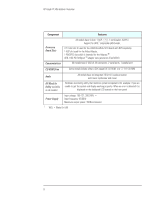
an overview of the HP Kayak XU Series 0441 PC Workstation. II Xeon™ processors with 512 KB or 1 MB cache memory. Support for up to two Pentium II Xeon processors. 400, 450 MHz: Processor. Operating System All models are preloaded with Windows NT 4.0. Main Memory Mass Storage SCSI Connectors Video - HP Kayak XU 04xx | HP Kayak XU Series 04xx, Familiarization guide - Page 6
HP Kayak PC Workstation Overview Component Features Accessory Board Slots Communications All models have 6 slots: 1 AGP, 4 PCI, 1 combination ISA/PCI. Support audio processor with music synthesizer and mixer Hardware monitoring utility that monitors system components (for example: if you are - HP Kayak XU 04xx | HP Kayak XU Series 04xx, Familiarization guide - Page 7
the two HP Kayak XU models, the Kayak XU Series 0441 model incorporates the new HP designed system board based on the Intel® 440GX AGPset supporting up to 2 GB of Registered memory modules. The following table shows the comparison between the HP Kayak XU models. Component HP Kayak XU Series 0441 - HP Kayak XU 04xx | HP Kayak XU Series 04xx, Familiarization guide - Page 8
HP Kayak PC Workstation Package HP Kayak PC Workstation Package Front view 2 internal mass storage PCI or ISA Power Supply Unit Rear View Serial ports A and B Two Processor fans Key lock HP MaxiLife LCD buttons LCD Status panel Two 3.5-inch wide shelf (including the floppy disk drive) Three - HP Kayak XU 04xx | HP Kayak XU Series 04xx, Familiarization guide - Page 9
SCSI Connector - J15 Hard Disk Drive Fan - J4 Status Panel - J5 LCD Status Panel - J8 Mem 4 - X3 Mem 3 - X4 Mem 2 - X5 Mem 1 - X6 Processor 2 Slot HP External Start - R403 Wake On Lan - J20 IDE 1 Connector - J14 I/O Cards Fan - J16 Multimedia Panel - J17 Internal Speaker - J2 Aux In Audio - J3 CD In - HP Kayak XU 04xx | HP Kayak XU Series 04xx, Familiarization guide - Page 10
front sides of the cover are lifted up, and that the lock is unlocked. Slide the cover onto the computer, making sure that the two guides at the bottom of the case slide into the two rails at the base of the computer. Firmly slide the cover backwards into position. Lower - HP Kayak XU 04xx | HP Kayak XU Series 04xx, Familiarization guide - Page 11
weighs about 1 kg, the system board can be damaged because of vibration if it is not securely set in place. The system board on the Kayak XU Series 0441 PC Workstation is secured to the PC chassis by seven screws. These screws are longer than the standard ones used on the PC - HP Kayak XU 04xx | HP Kayak XU Series 04xx, Familiarization guide - Page 12
from the system board by the processor's handle. Ž To access the VRMs, you will need to remove Ž the airflow guide. Press the retaining buttons on each side of the airflow guide and lift it partly out of the PC Workstation's case. Remove the fan connection to the system board and lift the - HP Kayak XU 04xx | HP Kayak XU Series 04xx, Familiarization guide - Page 13
processor system in the DUAL PROC processor socket. Insert the VRMs into the VRM sockets 1 and 2 (from left to right). Ž Replace the airflow guide and reconnect the fan to the system board. ™ Replace the metal retaining plate that secures the processor(s) and tighten the four self-retaining screw - HP Kayak XU 04xx | HP Kayak XU Series 04xx, Familiarization guide - Page 14
Removing and Replacing the Power Supply Unit Removing and Replacing the Power Supply Unit Removing the Power Supply Unit Œ Ensure that the computer's power cord is disconnected from the computer. Place the computer on its side. Unscrew the four screws at the bottom of the computer. Ž (a) - HP Kayak XU 04xx | HP Kayak XU Series 04xx, Familiarization guide - Page 15
Removing and Replacing the Internal Speaker Removing and Replacing the Internal Speaker Removing the Speaker ΠEnsure that the computer's power cord is disconnected from the computer. Place the computer on its side. Unscrew the four screws at the bottom of the computer. Return the computer to - HP Kayak XU 04xx | HP Kayak XU Series 04xx, Familiarization guide - Page 16
bezel with their respective locations. (b) Place your hands on each end of the side base bezel, then press it downwards until the four plastic guide tabs clear the guide ridge. Push the side base bezel forwards until it clicks into place. ™ Turn the computer on its other side, and repeat the steps - HP Kayak XU 04xx | HP Kayak XU Series 04xx, Familiarization guide - Page 17
the 8-bit SCSI Protection Clip Removing and Replacing the 8-bit SCSI Protection Clip Removing the 8-bit SCSI Protection Clip ΠRefer to page 10 for instructions on how to remove and replace the cover. DO NOT PULL the 8-bit SCSI Protection clip directly out. The clip be broken. Press the - HP Kayak XU 04xx | HP Kayak XU Series 04xx, Familiarization guide - Page 18
/SCSI Combination Board NOTE Connecting to the LAN/SCSI Combination Board The HP Kayak Series 0441 PC Workstation contains a SCSI/LAN 10BT/100TX combination board which in a badly "terminated" SCSI bus. In the HP Kayak XU and XW PC Workstations, only an Internal Narrow SCSI cable is provided. 18 - HP Kayak XU 04xx | HP Kayak XU Series 04xx, Familiarization guide - Page 19
and message on its LCD that specifies which component has the problem. Due to HP MaxiLife's system independent design, even if there is a serious component monitoring chip to be active, even if the system has been powered off. The following diagram shows where the LCD is located on the HP Kayak XU - HP Kayak XU 04xx | HP Kayak XU Series 04xx, Familiarization guide - Page 20
HP MaxiLife Utility Diags Exit Next Go • Boot Steps. Shows the Power-On Self (for example, a fan error when a cable is not connected). This type of error disappears dynamically when the problem has been fixed (for example, the fan cable has been reconnected). If an error is detected, a screen - HP Kayak XU 04xx | HP Kayak XU Series 04xx, Familiarization guide - Page 21
HP MaxiLife Utility Test 1 When pressing one of the LCD status panel buttons, nothing is displayed. 2 When the system is powered on, nothing is displayed. Presence - HP Kayak XU 04xx | HP Kayak XU Series 04xx, Familiarization guide - Page 22
controller is correctly installed. Note: No error is detected if a monitor is not connected to an installed video controller. In order to detect of errors that are available on the HP World-Wide Web support page. During normal usage of the PC, HP MaxiLife is always checking vital parameters of - HP Kayak XU 04xx | HP Kayak XU Series 04xx, Familiarization guide - Page 23
computer powered off (the LCD status panel will be blank), HP MaxiLife is still running and monitoring the state of the LCD buttons. If, one of the detected, a short message will be displayed indicating which component has a problem. For example: DIMM found:0 This indicates that there are no memory - HP Kayak XU 04xx | HP Kayak XU Series 04xx, Familiarization guide - Page 24
) can be checked through the System Info menu. The System Info menu also provides information about the following components: • Product name (HP Kayak XU). • Processors (number and speed). • DIMMs (number and size of memory). • Serial Number. All information provided by the BIOS has been stored - HP Kayak XU 04xx | HP Kayak XU Series 04xx, Familiarization guide - Page 25
but nothing appears on the screen. How can I find out what the problem is? Check the LCD status panel screen for an error message (a table to the POST error codes table contained in the Service Handbook for further explanation. Error! POST XXXX HP KAYAK XU An example of a POST error code screen - HP Kayak XU 04xx | HP Kayak XU Series 04xx, Familiarization guide - Page 26
successful boot step POST code is displayed on the LCD status panel. For support purposes, POST steps are only shown as POST codes. To access Boot Steps the button. For further details on the HP MaxiLife diagnostics utility, refer to the User's Guide. This provides examples of error screens arising - HP Kayak XU 04xx | HP Kayak XU Series 04xx, Familiarization guide - Page 27
first time. The BIOS checks that the inserted DIMMs are compatible with one another, and if it detects an error, it is reported to the HP MaxiLife. The error message (shown on the left) will then be displayed on the LCD status panel. Refer to the following table for DIMM compatibility - HP Kayak XU 04xx | HP Kayak XU Series 04xx, Familiarization guide - Page 28
(2) 9.1 GB Low Profile (LP) SCSI hard disk drives in the internal shelves. The HP Kayak XU PC Workstation contains seven mass storage shelves: • Two internal mass storage shelves (3.5-inch wide): Three 5.25-inch wide 1.6-inch frontaccess shelves, but only support 1-inch high hard disk drives 28 - HP Kayak XU 04xx | HP Kayak XU Series 04xx, Familiarization guide - Page 29
World Wide Web site (see below to access the World-Wide Web URL). To download a BIOS upgrade, connect to the HP Web site and follow the on-screen instructions to download the flash utility programs (FLASH.BAT, AUTOEXEC.BAT and PHLASH.EXE), the BIOS file (HO1xxxyy.FUL), and a file called platform.bin - HP Kayak XU 04xx | HP Kayak XU Series 04xx, Familiarization guide - Page 30
DIMM sockets available, and only 128 MB memory modules can be used. 3 How can you distinguish the difference between the HP Kayak XU model Series 0441, and the previous HP Kayak XU models Series 0301 and Series 0303? a There is a reinforced processor cage for the Pentium II Xeon processor for Slot - HP Kayak XU 04xx | HP Kayak XU Series 04xx, Familiarization guide - Page 31
to Check Your Understanding 5 To run the MaxiLife diagnostics program, does the computer need to be powered on? a No, it doesn't. The HP MaxiLife is always running and continuously monitors the state of the LCD buttons. b Yes, it does. This can be easily checked, because the LCD status panel will be - HP Kayak XU 04xx | HP Kayak XU Series 04xx, Familiarization guide - Page 32
HP Kayak XU model Series 0441, and the previous HP Kayak XU models Series 0301 and Series 0303? b The HP Kayak XU Series 0441 PC Workstation package is 8 cm higher than the standard Kayak XU ? b No, it doesn't. The HP MaxiLife is always running and continuously monitors the state of the LCD buttons. - HP Kayak XU 04xx | HP Kayak XU Series 04xx, Familiarization guide - Page 33
Answers and Explanations 7 Can a Pentium II Slot 1 processor system be upgraded to a Pentium II Xeon processor? b No, it cannot. Pentium II Slot 1 processors are not designed to be compatible with Pentium II Xeon processor systems. 8 Before installing or replacing a component, do I need to use a - HP Kayak XU 04xx | HP Kayak XU Series 04xx, Familiarization guide - Page 34
Answers and Explanations 34 - HP Kayak XU 04xx | HP Kayak XU Series 04xx, Familiarization guide - Page 35
Electrostatic Discharge Warning Electrostatic Discharge (ESD) can damage processors, memory, hard disk drives, accessory boards and other components. The ESD package is conductive and is easy to recognize from its label. Before installing or replacing a component: 1 Do not take the new component - HP Kayak XU 04xx | HP Kayak XU Series 04xx, Familiarization guide - Page 36
Manual Part Number: D6339-90901
-
 1
1 -
 2
2 -
 3
3 -
 4
4 -
 5
5 -
 6
6 -
 7
7 -
8
-
9
-
10
-
11
-
12
-
13
-
14
-
15
-
16
-
17
-
18
-
19
-
20
-
21
-
22
-
23
-
24
-
25
-
26
-
27
-
28
-
29
-
30
-
31
-
32
-
33
-
34
-
35
-
36
 |
 |
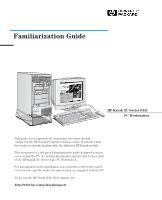
Familiarization Guide
HP Kayak XU Series 0441
This guide is for experienced technicians who have already
completed the HP Kayak PC family training course. It assumes that
the reader is already familiar with the different HP Kayak models.
This document is a self-paced familiarization guide designed to train
you to repair the PC. It contains information specific only to the repair
of the HP Kayak XU Series 0441 PC Workstation.
For information on the installation of accessories, refer to the paper
User’s Guide
and the online documents that are supplied with the PC.
PC Workstation
To access the HP World-Wide Web support site: