HP Kayak XU 04xx HP Kayak XU Series 04xx, Familiarization guide - Page 11
Preparing to Remove the System Board
 |
View all HP Kayak XU 04xx manuals
Add to My Manuals
Save this manual to your list of manuals |
Page 11 highlights
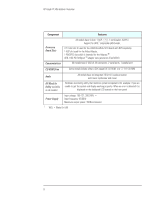
Preparing to Remove the System Board Preparing to Remove the System Board Due to the fact that the Intel Pentium II Xeon processor weighs about 1 kg, the system board can be damaged because of vibration if it is not securely set in place. The system board on the Kayak XU Series 0441 PC Workstation is secured to the PC chassis by seven screws. These screws are longer than the standard ones used on the PC Workstation and are not available as spare parts. If you do lose or mislay any of these screws, there are four spare ones located on the front of the chassis (underneath the audio front panel). These screws are to be used uniquely to secure the system board. Before attempting to remove the system board, you will have to first unscrew these screws. Six of them can be accessed from the outside of the chassis, while the seventh screw is located near PCI Slot 3. PCI 1 PCI 2 Screw located near PCI Slot 3 PCI 3 that needs to be removed before RAID removing the system board. PORT PCI 4 11
-
 1
1 -
2
-
3
-
4
-
5
-
 6
6 -
 7
7 -
 8
8 -
 9
9 -
 10
10 -
 11
11 -
 12
12 -
 13
13 -
 14
14 -
 15
15 -
 16
16 -
17
-
18
-
19
-
20
-
21
-
22
-
23
-
24
-
25
-
26
-
27
-
28
-
29
-
30
-
31
-
32
-
33
-
34
-
35
-
36
 |
 |
