HP Kayak XU 04xx HP Kayak XU Series 04xx, Upgrade and Configuration Guide
HP Kayak XU 04xx Manual
 |
View all HP Kayak XU 04xx manuals
Add to My Manuals
Save this manual to your list of manuals |
HP Kayak XU 04xx manual content summary:
- HP Kayak XU 04xx | HP Kayak XU Series 04xx, Upgrade and Configuration Guide - Page 1
Upgrade and Configuration Guide HP Kayak XU & XW PC Workstations - HP Kayak XU 04xx | HP Kayak XU Series 04xx, Upgrade and Configuration Guide - Page 2
, Aachen and/or ELSA Inc., Santa Clara. Symbios LogicTM is a trademark of Symbios Logic, Inc. Microsoft®, MS®, MS-DOS®, Windows®, and Windows NT® are U.S. registered trademark of Microsoft Corporation. Netscape® is a trademark of Netscape Communications Corporation. PentiumTM is a trademark of Intel - HP Kayak XU 04xx | HP Kayak XU Series 04xx, Upgrade and Configuration Guide - Page 3
Upgrade and Configuration Guide - HP Kayak XU 04xx | HP Kayak XU Series 04xx, Upgrade and Configuration Guide - Page 4
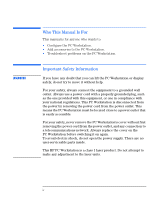
This Manual Is For This manual is for anyone who wants to: • Configure the PC Workstation. • Add accessories to the PC Workstation. • Troubleshoot problems do not open the power supply. There are no user-serviceable parts inside. This HP PC Workstation is a class 1 laser product. Do not attempt to - HP Kayak XU 04xx | HP Kayak XU Series 04xx, Upgrade and Configuration Guide - Page 5
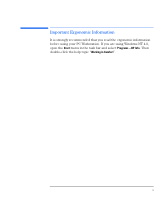
Important Ergonomic Information It is strongly recommended that you read the ergonomic information before using your PC Workstation. If you are using Windows NT 4.0, open the Start menu in the task bar and select Programs -HP Info. Then double-click the help topic "Working in Comfort". English v - HP Kayak XU 04xx | HP Kayak XU Series 04xx, Upgrade and Configuration Guide - Page 6
for support and maintenance personnel. • Network Administrator's Guide -provides instructions on setting up your PC Workstation for a LAN connection (also preloaded on your PC Workstation's hard disk drive). • Service Handbook Chapters -information on upgrade and replacement parts, including HP part - HP Kayak XU 04xx | HP Kayak XU Series 04xx, Upgrade and Configuration Guide - Page 7
the Cover 3 Removing and Replacing the Airflow Guide 5 Installing Memory 6 Installing Mass Storage Devices 8 Installing Accessory Boards 19 Installing a Processor 22 2 Troubleshooting Your HP PC Workstation Using HP MaxiLife to Diagnose Problems 28 HP DiagTools 32 If Your PC Workstation Does - HP Kayak XU 04xx | HP Kayak XU Series 04xx, Upgrade and Configuration Guide - Page 8
3 Technical Information Features 52 System Specifications 55 System Connectors and Switches 58 The HP Summary Screen and Setup Program 60 Configuring Your Network Connection 61 viii English - HP Kayak XU 04xx | HP Kayak XU Series 04xx, Upgrade and Configuration Guide - Page 9
1 How to Install Accessories In Your HP PC Workstation This chapter explains in detail how to install accessories, such as extra memory, accessory boards, and additional disk drives, in your PC Workstation. - HP Kayak XU 04xx | HP Kayak XU Series 04xx, Upgrade and Configuration Guide - Page 10
to Install Accessories In Your HP PC Workstation Supported HP Accessories Supported HP Accessories Internal Mass Storage Devices Four spare screws Contact your dealer for an up-to-date list of supported devices. NOTE 512 MB registered ECC SDRAM DIMMS cannot be used with 64 MB, 128 MB - HP Kayak XU 04xx | HP Kayak XU Series 04xx, Upgrade and Configuration Guide - Page 11
WARNING 1 How to Install Accessories In Your HP PC Workstation Removing and Replacing the Cover Removing and Replacing the Cover For your safety, never remove the PC Workstation's cover without first removing the - HP Kayak XU 04xx | HP Kayak XU Series 04xx, Upgrade and Configuration Guide - Page 12
1 How to Install Accessories In Your HP PC Workstation Removing and Replacing the Cover Replacing the Cover and that the lock is unlocked. 3 Slide the cover onto the computer, making sure that the two guides at the bottom of the case slide into the two rails on the base of the computer. Firmly slide - HP Kayak XU 04xx | HP Kayak XU Series 04xx, Upgrade and Configuration Guide - Page 13
out of the PC Workstation's case. To improve access when installing accessories you may need to remove the airflow guide. To Replace the HP UltraFlow Airflow Guide 1 Hold the airflow guide partly inside the PC Workstation's case and reconnect the fan to the system board. 2 Align the airflow - HP Kayak XU 04xx | HP Kayak XU Series 04xx, Upgrade and Configuration Guide - Page 14
memory, refer to "Supported HP Accessories", on page 2. To install a main memory module: 1 Disconnect the computer's power cord and any LAN or telecommunications cables. 2 Remove the computer's cover (refer to page 3). 3 Remove the HP UltraFlow airflow guide (refer to page 5). 4 Remove the Ultra - HP Kayak XU 04xx | HP Kayak XU Series 04xx, Upgrade and Configuration Guide - Page 15
1 How to Install Accessories In Your HP PC Workstation Installing Memory NOTE To ease installation, place your PC cords. Replace the cover (refer to page 4) and the airflow guide (refer to page 5). 10 Check the HP Summary Screen to verify the new configuration (for more information refer to "The - HP Kayak XU 04xx | HP Kayak XU Series 04xx, Upgrade and Configuration Guide - Page 16
1 How to Install Accessories In Your HP PC Workstation Installing Mass Storage Devices Installing Mass Storage Devices Connecting Devices If you add an IDE Zip drive, hard disk drive, CD-ROM drive, - HP Kayak XU 04xx | HP Kayak XU Series 04xx, Upgrade and Configuration Guide - Page 17
to the "HP FastRAID Installation and Configuration Guide" that came with your FastRAID2 accessory. Refer to the drive's installation guide to see if set a SCSI ID for Plug and Play devices (SCSI devices that support the SCAM protocol). If HP FastRAID is installed, you will need to set a SCSI ID. - HP Kayak XU 04xx | HP Kayak XU Series 04xx, Upgrade and Configuration Guide - Page 18
shelf. 1 Disconnect the computer's power cord and any LAN or telecommunications cable. 2 Remove the computer's cover (refer to page 3). 3 Remove the HP UltraFlow airflow guide (refer to page 5). 4 Slide the drive into position in the first internal shelf and align the screw holes in the drive with - HP Kayak XU 04xx | HP Kayak XU Series 04xx, Upgrade and Configuration Guide - Page 19
1 How to Install Accessories In Your HP PC Workstation Installing Mass Storage Devices 5 Secure the are shaped to go in one way only.) Data Cable Power Cable 8 Replace the HP UltraFlow airflow guide (refer to page 5). 9 Install any other accessories before completing the installation. 10 Turn - HP Kayak XU 04xx | HP Kayak XU Series 04xx, Upgrade and Configuration Guide - Page 20
NOTE 1 How to Install Accessories In Your HP PC Workstation Installing Mass Storage Devices Installing a Hard cable. 2 Remove the computer's cover (refer to page 3). 3 Remove the HP UltraFlow airflow guide (refer to page 5). 4 Unscrew and remove an unused drive tray. Remove the drive tray - HP Kayak XU 04xx | HP Kayak XU Series 04xx, Upgrade and Configuration Guide - Page 21
1 How to Install Accessories In Your HP PC Workstation Installing Mass Storage Devices 5 Mount the drive on the tray as shown below. Set the drive on the tray Fix the drive to - HP Kayak XU 04xx | HP Kayak XU Series 04xx, Upgrade and Configuration Guide - Page 22
in one way only.) Data Cable Power Cable 9 Replace the HP UltraFlow airflow guide (refer to page 5). 10 Install any other accessories before replacing the cover and completing the installation. 11 Follow the instructions below to complete the installation. Completing the Installation of a Hard - HP Kayak XU 04xx | HP Kayak XU Series 04xx, Upgrade and Configuration Guide - Page 23
Accessories In Your HP PC Workstation Installing Mass Storage Devices NOTE 3 If an error message appears, follow the instructions provided by the also refer to the manual supplied with the drive for any additional installation instructions. Refer to the drive's installation guide to see if you - HP Kayak XU 04xx | HP Kayak XU Series 04xx, Upgrade and Configuration Guide - Page 24
1 How to Install Accessories In Your HP PC Workstation Installing Mass Storage Devices 3 If installing a drive in a 5.25-inch shelf, remove the drive tray and put it in a safe place. Remove the - HP Kayak XU 04xx | HP Kayak XU Series 04xx, Upgrade and Configuration Guide - Page 25
1 How to Install Accessories In Your HP PC Workstation Installing Mass Storage Devices 8 Connect the data and power cables to the rear of the device. (The connectors are shaped to go in - HP Kayak XU 04xx | HP Kayak XU Series 04xx, Upgrade and Configuration Guide - Page 26
1 How to Install Accessories In Your HP PC Workstation Installing Mass Storage Devices Completing the Installation of a Drive When an IDE CD-ROM 1 Switch on the computer and press when Setup appears. - HP Kayak XU 04xx | HP Kayak XU Series 04xx, Upgrade and Configuration Guide - Page 27
3 can be used for a full-length 32-bit PCI board, and on selected models, a RAIDport™ connector with HP FastRAID adapter installed • Slot PCI 2 for a full-length 32-bit PCI board • Slot PCI 1 for a have preferred locations and special installation instructions detailed in their manuals. English 19 - HP Kayak XU 04xx | HP Kayak XU Series 04xx, Upgrade and Configuration Guide - Page 28
Your HP PC Workstation Installing Accessory Boards 4 Unscrew and remove the slot cover. Store it in a safe place. If the slot cover is tight, loosen the screws on the adjacent slots. Unscrew and remove the slot cover 5 Hold the board horizontally by its "top" edge. Slide it into the board guide of - HP Kayak XU 04xx | HP Kayak XU Series 04xx, Upgrade and Configuration Guide - Page 29
1 How to Install Accessories In Your HP PC Workstation Installing Accessory Boards 7 Secure the board by replacing the slot cover screw. If you loosened the screws on adjacent slots, remember to tighten - HP Kayak XU 04xx | HP Kayak XU Series 04xx, Upgrade and Configuration Guide - Page 30
Install Accessories In Your HP PC Workstation Installing a Processor Installing a Processor Some operating systems support a second processor for to page 3). 3 If installing a second processor, remove the HP UltraFlow airflow guide (refer to page 5). 4 Remove the metal retaining plate that secures - HP Kayak XU 04xx | HP Kayak XU Series 04xx, Upgrade and Configuration Guide - Page 31
NOTE 1 How to Install Accessories In Your HP PC Workstation Installing a Processor 5 The system board has two processor sockets. a If you are changing the existing (boot) processor, remove it from the socket by - HP Kayak XU 04xx | HP Kayak XU Series 04xx, Upgrade and Configuration Guide - Page 32
NOTE 7 Replace the metal retaining plate. 8 Replace the HP UltraFlow airflow guide (refer to page 5). 1 Verify that the system and processor speed. Refer to the manual supplied with the processor to verify which bus and processor speeds are supported. Your PC Workstation's system board switches - HP Kayak XU 04xx | HP Kayak XU Series 04xx, Upgrade and Configuration Guide - Page 33
to Install Accessories In Your HP PC Workstation Installing a Processor 3 Replace the cover (see page 4). 4 Turn on the computer and check that the new processor is recognized by the power-on system-test. To fully benefit from dual processing, you will need to re-install Windows NT 4.0 on your PC - HP Kayak XU 04xx | HP Kayak XU Series 04xx, Upgrade and Configuration Guide - Page 34
1 How to Install Accessories In Your HP PC Workstation Installing a Processor 26 English - HP Kayak XU 04xx | HP Kayak XU Series 04xx, Upgrade and Configuration Guide - Page 35
2 Troubleshooting Your HP PC Workstation This chapter deals with problems you may encounter when using your PC Workstation. - HP Kayak XU 04xx | HP Kayak XU Series 04xx, Upgrade and Configuration Guide - Page 36
Troubleshooting Your HP PC Workstation Using HP MaxiLife to Diagnose Problems Pre-Boot Checks Using HP MaxiLife to Diagnose Problems Your HP LCD can help you to diagnose problems with your PC Workstation, even when you are unable to get your system and monitor connected. HP KAYAK XU Error! - HP Kayak XU 04xx | HP Kayak XU Series 04xx, Upgrade and Configuration Guide - Page 37
POST Phase 2 Troubleshooting Your HP PC Workstation Using HP MaxiLife to Diagnose Problems Following these checks, the POST (Power-On Self Test) sequence is initiated. One of the following screens will appear in this phase: HP KAYAK XU No errors occurred. Error! POST XXXX A POST error occurred. - HP Kayak XU 04xx | HP Kayak XU Series 04xx, Upgrade and Configuration Guide - Page 38
Info. Boot Steps Diags 2 Troubleshooting Your HP PC Workstation Using HP MaxiLife to Diagnose Problems System information is displayed on the is powered on. For support purposes, POST steps are shown as POST codes and displayed on the LCD as follows: HP KAYAK XU POST Code 24 Post steps - HP Kayak XU 04xx | HP Kayak XU Series 04xx, Upgrade and Configuration Guide - Page 39
2 Troubleshooting Your HP PC Workstation Using HP MaxiLife to Diagnose Problems If an error is detected, an error screen appears indicating the problem. To continue viewing the test results of the other system components, press the control button. For example, if there is a problem with the boot - HP Kayak XU 04xx | HP Kayak XU Series 04xx, Upgrade and Configuration Guide - Page 40
, refer to the Vectra\Kayak Hardware Diagnostics User's Guide, available on the HP World Wide Web Site in PDF (Adobe Acrobat) format. It is important that you use the latest version of this utility to diagnose hardware-related problems. If you do not, HP-dedicated Support Agents may request that you - HP Kayak XU 04xx | HP Kayak XU Series 04xx, Upgrade and Configuration Guide - Page 41
results, you will need to create a Support Ticket. This can then be sent, via email or fax, to your local or HP-dedicated Support Agent. For more information on how to use this utility, refer to the Vectra\ Kayak Hardware Diagnostics User's Guide, available on the HP World Wide Web Site, at http - HP Kayak XU 04xx | HP Kayak XU Series 04xx, Upgrade and Configuration Guide - Page 42
2 Troubleshooting Your HP PC Workstation If Your PC Workstation Does Not Start is displayed. • An error message and an icon appears on the LCD screen (refer to "Using HP MaxiLife to Diagnose Problems" on page 28). Display is Blank and There Are No Error Messages If your display is blank and - HP Kayak XU 04xx | HP Kayak XU Series 04xx, Upgrade and Configuration Guide - Page 43
2 Troubleshooting Your HP PC Workstation If Your PC Workstation Does Not Start correctly. Refer to the User's Guide that came with your PC Workstation. Refer to "Installing Memory" on page 6. Refer to "Installing Accessory Boards" on page 19. Refer to the manuals that came with each board. Refer - HP Kayak XU 04xx | HP Kayak XU Series 04xx, Upgrade and Configuration Guide - Page 44
2 Troubleshooting Your HP PC Workstation If Your PC Workstation Does Not Start Properly Workstation now works, add the boards and accessories one at a time to determine which one is causing the problem. If you are Unable to Change any Values in Setup Ensure that you are using the correct password. - HP Kayak XU 04xx | HP Kayak XU Series 04xx, Upgrade and Configuration Guide - Page 45
2 Troubleshooting Your HP PC Workstation If Your PC Workstation Does Not Start Switch on the PC Workstation. An error message will be displayed similar to the following: On your monitor: On your PC Workstation's LCD: Incorrect PC Configuration Error! POST 0012 The PC Workstation will stop. - HP Kayak XU 04xx | HP Kayak XU Series 04xx, Upgrade and Configuration Guide - Page 46
2 Troubleshooting Your HP PC Workstation If Your PC Workstation Does Not Start Properly 4 Run Setup by pressing . CMOS default values will be automatically downloaded and saved. 5 Make any other changes you want and press to save the configuration and exit from Setup. 38 English - HP Kayak XU 04xx | HP Kayak XU Series 04xx, Upgrade and Configuration Guide - Page 47
Troubleshooting Your HP PC Workstation If You Cannot Turn Off Your PC Workstation If You Cannot Turn Off Your PC Workstation Use this section if you cannot turn off your PC Workstation, the power indication light is red, and you hear a "buzzing" sound the Power menu in the HP Setup program). If you - HP Kayak XU 04xx | HP Kayak XU Series 04xx, Upgrade and Configuration Guide - Page 48
Troubleshooting Your HP PC Workstation If Your PC Workstation Has a Hardware Problem If Your PC Workstation Has a Hardware Problem This section describes what to do if you have problems the Power-On-Self-Test (POST), but goes blank when Windows starts, check that you have enough memory for the video - HP Kayak XU 04xx | HP Kayak XU Series 04xx, Upgrade and Configuration Guide - Page 49
2 Troubleshooting Your HP PC Workstation If Your PC Workstation Has a Hardware Problem Other Display Problems If the display image is not aligned with the screen, use the display's controls to center the image (refer to the display manual for instructions). If the screens generated by the - HP Kayak XU 04xx | HP Kayak XU Series 04xx, Upgrade and Configuration Guide - Page 50
2 Troubleshooting Your HP PC Workstation If Your PC Workstation Has a Hardware Problem If Your Mouse Does Not Work • Ensure that the mouse is correctly connected. • Ensure that the mouse driver supplied with the preloaded software is installed - HP Kayak XU 04xx | HP Kayak XU Series 04xx, Upgrade and Configuration Guide - Page 51
2 Troubleshooting Your HP PC Workstation If Your PC Workstation Has a Hardware Problem If the Hard Disk Drive Does not Work SCSI Utility (Symbios). For more information, refer to the SCSI Administrator's Guide available from HP's web site. If the Hard Disk Activity If the hard disk activity light - HP Kayak XU 04xx | HP Kayak XU Series 04xx, Upgrade and Configuration Guide - Page 52
2 Troubleshooting Your HP PC Workstation If Your PC Workstation Has a Hardware Problem If the CD-ROM Drive Has a Problem The CD-ROM in the Setup program (Advanced > IDE Devices). No Sound from the CD-ROM Drive If you are having problems with sound when playing a CD: • Check that the volume control - HP Kayak XU 04xx | HP Kayak XU Series 04xx, Upgrade and Configuration Guide - Page 53
2 Troubleshooting Your HP PC Workstation If Your PC Workstation Has a Hardware Problem The CD-ROM Drive Does not Open If you have difficulty removing a CD-ROM disk from the CD-ROM drive (during a power failure for example), you can use the manual eject button. To eject a CD-ROM disk using the manual - HP Kayak XU 04xx | HP Kayak XU Series 04xx, Upgrade and Configuration Guide - Page 54
2 Troubleshooting Your HP PC Workstation If Your PC Workstation Has a Hardware Problem If an Accessory Board Does not Work Carry out the following checks: • Check that the accessory board has been firmly installed in the slot. • Check - HP Kayak XU 04xx | HP Kayak XU Series 04xx, Upgrade and Configuration Guide - Page 55
2 Troubleshooting Your HP PC Workstation If Your PC Workstation Has a Software Problem If Your PC Workstation Has a Software Problem If You Have Forgotten Your Hardware Password NOTE If you forget your operating system's password, refer to your operating system's documentation for the correct - HP Kayak XU 04xx | HP Kayak XU Series 04xx, Upgrade and Configuration Guide - Page 56
2 Troubleshooting Your HP PC Workstation If Your PC Workstation Has a Software Problem 8 Press when prompted to use Setup. 9 Set new User and Administrator passwords. 10 Press to save the new passwords and exit Setup. If You Can't - HP Kayak XU 04xx | HP Kayak XU Series 04xx, Upgrade and Configuration Guide - Page 57
Troubleshooting Your HP PC Workstation If Your PC Workstation Has a Software Problem HPIEDIAG the instructions on the Guide preloaded onto your PC Workstation. If Your PC Workstation Has an Audio Problem If you encounter problems with the audio on your PC Workstation, refer to the Using Sound guide - HP Kayak XU 04xx | HP Kayak XU Series 04xx, Upgrade and Configuration Guide - Page 58
2 Troubleshooting Your HP PC Workstation If Your PC Workstation Has a Software Problem 50 English - HP Kayak XU 04xx | HP Kayak XU Series 04xx, Upgrade and Configuration Guide - Page 59
3 Technical Information This chapter provides technical information about your PC Workstation and includes information on the HP Setup program. - HP Kayak XU 04xx | HP Kayak XU Series 04xx, Upgrade and Configuration Guide - Page 60
Video Your PC Workstation may be supplied with an alternative graphics solution to the ones documented here. Refer to HP's web site for more up-to-date information. XU Models ELSA GLoria Synergy Graphics Accelerator installed on the AGP slot 8 MB SGRAM Graphics Memory XW Models VISUALIZE Fx6 - HP Kayak XU 04xx | HP Kayak XU Series 04xx, Upgrade and Configuration Guide - Page 61
one port uses 2xxh, the other port must use 3xxh). Seven mass storage shelves supporting: • Two front-access, third-height, 3.5-inch drives • Three front-access, half panel MIC-IN connector • Internal speaker connector • One HP network start connector • One WOL connector • External battery - HP Kayak XU 04xx | HP Kayak XU Series 04xx, Upgrade and Configuration Guide - Page 62
32-bit PCI slots • one with a combined SCSI\LAN interface board installed • an HP RAIDport with the HP FastRAID2 accessory installed • One combination ISA or PCI slot • HP enhanced keyboard with mini-DIN connector • HP enhanced scrolling mouse with mini-DIN connector Cooling system with multiple - HP Kayak XU 04xx | HP Kayak XU Series 04xx, Upgrade and Configuration Guide - Page 63
3 Technical Information System Specifications System Specifications Power Consumption Information XU Models XW Models Operating 85 W (average) 140 W (average) Idle 75 W (average) are provided on HP's web site (in the support documentation section for your PC Workstation) at: http://www - HP Kayak XU 04xx | HP Kayak XU Series 04xx, Upgrade and Configuration Guide - Page 64
3 Technical Information System Specifications IRQs, DMAs, and I/O Addresses Used by Your PC Workstation The IRQ, DMA, and I/O address mappings shown here are for a basic configuration. The resources used by your PC Workstation may vary, depending on which accessory boards are bundled with the PC - HP Kayak XU 04xx | HP Kayak XU Series 04xx, Upgrade and Configuration Guide - Page 65
low page register PS/2 reset and Fast A20 Slave interrupt controller DMA controller 2 Coprocessor error AD1816 sound system Free (IDE secondary channel) IDE primary channel AD1816 Joystick AD1816 Sound Blaster LPT 2 Serial port 4 (COM4) Serial port 2 (COM2) AD1816 MIDI Free (Secondary flexible disk - HP Kayak XU 04xx | HP Kayak XU Series 04xx, Upgrade and Configuration Guide - Page 66
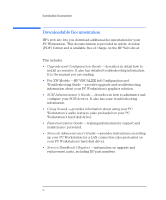
Modules Fan (HDD) External Battery Connector Status Panel LCD Panel Mem 4 Mem 3 Mem 1Mem 2 AGP Slot PCI Slots 1 2 3 4 ISA/PCI (5) Combination Slots HP Network Start Wake On Lan RAIDport Fan (I\O) IDE 1 Loudspeaker Aux In Audio Power Supply Connectors CD In Audio Mic In Multimedia Front Panel - HP Kayak XU 04xx | HP Kayak XU Series 04xx, Upgrade and Configuration Guide - Page 67
System Board Switches Your PC Workstation's system board switches may look like either of the examples documented here. UP=OFF DOWN=ON 3 Technical Information System Connectors and Switches OPEN=OFF CLOSED=ON Switches 2 through 5 are used for processor settings (see page 22) and should be - HP Kayak XU 04xx | HP Kayak XU Series 04xx, Upgrade and Configuration Guide - Page 68
to configure your PC Workstation and solve configuration problems with your PC Workstation. Starting the HP Setup Program 1 Turn on the display and PC Workstation. Consult your operating system documentation for any special instructions concerning turning off and then restarting your PC Workstation. - HP Kayak XU 04xx | HP Kayak XU Series 04xx, Upgrade and Configuration Guide - Page 69
in this section if your PC Workstation comes with an HP-supplied integrated network solution. You must use the PC full information on setting up your network, refer to the online Network Administrator's Guide preloaded onto your PC Workstation. 2. Disabling the LAN card will only disable certain - HP Kayak XU 04xx | HP Kayak XU Series 04xx, Upgrade and Configuration Guide - Page 70
3 Technical Information Configuring Your Network Connection Controlling the Network Security Features The Security Features allow you to enable starting from the network if you want the PC Workstation to start from a LAN server. To enable starting from the network: 1 With the Setup program running ( - HP Kayak XU 04xx | HP Kayak XU Series 04xx, Upgrade and Configuration Guide - Page 71
, 1 supported, 2 accessory board installing, 19 AGP slot on system board, 58 audio troubleshooting, 49 audio interface, troubleshooting, 49 troubleshooting, 42 hard disk drive cables, 11, 14 completing installation, 14 HP DiagTools, 32 HP MaxiLife, 28 HP Setup program, 60 HP Summary screen, 60 HP - HP Kayak XU 04xx | HP Kayak XU Series 04xx, Upgrade and Configuration Guide - Page 72
, 58 socket processor, on system board, 58 VRM, on system board, 58 software troubleshooting, 47 specifications, 55-57 starting changing the boot device, 62 status panel connector, 58 summary screen, 60 supported HP accessories, 2 switches on system board, 59 System, 55 system board, 58 CD connector - HP Kayak XU 04xx | HP Kayak XU Series 04xx, Upgrade and Configuration Guide - Page 73
Your HP PC Workstation's Physical Characteristics Characteristics: Description: Weight (excl. keyboard and display) - XU Models 22 kilograms ( to 104 °F). Operating humidity 15% to 80% (relative). Acoustic noise emission: Sound Power - with 10 krpm SCSI hard disk drive (as defined ISO 7779) - HP Kayak XU 04xx | HP Kayak XU Series 04xx, Upgrade and Configuration Guide - Page 74
your PC Workstation Find out how to troubleshoot your graphics solution (HP Kayak XW) HP User's Guide HP Support and Information Services HP VISUALIZE Fx6 Configuration and Troubleshooting Guide, downloadable from: http://www.hp.com/go/kayaksupport Part Number D6339-UPG-ABA Created in France
-
 1
1 -
 2
2 -
 3
3 -
 4
4 -
 5
5 -
 6
6 -
 7
7 -
8
-
9
-
10
-
11
-
12
-
13
-
14
-
15
-
16
-
17
-
18
-
19
-
20
-
21
-
22
-
23
-
24
-
25
-
26
-
27
-
28
-
29
-
30
-
31
-
32
-
33
-
34
-
35
-
36
-
37
-
38
-
39
-
40
-
41
-
42
-
43
-
44
-
45
-
46
-
47
-
48
-
49
-
50
-
51
-
52
-
53
-
54
-
55
-
56
-
57
-
58
-
59
-
60
-
61
-
62
-
63
-
64
-
65
-
66
-
67
-
68
-
69
-
70
-
71
-
72
-
73
-
74
 |
 |

HP Kayak XU & XW PC Workstations
Upgrade and
Configuration Guide