HP LaserJet 4250 Service Manual - Page 337
Service menu (service PIN codes), SERVICE, Clear event log., Total count., Maintenance count.
 |
View all HP LaserJet 4250 manuals
Add to My Manuals
Save this manual to your list of manuals |
Page 337 highlights
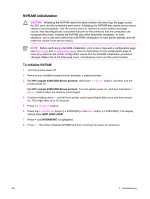
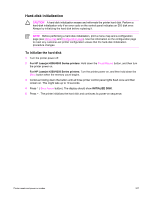
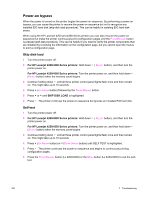
Service menu (service PIN codes) Authorized HP service technicians can use this menu to gain access to printer settings that are reserved for service personnel. The service menu is protected by use of a personal identification number (PIN). When you select SERVICE from the list of menus, you are prompted to type an eightdigit PIN code. NOTE The printer automatically exits the service menu after about one minute if no menu items are selected or changed. Use the PIN codes provided in the table Table 7-5 Service PIN codes Table 7-5 Service PIN codes Printer model HP LaserJet 4200 Series printer HP LaserJet 4250 Series printer HP LaserJet 4300 Series printer HP LaserJet 4350 Series printer PIN code 11420002 09425004 11430002 09435004 1 Press (SELECT button) or the MENU button to open the menus. 2 Use (UP ARROW button) or (DOWN ARROW button) to scroll to SERVICE, and then press . 3 Press or until the first digit of the PIN code appears. Press to save that digit. Repeat this selection procedure until you have typed the entire eight-digit PIN code. You can use (BACK ARROW button) to return to a PIN digit. When the last digit is saved, the service submenu appears on the control-panel display. 4 Use or to scroll to the service-menu item that you want, and then press . ■ Clear event log. Select this item to clear (reset to zero) the internal event log. ■ Total page count. Select this item to set the total number of pages that have been printed todate. Typically this is only required when a new formatter is installed. ■ Maintenance count. Select this item to set the number of pages that have been printed since the last maintenance kit was installed or the total number of pages that have been printed on this printer if a maintenance kit has not yet been installed (during the first 200,000 pages). ■ Maintenance interval. Select this item to specify the number of pages that can be printed before a maintenance-kit-required message appears on the control-panel display to indicate that a maintenance kit is required. ■ Serial number. Select this item to update the serial number if you replace the formatter. ■ Service ID. Select this item to specify the date when the printer was first used, rather than the date that a replacement formatter is installed. See Restoring the Service ID. ■ Cold reset. Select this item to reset the default paper size when you replace the formatter or restore factory settings (see Resets submenu). When you replace a formatter or restore factory settings in a country/region that uses A4 as the standard paper size, use this item to reset the default paper size to A4 (see Cold reset). Letter and A4 are the only cold-reset values available. Control-panel menus 323
-
 1
1 -
2
-
3
-
4
-
5
-
6
-
7
-
8
-
9
-
10
-
11
-
12
-
13
-
14
-
15
-
16
-
17
-
18
-
19
-
20
-
21
-
22
-
23
-
24
-
25
-
26
-
27
-
28
-
29
-
30
-
31
-
32
-
33
-
34
-
35
-
36
-
37
-
38
-
39
-
40
-
41
-
42
-
43
-
44
-
45
-
46
-
47
-
48
-
49
-
50
-
51
-
52
-
53
-
54
-
55
-
56
-
57
-
58
-
59
-
60
-
61
-
62
-
63
-
64
-
65
-
66
-
67
-
68
-
69
-
70
-
71
-
72
-
73
-
74
-
75
-
76
-
77
-
78
-
79
-
80
-
81
-
82
-
83
-
84
-
85
-
86
-
87
-
88
-
89
-
90
-
91
-
92
-
93
-
94
-
95
-
96
-
97
-
98
-
99
-
100
-
101
-
102
-
103
-
104
-
105
-
106
-
107
-
108
-
109
-
110
-
111
-
112
-
113
-
114
-
115
-
116
-
117
-
118
-
119
-
120
-
121
-
122
-
123
-
124
-
125
-
126
-
127
-
128
-
129
-
130
-
131
-
132
-
133
-
134
-
135
-
136
-
137
-
138
-
139
-
140
-
141
-
142
-
143
-
144
-
145
-
146
-
147
-
148
-
149
-
150
-
151
-
152
-
153
-
154
-
155
-
156
-
157
-
158
-
159
-
160
-
161
-
162
-
163
-
164
-
165
-
166
-
167
-
168
-
169
-
170
-
171
-
172
-
173
-
174
-
175
-
176
-
177
-
178
-
179
-
180
-
181
-
182
-
183
-
184
-
185
-
186
-
187
-
188
-
189
-
190
-
191
-
192
-
193
-
194
-
195
-
196
-
197
-
198
-
199
-
200
-
201
-
202
-
203
-
204
-
205
-
206
-
207
-
208
-
209
-
210
-
211
-
212
-
213
-
214
-
215
-
216
-
217
-
218
-
219
-
220
-
221
-
222
-
223
-
224
-
225
-
226
-
227
-
228
-
229
-
230
-
231
-
232
-
233
-
234
-
235
-
236
-
237
-
238
-
239
-
240
-
241
-
242
-
243
-
244
-
245
-
246
-
247
-
248
-
249
-
250
-
251
-
252
-
253
-
254
-
255
-
256
-
257
-
258
-
259
-
260
-
261
-
262
-
263
-
264
-
265
-
266
-
267
-
268
-
269
-
270
-
271
-
272
-
273
-
274
-
275
-
276
-
277
-
278
-
279
-
280
-
281
-
282
-
283
-
284
-
285
-
286
-
287
-
288
-
289
-
290
-
291
-
292
-
293
-
294
-
295
-
296
-
297
-
298
-
299
-
300
-
301
-
302
-
303
-
304
-
305
-
306
-
307
-
308
-
309
-
310
-
311
-
312
-
313
-
314
-
315
-
316
-
317
-
318
-
319
-
320
-
321
-
322
-
323
-
324
-
325
-
326
-
327
-
328
-
329
-
330
-
331
-
 332
332 -
 333
333 -
 334
334 -
 335
335 -
 336
336 -
 337
337 -
 338
338 -
 339
339 -
 340
340 -
 341
341 -
 342
342 -
343
-
344
-
345
-
346
-
347
-
348
-
349
-
350
-
351
-
352
-
353
-
354
-
355
-
356
-
357
-
358
-
359
-
360
-
361
-
362
-
363
-
364
-
365
-
366
-
367
-
368
-
369
-
370
-
371
-
372
-
373
-
374
-
375
-
376
-
377
-
378
-
379
-
380
-
381
-
382
-
383
-
384
-
385
-
386
-
387
-
388
-
389
-
390
-
391
-
392
-
393
-
394
-
395
-
396
-
397
-
398
-
399
-
400
-
401
-
402
-
403
-
404
-
405
-
406
-
407
-
408
-
409
-
410
-
411
-
412
-
413
-
414
-
415
-
416
-
417
-
418
-
419
-
420
-
421
-
422
-
423
-
424
-
425
-
426
-
427
-
428
-
429
-
430
-
431
-
432
-
433
-
434
-
435
-
436
-
437
-
438
-
439
-
440
-
441
-
442
-
443
-
444
-
445
-
446
-
447
-
448
-
449
-
450
-
451
-
452
-
453
-
454
-
455
-
456
-
457
-
458
-
459
-
460
-
461
-
462
-
463
-
464
-
465
-
466
-
467
-
468
-
469
-
470
-
471
-
472
-
473
-
474
-
475
-
476
-
477
-
478
-
479
-
480
-
481
-
482
-
483
-
484
-
485
-
486
-
487
-
488
-
489
-
490
-
491
-
492
-
493
-
494
-
495
-
496
-
497
-
498
-
499
-
500
-
501
-
502
-
503
-
504
-
505
-
506
-
507
-
508
-
509
-
510
-
511
-
512
-
513
-
514
-
515
-
516
-
517
-
518
-
519
-
520
-
521
-
522
-
523
-
524
-
525
-
526
-
527
-
528
-
529
-
530
-
531
-
532
-
533
-
534
-
535
-
536
-
537
-
538
-
539
-
540
 |
 |
