HP LaserJet M4345 HP LaserJet M4345 MFP - Software Technical Reference (extern - Page 305
Remote firmware update through the HP Embedded Web Server, Open the HP Embedded Web Server HP EWS.
 |
View all HP LaserJet M4345 manuals
Add to My Manuals
Save this manual to your list of manuals |
Page 305 highlights
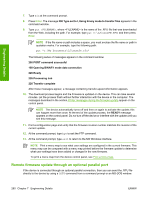
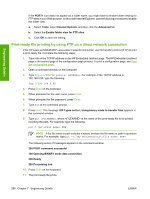
Engineering Details NOTE The device automatically turns off and then on again to activate the update; this can happen more than once. At the end of the update process, the READY message appears on the control panel. Do not turn off the device or interfere with the update until you see this message. 12. Print a configuration page and verify that the firmware revision number matches the revision of the current update. NOTE Print a menu map to see what user settings are configured in the current firmware. This menu map can be compared with a menu map printed before the firmware update to determine what features have been added or changed in the new firmware. To print a menu map from the device control panel, see Print a menu map. HP Web Jetadmin V7.8 and later can also be used to perform multiple or unattended installations. Complete the following steps for multiple or unattended installations. 1. Start HP Web Jetadmin. 2. Create a device group. A simple way to do this is to follow these steps: a. Click Device Management, and then click All Devices. b. Shift-click to select devices that are to be included in the group, and then click OK. c. When prompted, type a name for the new device group, and then click OK. 3. To modify several products in a group, click the group name, and then click Open. 4. The drop-down menu for Device Group Tools appears on the right side of the window. Scroll if necessary to view it. 5. In the Device Group Tools drop-down box, select an action. Type the appropriate information. Click Return to Device Group when finished. Remote firmware update through the HP Embedded Web Server CAUTION Use extreme caution when using this method. Only use this method as a last resort. CAUTION When trying to install or update RFU, do NOT use any buttons, browse to another site, close or touch the browser page in anyway until the device has reset and displays READY. 1. Open the HP Embedded Web Server (HP EWS). 2. In the Information tab, click the Print menu item. 3. Click Browse and navigate to the RFU file. 4. Click Apply. 5. After the device automatically reboots, the device may ask you to reboot the device manually. Turn the device off, then on. Wait until the device reboots and displays Ready. ENWW Remote firmware updates 285
-
 1
1 -
2
-
3
-
4
-
5
-
6
-
7
-
8
-
9
-
10
-
11
-
12
-
13
-
14
-
15
-
16
-
17
-
18
-
19
-
20
-
21
-
22
-
23
-
24
-
25
-
26
-
27
-
28
-
29
-
30
-
31
-
32
-
33
-
34
-
35
-
36
-
37
-
38
-
39
-
40
-
41
-
42
-
43
-
44
-
45
-
46
-
47
-
48
-
49
-
50
-
51
-
52
-
53
-
54
-
55
-
56
-
57
-
58
-
59
-
60
-
61
-
62
-
63
-
64
-
65
-
66
-
67
-
68
-
69
-
70
-
71
-
72
-
73
-
74
-
75
-
76
-
77
-
78
-
79
-
80
-
81
-
82
-
83
-
84
-
85
-
86
-
87
-
88
-
89
-
90
-
91
-
92
-
93
-
94
-
95
-
96
-
97
-
98
-
99
-
100
-
101
-
102
-
103
-
104
-
105
-
106
-
107
-
108
-
109
-
110
-
111
-
112
-
113
-
114
-
115
-
116
-
117
-
118
-
119
-
120
-
121
-
122
-
123
-
124
-
125
-
126
-
127
-
128
-
129
-
130
-
131
-
132
-
133
-
134
-
135
-
136
-
137
-
138
-
139
-
140
-
141
-
142
-
143
-
144
-
145
-
146
-
147
-
148
-
149
-
150
-
151
-
152
-
153
-
154
-
155
-
156
-
157
-
158
-
159
-
160
-
161
-
162
-
163
-
164
-
165
-
166
-
167
-
168
-
169
-
170
-
171
-
172
-
173
-
174
-
175
-
176
-
177
-
178
-
179
-
180
-
181
-
182
-
183
-
184
-
185
-
186
-
187
-
188
-
189
-
190
-
191
-
192
-
193
-
194
-
195
-
196
-
197
-
198
-
199
-
200
-
201
-
202
-
203
-
204
-
205
-
206
-
207
-
208
-
209
-
210
-
211
-
212
-
213
-
214
-
215
-
216
-
217
-
218
-
219
-
220
-
221
-
222
-
223
-
224
-
225
-
226
-
227
-
228
-
229
-
230
-
231
-
232
-
233
-
234
-
235
-
236
-
237
-
238
-
239
-
240
-
241
-
242
-
243
-
244
-
245
-
246
-
247
-
248
-
249
-
250
-
251
-
252
-
253
-
254
-
255
-
256
-
257
-
258
-
259
-
260
-
261
-
262
-
263
-
264
-
265
-
266
-
267
-
268
-
269
-
270
-
271
-
272
-
273
-
274
-
275
-
276
-
277
-
278
-
279
-
280
-
281
-
282
-
283
-
284
-
285
-
286
-
287
-
288
-
289
-
290
-
291
-
292
-
293
-
294
-
295
-
296
-
297
-
298
-
299
-
 300
300 -
 301
301 -
 302
302 -
 303
303 -
 304
304 -
 305
305 -
 306
306 -
 307
307 -
 308
308 -
 309
309 -
 310
310 -
311
-
312
-
313
-
314
-
315
-
316
-
317
-
318
-
319
-
320
-
321
-
322
-
323
-
324
-
325
-
326
-
327
-
328
-
329
-
330
 |
 |