HP LaserJet Pro MFP M426-M427 User Guide - Page 33
If the tray is not adjusted correctly, an, indicators, as shown in the enlargement in
 |
View all HP LaserJet Pro MFP M426-M427 manuals
Add to My Manuals
Save this manual to your list of manuals |
Page 33 highlights
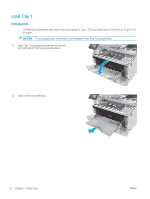
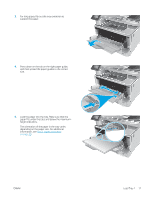
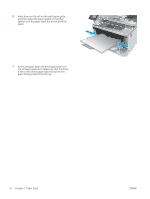
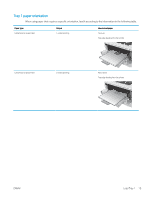
3. Adjust the paper-length guide by squeezing the adjustment latch and sliding the guides to the size of the paper being used. 4. Load paper into the tray. For information about how to orient the paper, see Tray 2 paper orientation on page 22 NOTE: Do not adjust the paper guides tightly against the paper stack. Adjust them to the indentations or markings in the tray. NOTE: To prevent jams, adjust the paper guides to the correct size and do not overfill the tray. Be sure that the top of the stack is below the tray full indicators, as shown in the enlargement in the illustration. NOTE: If the tray is not adjusted correctly, an error message might display during printing or the paper might jam. 5. Slide the tray completely into the printer. 6. At the computer, begin the printing process from the software application. Make sure that the driver is set to the correct paper type and size for the paper being printed from the tray. ENWW A4 11 B5 2 2 ETT-PACKARD 1 2 Load Tray 2 21
-
 1
1 -
2
-
3
-
4
-
5
-
6
-
7
-
8
-
9
-
10
-
11
-
12
-
13
-
14
-
15
-
16
-
17
-
18
-
19
-
20
-
21
-
22
-
23
-
24
-
25
-
26
-
27
-
 28
28 -
 29
29 -
 30
30 -
 31
31 -
 32
32 -
 33
33 -
 34
34 -
 35
35 -
 36
36 -
 37
37 -
 38
38 -
39
-
40
-
41
-
42
-
43
-
44
-
45
-
46
-
47
-
48
-
49
-
50
-
51
-
52
-
53
-
54
-
55
-
56
-
57
-
58
-
59
-
60
-
61
-
62
-
63
-
64
-
65
-
66
-
67
-
68
-
69
-
70
-
71
-
72
-
73
-
74
-
75
-
76
-
77
-
78
-
79
-
80
-
81
-
82
-
83
-
84
-
85
-
86
-
87
-
88
-
89
-
90
-
91
-
92
-
93
-
94
-
95
-
96
-
97
-
98
-
99
-
100
-
101
-
102
-
103
-
104
-
105
-
106
-
107
-
108
-
109
-
110
-
111
-
112
-
113
-
114
-
115
-
116
-
117
-
118
-
119
-
120
-
121
-
122
-
123
-
124
-
125
-
126
-
127
-
128
-
129
-
130
-
131
-
132
-
133
-
134
-
135
-
136
-
137
-
138
-
139
-
140
-
141
-
142
-
143
-
144
-
145
-
146
-
147
-
148
-
149
-
150
-
151
-
152
-
153
-
154
-
155
-
156
-
157
-
158
-
159
-
160
-
161
-
162
-
163
-
164
-
165
-
166
-
167
-
168
-
169
-
170
-
171
-
172
-
173
-
174
-
175
-
176
-
177
-
178
-
179
-
180
-
181
-
182
-
183
-
184
-
185
-
186
 |
 |
