HP Latex 110 Introductory information - Page 6
Problem solving, Front-panel error codes
 |
View all HP Latex 110 manuals
Add to My Manuals
Save this manual to your list of manuals |
Page 6 highlights
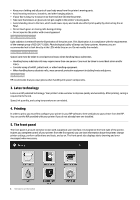
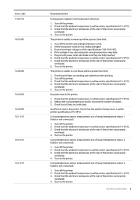
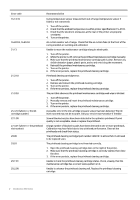
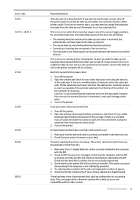
The printer wakes from sleep mode and switches on the front-panel display whenever there is some external interaction with it. 6. Problem solving See the troubleshooting sections of the user's guide. 7. Front-panel error codes Under certain circumstances, a numeric error code appears on the front panel. Follow the advice in the Recommendation column to resolve the error. If the recommendation does not seem to solve the problem, call your service representative. If an error code appears on the front panel that is not included in this list, turn off the printer and then turn it back on. If the problem persists, call your service representative. Error code 03.21:01 03.22:01 14.72:01 14.73:01 14.74:01 14.75:01 5 Introductory Information Recommendation PSU undervoltage detected. 1. Turn off the printer and unplug both power cords. 2. Check that the power cords are not visibly damaged. 3. Ensure that the input voltage is within specifications (180-264 V AC). 4. Plug in both power cords and make sure they are fully inserted. 5. Turn on the printer. PSU overvoltage detected. 1. Turn off the printer and unplug both power cords. 2. Check that the power cords are not visibly damaged. 3. Ensure that input voltage is within specifications (180-264 V AC). 4. Plug in both power cords and make sure they are fully inserted. 5. Turn on the printer. Zero voltage detected. 1. Turn off the printer and unplug both power cords. 2. Check that the power cords are not visibly damaged. 3. Ensure that the input voltage is within specifications (180-264 V AC). 4. Plug in both power cords and make sure they are fully inserted. 5. Turn on the printer. Very low voltage detected. 1. Turn off the printer and unplug both power cords. 2. Check that the power cords are not visibly damaged. 3. Ensure that the input voltage is within specifications (180-264 V AC). 4. Plug in both power cords and make sure they are fully inserted. 5. Turn on the printer. Low voltage detected. 1. Turn off the printer and unplug both power cords. 2. Check that the power cords are not visibly damaged. 3. Ensure that the input voltage is within specifications (180-264 V AC). 4. Plug in both power cords and make sure they are fully inserted. 5. Turn on the printer. Excessive voltage detected. 1. Turn off the printer and unplug both power cords. 2. Check that the power cords are not visibly damaged. 3. Ensure that the input voltage is within specifications (180-264 V AC). 4. Plug in both power cords and make sure they are fully inserted. 5. Turn on the printer.
-
 1
1 -
 2
2 -
 3
3 -
 4
4 -
 5
5 -
 6
6 -
 7
7 -
 8
8 -
 9
9 -
 10
10 -
 11
11 -
 12
12
 |
 |