HP M3027 HP LaserJet M3027/M3035 MFP - User Guide for Model Numbers CC476A/CC4 - Page 155
Clean the paper path, HP Customer Care, on Administration, Print Quality, Calibration/Cleaning
 |
UPC - 882780570054
View all HP M3027 manuals
Add to My Manuals
Save this manual to your list of manuals |
Page 155 highlights
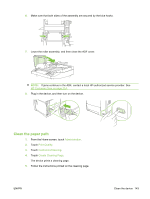
6. Make sure that both sides of the assembly are secured by the blue hooks. 7. Lower the roller assembly, and then close the ADF cover. NOTE: If jams continue in the ADF, contact a local HP-authorized service provider. See HP Customer Care on page 214. 8. Plug in the device, and then turn on the device. Clean the paper path 1. From the Home screen, touch Administration. 2. Touch Print Quality. 3. Touch Calibration/Cleaning. 4. Touch Create Cleaning Page. The device prints a cleaning page. 5. Follow the instructions printed on the cleaning page. ENWW Clean the device 143
-
 1
1 -
2
-
3
-
4
-
5
-
6
-
7
-
8
-
9
-
10
-
11
-
12
-
13
-
14
-
15
-
16
-
17
-
18
-
19
-
20
-
21
-
22
-
23
-
24
-
25
-
26
-
27
-
28
-
29
-
30
-
31
-
32
-
33
-
34
-
35
-
36
-
37
-
38
-
39
-
40
-
41
-
42
-
43
-
44
-
45
-
46
-
47
-
48
-
49
-
50
-
51
-
52
-
53
-
54
-
55
-
56
-
57
-
58
-
59
-
60
-
61
-
62
-
63
-
64
-
65
-
66
-
67
-
68
-
69
-
70
-
71
-
72
-
73
-
74
-
75
-
76
-
77
-
78
-
79
-
80
-
81
-
82
-
83
-
84
-
85
-
86
-
87
-
88
-
89
-
90
-
91
-
92
-
93
-
94
-
95
-
96
-
97
-
98
-
99
-
100
-
101
-
102
-
103
-
104
-
105
-
106
-
107
-
108
-
109
-
110
-
111
-
112
-
113
-
114
-
115
-
116
-
117
-
118
-
119
-
120
-
121
-
122
-
123
-
124
-
125
-
126
-
127
-
128
-
129
-
130
-
131
-
132
-
133
-
134
-
135
-
136
-
137
-
138
-
139
-
140
-
141
-
142
-
143
-
144
-
145
-
146
-
147
-
148
-
149
-
 150
150 -
 151
151 -
 152
152 -
 153
153 -
 154
154 -
 155
155 -
 156
156 -
 157
157 -
 158
158 -
 159
159 -
 160
160 -
161
-
162
-
163
-
164
-
165
-
166
-
167
-
168
-
169
-
170
-
171
-
172
-
173
-
174
-
175
-
176
-
177
-
178
-
179
-
180
-
181
-
182
-
183
-
184
-
185
-
186
-
187
-
188
-
189
-
190
-
191
-
192
-
193
-
194
-
195
-
196
-
197
-
198
-
199
-
200
-
201
-
202
-
203
-
204
-
205
-
206
-
207
-
208
-
209
-
210
-
211
-
212
-
213
-
214
-
215
-
216
-
217
-
218
-
219
-
220
-
221
-
222
-
223
-
224
-
225
-
226
-
227
-
228
-
229
-
230
-
231
-
232
-
233
-
234
-
235
-
236
-
237
-
238
-
239
-
240
-
241
-
242
-
243
-
244
-
245
-
246
-
247
-
248
-
249
-
250
-
251
-
252
-
253
-
254
-
255
-
256
-
257
-
258
-
259
-
260
-
261
-
262
-
263
-
264
-
265
-
266
-
267
-
268
-
269
-
270
 |
 |

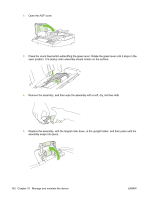
6.
Make sure that both sides of the assembly are secured by the blue hooks.
7.
Lower the roller assembly, and then close the ADF cover.
NOTE:
If jams continue in the ADF, contact a local HP-authorized service provider. See
HP Customer Care
on page
214
.
8.
Plug in the device, and then turn on the device.
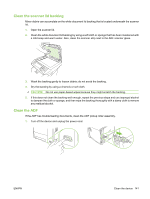
Clean the paper path
1.
From the Home screen, touch
Administration
.
2.
Touch
Print Quality
.
3.
Touch
Calibration/Cleaning
.
4.
Touch
Create Cleaning Page
.
The device prints a cleaning page.
5.
Follow the instructions printed on the cleaning page.
ENWW
Clean the device
143