HP M3027 HP LaserJet M3027/M3035 MFP - User Guide for Model Numbers CC476A/CC4 - Page 73
Select the correct fuser mode, Control print jobs, on Administration, Print Quality, High 1
 |
UPC - 882780570054
View all HP M3027 manuals
Add to My Manuals
Save this manual to your list of manuals |
Page 73 highlights
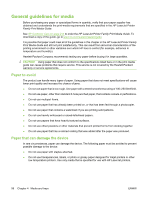
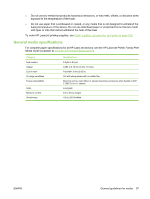
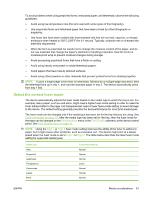
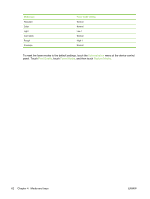
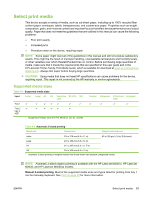
To avoid problems when using preprinted forms, embossed paper, and letterhead, observe the following guidelines: ● Avoid using low-temperature inks (the kind used with some types of thermography). ● Use preprinted forms and letterhead paper that have been printed by offset lithography or engraving. ● Use forms that have been created with heat-resistant inks that will not melt, vaporize, or release emissions when heated to 200°C (392°F) for 0.1 second. Typically, oxidation-set or oil-based inks meet this requirement. ● When the form is preprinted, be careful not to change the moisture content of the paper, and do not use materials that change the paper's electrical or handling properties. Seal the forms in moisture-proof wrap to prevent moisture changes during storage. ● Avoid processing preprinted forms that have a finish or coating. ● Avoid using heavily embossed or raised-letterhead papers. ● Avoid papers that have heavily textured surfaces. ● Avoid using offset powders or other materials that prevent printed forms from sticking together. NOTE: To print a single-page cover letter on letterhead, followed by a multiple-page document, feed the letterhead face up in tray 1, and load the standard paper in tray 2. The device automatically prints from tray 1 first. Select the correct fuser mode The device automatically adjusts the fuser mode based on the media type to which the tray is set. For example, heavy paper, such as card stock, might need a higher fuser-mode setting in order to make the toner adhere better to the page, but transparencies need a lower fuser-mode setting to avoid damage to the device. The default setting generally provides the best performance for most print-media types. The fuser mode can be changed only if the media type has been set for the tray that you are using. See Control print jobs on page 72. After the media type has been set for the tray, then the fuser mode for that type can be changed on the Administration menu in the Print Quality submenu at the device control panel. See Print Quality menu on page 43. NOTE: Using the High 1 or High 2 fuser mode setting improves the ability of the toner to adhere to paper, but it might cause other problems, such as excessive curl. The device might print at a slower speed when the fuser mode is set to High 1 or High 2. The table below describes the ideal fuser mode setting for supported media types. Media type Plain Preprinted Letterhead Transparency Prepunched Labels Bond Fuser mode setting Normal Normal Normal Low 2 Normal Normal Normal ENWW Media considerations 61
-
 1
1 -
2
-
3
-
4
-
5
-
6
-
7
-
8
-
9
-
10
-
11
-
12
-
13
-
14
-
15
-
16
-
17
-
18
-
19
-
20
-
21
-
22
-
23
-
24
-
25
-
26
-
27
-
28
-
29
-
30
-
31
-
32
-
33
-
34
-
35
-
36
-
37
-
38
-
39
-
40
-
41
-
42
-
43
-
44
-
45
-
46
-
47
-
48
-
49
-
50
-
51
-
52
-
53
-
54
-
55
-
56
-
57
-
58
-
59
-
60
-
61
-
62
-
63
-
64
-
65
-
66
-
67
-
 68
68 -
 69
69 -
 70
70 -
 71
71 -
 72
72 -
 73
73 -
 74
74 -
 75
75 -
 76
76 -
 77
77 -
 78
78 -
79
-
80
-
81
-
82
-
83
-
84
-
85
-
86
-
87
-
88
-
89
-
90
-
91
-
92
-
93
-
94
-
95
-
96
-
97
-
98
-
99
-
100
-
101
-
102
-
103
-
104
-
105
-
106
-
107
-
108
-
109
-
110
-
111
-
112
-
113
-
114
-
115
-
116
-
117
-
118
-
119
-
120
-
121
-
122
-
123
-
124
-
125
-
126
-
127
-
128
-
129
-
130
-
131
-
132
-
133
-
134
-
135
-
136
-
137
-
138
-
139
-
140
-
141
-
142
-
143
-
144
-
145
-
146
-
147
-
148
-
149
-
150
-
151
-
152
-
153
-
154
-
155
-
156
-
157
-
158
-
159
-
160
-
161
-
162
-
163
-
164
-
165
-
166
-
167
-
168
-
169
-
170
-
171
-
172
-
173
-
174
-
175
-
176
-
177
-
178
-
179
-
180
-
181
-
182
-
183
-
184
-
185
-
186
-
187
-
188
-
189
-
190
-
191
-
192
-
193
-
194
-
195
-
196
-
197
-
198
-
199
-
200
-
201
-
202
-
203
-
204
-
205
-
206
-
207
-
208
-
209
-
210
-
211
-
212
-
213
-
214
-
215
-
216
-
217
-
218
-
219
-
220
-
221
-
222
-
223
-
224
-
225
-
226
-
227
-
228
-
229
-
230
-
231
-
232
-
233
-
234
-
235
-
236
-
237
-
238
-
239
-
240
-
241
-
242
-
243
-
244
-
245
-
246
-
247
-
248
-
249
-
250
-
251
-
252
-
253
-
254
-
255
-
256
-
257
-
258
-
259
-
260
-
261
-
262
-
263
-
264
-
265
-
266
-
267
-
268
-
269
-
270
 |
 |
