HP M3027 HP LaserJet M3027/M3035 MFP - User Guide for Model Numbers CC476A/CC4 - Page 82
Load special media, Paper, Type is, Printer features, Media
 |
UPC - 882780570054
View all HP M3027 manuals
Add to My Manuals
Save this manual to your list of manuals |
Page 82 highlights
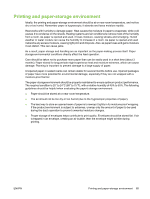
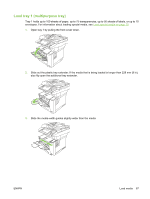
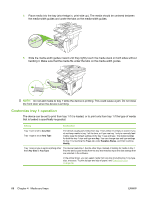
4. Place the paper in the tray and make sure that it is flat at all four corners. Keep the paper below the height tabs on the paper-length guide in the rear of the tray. 5. Push down on the paper to lock the metal paper-lift plate in place. 6. Slide the tray into the device. Load special media The following table provides guidelines for loading special media and configuring the printer driver. Use the correct media-type setting in the printer driver to obtain the best print quality. For some types of media, the product reduces the print speed. NOTE: In the Windows printer driver, adjust the media type on the Paper tab in the Type is drop-down list. In the Macintosh printer driver, adjust the media type on the Printer features pop-up menu in the Media type drop-down list. Media type Normal Envelopes Heavy envelopes Maximum amount that can be loaded into tray 2 or optional tray 3 Printer-driver setting Tray 1 media orientation Tray 2 or tray 3 media orientation Up to 500 sheets Plain or unspecified Zero. Envelopes Envelope should be used only in tray 1 Zero. Envelopes Envelope should be used only in tray 1 Side to be printed facing up Side to be printed facing down Side to be printed facing up, stamp area closest to the product, short edge toward the product Do not print envelopes from tray 2 or optional tray 3. Side to be printed facing up, stamp area closest to the product, Do not print heavy envelopes from tray 2 or optional tray 3. 70 Chapter 4 Media and trays ENWW
-
 1
1 -
2
-
3
-
4
-
5
-
6
-
7
-
8
-
9
-
10
-
11
-
12
-
13
-
14
-
15
-
16
-
17
-
18
-
19
-
20
-
21
-
22
-
23
-
24
-
25
-
26
-
27
-
28
-
29
-
30
-
31
-
32
-
33
-
34
-
35
-
36
-
37
-
38
-
39
-
40
-
41
-
42
-
43
-
44
-
45
-
46
-
47
-
48
-
49
-
50
-
51
-
52
-
53
-
54
-
55
-
56
-
57
-
58
-
59
-
60
-
61
-
62
-
63
-
64
-
65
-
66
-
67
-
68
-
69
-
70
-
71
-
72
-
73
-
74
-
75
-
76
-
 77
77 -
 78
78 -
 79
79 -
 80
80 -
 81
81 -
 82
82 -
 83
83 -
 84
84 -
 85
85 -
 86
86 -
 87
87 -
88
-
89
-
90
-
91
-
92
-
93
-
94
-
95
-
96
-
97
-
98
-
99
-
100
-
101
-
102
-
103
-
104
-
105
-
106
-
107
-
108
-
109
-
110
-
111
-
112
-
113
-
114
-
115
-
116
-
117
-
118
-
119
-
120
-
121
-
122
-
123
-
124
-
125
-
126
-
127
-
128
-
129
-
130
-
131
-
132
-
133
-
134
-
135
-
136
-
137
-
138
-
139
-
140
-
141
-
142
-
143
-
144
-
145
-
146
-
147
-
148
-
149
-
150
-
151
-
152
-
153
-
154
-
155
-
156
-
157
-
158
-
159
-
160
-
161
-
162
-
163
-
164
-
165
-
166
-
167
-
168
-
169
-
170
-
171
-
172
-
173
-
174
-
175
-
176
-
177
-
178
-
179
-
180
-
181
-
182
-
183
-
184
-
185
-
186
-
187
-
188
-
189
-
190
-
191
-
192
-
193
-
194
-
195
-
196
-
197
-
198
-
199
-
200
-
201
-
202
-
203
-
204
-
205
-
206
-
207
-
208
-
209
-
210
-
211
-
212
-
213
-
214
-
215
-
216
-
217
-
218
-
219
-
220
-
221
-
222
-
223
-
224
-
225
-
226
-
227
-
228
-
229
-
230
-
231
-
232
-
233
-
234
-
235
-
236
-
237
-
238
-
239
-
240
-
241
-
242
-
243
-
244
-
245
-
246
-
247
-
248
-
249
-
250
-
251
-
252
-
253
-
254
-
255
-
256
-
257
-
258
-
259
-
260
-
261
-
262
-
263
-
264
-
265
-
266
-
267
-
268
-
269
-
270
 |
 |
