HP ML530 Implementing Microsoft Windows Server 2003 with Service Pack 2 on HP - Page 25
After Windows Server 2003 SP2 has been installed, install the Simple Network Management
 |
UPC - 720591250669
View all HP ML530 manuals
Add to My Manuals
Save this manual to your list of manuals |
Page 25 highlights
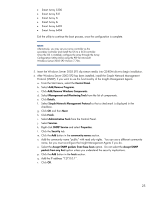
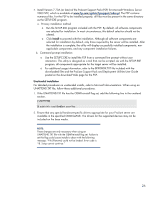
• Smart Array 5300 • Smart Array 531 • Smart Array 5i • Smart Array 6i • Smart Array 6402 • Smart Array 6404 Exit the utility to continue the boot process, once the configuration is complete. NOTE: Alternatively, you may set your array controller as the secondary controller and install the OS to a SCSI controller. Once the OS is installed, configure the array through the Array Configuration Utility (ACU) using the PSP for Microsoft Windows Server 2003 SP2 Version 7.70A. 5. Insert the Windows Server 2003 SP2 slip stream media into CD-ROM drive to begin installation. 6. After Windows Server 2003 SP2 has been installed, install the Simple Network Management Protocol (SNMP), if you want to use the functionality of the Insight Management Agents. a. From the Start menu, select the Control Panel. b. Select Add/Remove Programs. c. Click Add/Remove Windows Components. d. Select Management and Monitoring Tools from the list of components. e. Click Details. f. Select Simple Network Management Protocol so that a checkmark is displayed in the checkbox. g. Click OK and then Next. h. Click Finish. i. Select Administrative Tools from the Control Panel. j. Select Services. k. Right click SNMP Service and select Properties. l. Click the Security tab. m. Click the Add button in the community names section. n. Add the community name "public" with read only rights. You can use a different community name, but you must reconfigure the Insight Management Agents if you do. o. Select the Accept SNMP packets from these hosts option. Do not select the Accept SNMP packets from any host option unless you understand the security implications. p. Click the Add button in the hosts section. q. Add the IP address "127.0.0.1". r. Click OK. 25
-
 1
1 -
2
-
3
-
4
-
5
-
6
-
7
-
8
-
9
-
10
-
11
-
12
-
13
-
14
-
15
-
16
-
17
-
18
-
19
-
 20
20 -
 21
21 -
 22
22 -
 23
23 -
 24
24 -
 25
25 -
 26
26 -
 27
27 -
 28
28 -
 29
29 -
 30
30 -
31
-
32
-
33
-
34
-
35
 |
 |