HP Media Center m7200 HP Media Center PC Software Guide - Page 56
Working with Digital Images, Using HP Image Zone in Media Center
 |
View all HP Media Center m7200 manuals
Add to My Manuals
Save this manual to your list of manuals |
Page 56 highlights
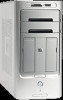
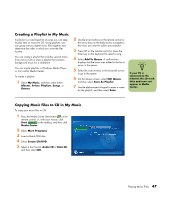
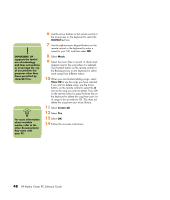
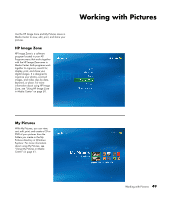
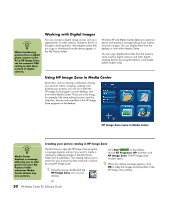
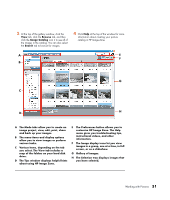
n When transferring pictures from a digital photo camera to the PC in HP Image Zone, set the camera's USB setting to disk drive instead of digital camera. Working with Digital Images You can connect a digital image source, such as a digital photo or video camera, directly to the PC or through a docking station. Most digital picture files you copy or download from the device appear in the My Pictures folder. Windows XP and Media Center detect your external device and display a message asking if you want to view your images. You can display them from the desktop or from within Media Center. You can copy digital picture files from the memory cards used by digital cameras and other digital imaging devices by using the memory card reader (select models only). r Using HP Image Zone in Media Center Most tasks, such as viewing a slideshow, sharing your pictures online, cropping, rotating, and printing your pictures, you can do in both the HP Image Zone program on your desktop, and from within Media Center. There are a few things, for example, like some editing functions and the Help files, that are only available in the HP Image Zone program on the desktop. HP Image Zone menu in Media Center n Media Center displays a message allowing you to add pictures to your My Pictures folder whenever Media Center detects any new pictures. Creating your picture catalog in HP Image Zone The first time you open the HP Image Zone program, a message appears asking if you want to create a catalog by indexing images in the My Pictures folder and its subfolders. This catalog allows you to search for your pictures by date, keyword, or place, by using HP Image Zone. 1 Using the mouse, double-click the HP Image Zone icon on your desktop. Click Start on the taskbar, choose All Programs, HP, and then click HP Image Zone. The HP Image Zone window opens. 2 When the catalog message appears, click OK to index the images and place them in the HP Image Zone catalog. Or 50 HP Media Center PC Software Guide
-
 1
1 -
2
-
3
-
4
-
5
-
6
-
7
-
8
-
9
-
10
-
11
-
12
-
13
-
14
-
15
-
16
-
17
-
18
-
19
-
20
-
21
-
22
-
23
-
24
-
25
-
26
-
27
-
28
-
29
-
30
-
31
-
32
-
33
-
34
-
35
-
36
-
37
-
38
-
39
-
40
-
41
-
42
-
43
-
44
-
45
-
46
-
47
-
48
-
49
-
50
-
 51
51 -
 52
52 -
 53
53 -
 54
54 -
 55
55 -
 56
56 -
 57
57 -
 58
58 -
 59
59 -
 60
60 -
 61
61 -
62
-
63
-
64
-
65
-
66
-
67
-
68
-
69
-
70
-
71
-
72
-
73
-
74
-
75
-
76
-
77
-
78
-
79
-
80
-
81
-
82
-
83
-
84
-
85
-
86
-
87
-
88
-
89
-
90
-
91
-
92
-
93
-
94
-
95
-
96
-
97
-
98
-
99
-
100
-
101
-
102
-
103
-
104
-
105
-
106
-
107
-
108
-
109
-
110
-
111
-
112
-
113
-
114
-
115
-
116
-
117
-
118
-
119
-
120
-
121
-
122
-
123
-
124
-
125
-
126
-
127
-
128
-
129
-
130
-
131
-
132
-
133
-
134
-
135
-
136
-
137
-
138
 |
 |