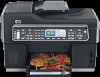
HP Officejet Pro L7600 Setup Guide - Page 26
Troubleshooting, Solving installation problems, Solving installation, problems - driver
 |
View all HP Officejet Pro L7600 manuals
Add to My Manuals
Save this manual to your list of manuals |
Page 26 highlights
6 Troubleshooting This section provides troubleshooting suggestions for some of the most common issues associated with hardware and software installation. For late-breaking information, see the readme file and release notes on the Starter CD, or visit the product support Web site at www.hp.com/support. Solving installation problems This section provides troubleshooting suggestions for some of the most common issues associated with hardware and software installation. Hardware installation suggestions Check the device • Make sure that all packing tape and material have been removed from outside and inside the device. • Make sure paper is loaded correctly in the tray, and is not jammed in the device. • Make sure that no lights are on or blinking except the Power light, which should be on. If the Attention light is blinking, check for messages on the control panel. When the device is first turned on, it takes approximately 45 seconds to warm up. • Make sure the rear access panel or duplexer is locked into place. • Make sure that the device can print a Self-test diagnostic page. For more information, see "Self-test diagnostic page" on page 28. Check the hardware connections • Make sure that any cords and cables that you are using are in good working order. • Make sure that the power cord is connected securely to both the device and to a working power outlet. • Make sure that the phone cord is connected to the 1-LINE port. Check the printheads and ink cartridges • Make sure that you have removed the orange caps from the printheads. • Make sure that all of the printheads and ink cartridges are firmly installed in their correct, colorcoded slot. Press down firmly on each one to ensure proper contact. The device cannot work if they are not all installed. • Make sure that the printhead latch and all covers are closed. • If the display shows a printhead error message, clean the contacts on the printheads. For more information, see the onscreen user guide on the Starter CD. Software installation suggestions Check the computer system • Make sure that your computer is running one of the supported operating systems. For more information, see the onscreen user guide on the Starter CD. • Make sure that the computer meets at least the minimum system requirements. For more information, see the onscreen user guide on the Starter CD. Verify installation preliminaries • Make sure to use the Starter CD that contains the correct installation software for your operating system. • Before installing software, make sure that all other programs are closed. • If the computer does not recognize the path to the CD-ROM drive that you type, make sure that you are specifying the correct drive letter. • If the computer cannot recognize the Starter CD in the CD-ROM drive, inspect the Starter CD for damage. You can download the device driver from www.hp.com/support. • In the Windows device manager, make sure that the USB drivers have not been disabled. • If you are using a computer running Windows, and the computer cannot detect the device, run the uninstallation utility (util\ccc\uninstall.bat on the Starter CD) to perform a clean uninstallation of the device driver. Restart your computer, and reinstall the device driver. 22 Troubleshooting
-
 1
1 -
2
-
3
-
4
-
5
-
6
-
7
-
8
-
9
-
10
-
11
-
12
-
13
-
14
-
15
-
16
-
17
-
18
-
19
-
20
-
 21
21 -
 22
22 -
 23
23 -
 24
24 -
 25
25 -
 26
26 -
 27
27 -
 28
28 -
 29
29 -
 30
30 -
 31
31 -
32
-
33
-
34
-
35
-
36
-
37
-
38
-
39
-
40
-
41
-
42
-
43
-
44
-
45
-
46
-
47
-
48
-
49
-
50
-
51
-
52
-
53
-
54
-
55
-
56
-
57
-
58
-
59
-
60
-
61
-
62
-
63
-
64
-
65
-
66
-
67
-
68
-
69
-
70
-
71
-
72
-
73
-
74
-
75
-
76
-
77
-
78
-
79
-
80
-
81
-
82
-
83
-
84
-
85
-
86
-
87
-
88
-
89
-
90
-
91
-
92
-
93
-
94
-
95
-
96
-
97
-
98
-
99
-
100
-
101
-
102
-
103
-
104
-
105
-
106
-
107
-
108
-
109
-
110
-
111
-
112
-
113
-
114
-
115
-
116
-
117
-
118
-
119
-
120
-
121
-
122
-
123
-
124
-
125
-
126
-
127
-
128
-
129
-
130
-
131
-
132
-
133
-
134
-
135
-
136
 |
 |
