HP P2015dn HP LaserJet P2015 - Software Technical Reference - Page 236
Troubleshooting the printer setup, Printer List - ip address
 |
UPC - 882780492462
View all HP P2015dn manuals
Add to My Manuals
Save this manual to your list of manuals |
Page 236 highlights
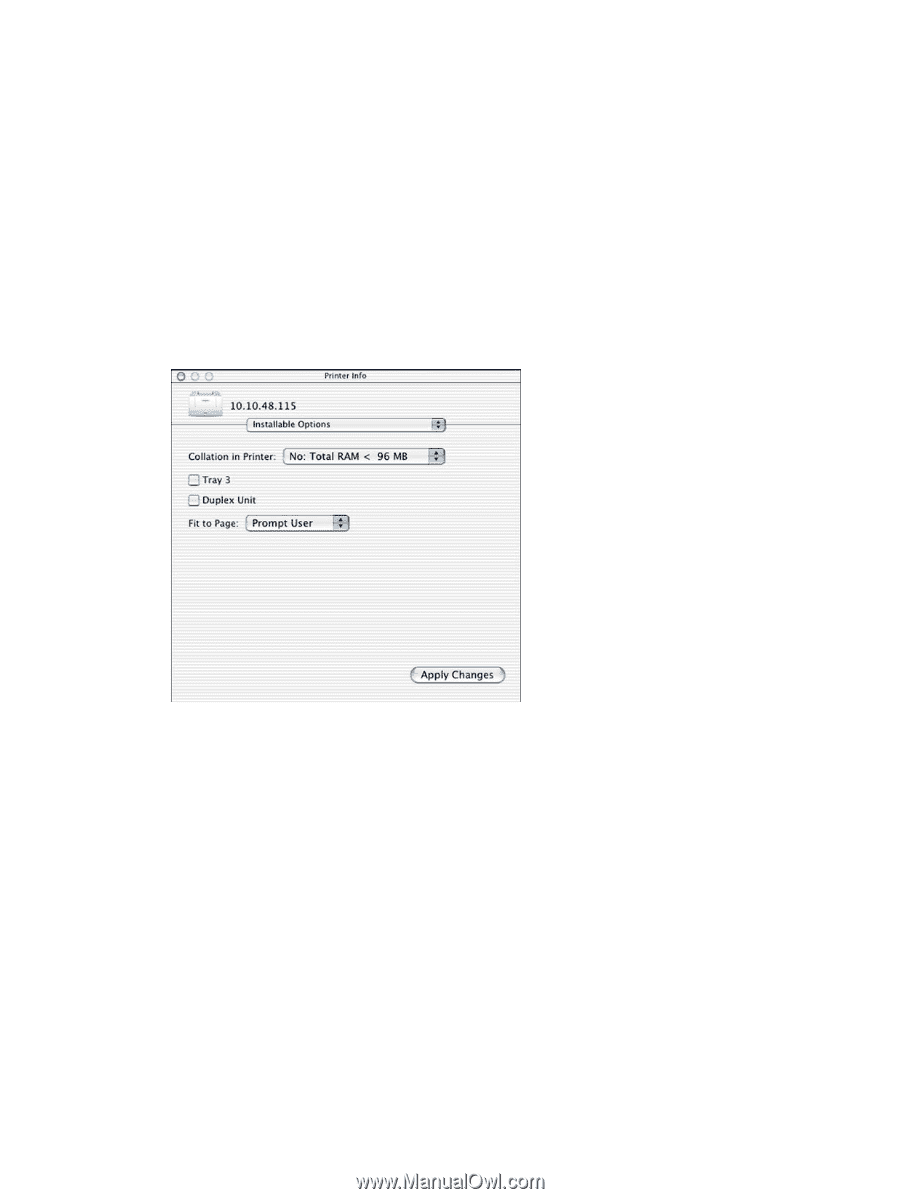
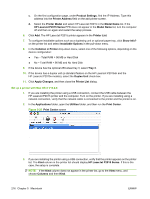
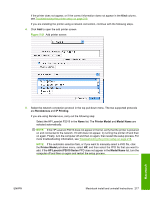
If you are using IP Printing, carry out the following steps: a. Print out the printer configuration pages. On the printer, press and hold in the green button for eight seconds, or until you see the LEDs above the button start to blink. The printer prints out the configuration pages. b. On the first configuration page, under Product Settings, find the IP Address. Type this address into the Printer's Address field. c. Select the Printer Model and select HP LaserJet P2015 in the Model Name list. 6. Click Add. The HP LaserJet P2015 printer appears in the Printer List. 7. Select the HP LaserJet P2015 printer, go to the Printers menu, and choose Show Info. 8. Select Installable Options from the top pull-down menu. 9. In the Collation in Printer drop-down menu, select one of the following options, depending on the device configuration: ● Yes - Total RAM > 96 MB or Hard Disk ● No - Total RAM < 96 MB and No Hard Disk 10. If the device has the optional 250-sheet tray 3, select Tray 3. 11. If the device has a duplex unit (a standard feature on the HP LaserJet P2015dn and the HP LaserJet P2015x models), select the Duplex Unit check box. 12. Click Apply Changes, and then close the Printer List dialog. Troubleshooting the printer setup If the printer does not appear in the printer list after an installation: 218 Chapter 5 Macintosh ENWW
-
 1
1 -
2
-
3
-
4
-
5
-
6
-
7
-
8
-
9
-
10
-
11
-
12
-
13
-
14
-
15
-
16
-
17
-
18
-
19
-
20
-
21
-
22
-
23
-
24
-
25
-
26
-
27
-
28
-
29
-
30
-
31
-
32
-
33
-
34
-
35
-
36
-
37
-
38
-
39
-
40
-
41
-
42
-
43
-
44
-
45
-
46
-
47
-
48
-
49
-
50
-
51
-
52
-
53
-
54
-
55
-
56
-
57
-
58
-
59
-
60
-
61
-
62
-
63
-
64
-
65
-
66
-
67
-
68
-
69
-
70
-
71
-
72
-
73
-
74
-
75
-
76
-
77
-
78
-
79
-
80
-
81
-
82
-
83
-
84
-
85
-
86
-
87
-
88
-
89
-
90
-
91
-
92
-
93
-
94
-
95
-
96
-
97
-
98
-
99
-
100
-
101
-
102
-
103
-
104
-
105
-
106
-
107
-
108
-
109
-
110
-
111
-
112
-
113
-
114
-
115
-
116
-
117
-
118
-
119
-
120
-
121
-
122
-
123
-
124
-
125
-
126
-
127
-
128
-
129
-
130
-
131
-
132
-
133
-
134
-
135
-
136
-
137
-
138
-
139
-
140
-
141
-
142
-
143
-
144
-
145
-
146
-
147
-
148
-
149
-
150
-
151
-
152
-
153
-
154
-
155
-
156
-
157
-
158
-
159
-
160
-
161
-
162
-
163
-
164
-
165
-
166
-
167
-
168
-
169
-
170
-
171
-
172
-
173
-
174
-
175
-
176
-
177
-
178
-
179
-
180
-
181
-
182
-
183
-
184
-
185
-
186
-
187
-
188
-
189
-
190
-
191
-
192
-
193
-
194
-
195
-
196
-
197
-
198
-
199
-
200
-
201
-
202
-
203
-
204
-
205
-
206
-
207
-
208
-
209
-
210
-
211
-
212
-
213
-
214
-
215
-
216
-
217
-
218
-
219
-
220
-
221
-
222
-
223
-
224
-
225
-
226
-
227
-
228
-
229
-
230
-
 231
231 -
 232
232 -
 233
233 -
 234
234 -
 235
235 -
 236
236 -
 237
237 -
 238
238 -
 239
239 -
 240
240 -
 241
241 -
242
-
243
-
244
-
245
-
246
-
247
-
248
-
249
-
250
-
251
-
252
-
253
-
254
-
255
-
256
-
257
-
258
-
259
-
260
-
261
-
262
-
263
-
264
-
265
-
266
-
267
-
268
-
269
-
270
-
271
-
272
-
273
-
274
-
275
-
276
-
277
-
278
-
279
-
280
-
281
-
282
-
283
-
284
 |
 |