HP P3005 HP LaserJet P3005 - Software Technical Reference - Page 182
Using job-storage features when printing, Releasing a job-storage print job
 |
UPC - 882780566361
View all HP P3005 manuals
Add to My Manuals
Save this manual to your list of manuals |
Page 182 highlights
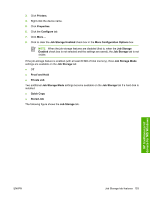
try to type a character in an ASCII code of fewer than 32 or more than 126 characters, the character is removed from the edit field, along with all of the characters that follow it. If you try to type more than 16 characters, any character beyond 16 is truncated. When the dialog box is closed, or as soon as the focus is removed from the control (that is, when the Tab key is pressed or another control is selected), an empty string is replaced with . The acceptable characters for job name and user name vary for each operating system. The string must be of a length and type that can appear on the device control-panel display. If Job Name Exists. When you store a print job, you can create a print-job name or the device software can assign one automatically. If a print job with the same name already exists, the new print job will overwrite the existing print job. To eliminate the chances of a new print job overwriting an old print job because both have the same name, select Use Job Name + (1-999). After you create the print job name, or when one is created automatically, the device software assigns a number between 1 and 999 to the end of the print job name to make the name unique. Select Replace Existing File if you always want the device software to overwrite an existing print job with the same print job name. Using job-storage features when printing To use job-storage features when printing, follow these steps: 1. Click File and then click Print from the software program. The Print dialog box appears. NOTE Clicking the print icon in the software program toolbar prints the job without using job-storage features. 2. Click Properties. The Properties dialog box appears. 3. Click the Job Storage tab. 4. Select the job-storage options by clicking the appropriate option button, and then complete any required fields. 5. Click OK. Releasing a job-storage print job After you send a print job that uses the job-storage feature, you can release the job to print from the device control panel. 1. Press theMenu button to open the menus. 2. Press (the up arrow) or (the down arrow) until RETRIEVE JOB is highlighted on the device control panel, and then press (select). 3. Press (up) or (down) to scroll to your user name, and then press (select). 4. Press (up) or (down) to scroll to the job name, and then press (select). 5. Press (up) or (down) until PRINT is highlighted on the device control panel, and then press (select). 6. Press (select). 7. If a PIN number is assigned to the job, press (up) or (down) to select the first digit of the PIN, and then press (select). The number in the device control-panel display changes to an asterisk. Repeat this step for each of the remaining three digits of the PIN number. 158 Chapter 4 HP traditional print drivers for MS Windows ENWW
-
 1
1 -
2
-
3
-
4
-
5
-
6
-
7
-
8
-
9
-
10
-
11
-
12
-
13
-
14
-
15
-
16
-
17
-
18
-
19
-
20
-
21
-
22
-
23
-
24
-
25
-
26
-
27
-
28
-
29
-
30
-
31
-
32
-
33
-
34
-
35
-
36
-
37
-
38
-
39
-
40
-
41
-
42
-
43
-
44
-
45
-
46
-
47
-
48
-
49
-
50
-
51
-
52
-
53
-
54
-
55
-
56
-
57
-
58
-
59
-
60
-
61
-
62
-
63
-
64
-
65
-
66
-
67
-
68
-
69
-
70
-
71
-
72
-
73
-
74
-
75
-
76
-
77
-
78
-
79
-
80
-
81
-
82
-
83
-
84
-
85
-
86
-
87
-
88
-
89
-
90
-
91
-
92
-
93
-
94
-
95
-
96
-
97
-
98
-
99
-
100
-
101
-
102
-
103
-
104
-
105
-
106
-
107
-
108
-
109
-
110
-
111
-
112
-
113
-
114
-
115
-
116
-
117
-
118
-
119
-
120
-
121
-
122
-
123
-
124
-
125
-
126
-
127
-
128
-
129
-
130
-
131
-
132
-
133
-
134
-
135
-
136
-
137
-
138
-
139
-
140
-
141
-
142
-
143
-
144
-
145
-
146
-
147
-
148
-
149
-
150
-
151
-
152
-
153
-
154
-
155
-
156
-
157
-
158
-
159
-
160
-
161
-
162
-
163
-
164
-
165
-
166
-
167
-
168
-
169
-
170
-
171
-
172
-
173
-
174
-
175
-
176
-
 177
177 -
 178
178 -
 179
179 -
 180
180 -
 181
181 -
 182
182 -
 183
183 -
 184
184 -
 185
185 -
 186
186 -
 187
187 -
188
-
189
-
190
-
191
-
192
-
193
-
194
-
195
-
196
-
197
-
198
-
199
-
200
-
201
-
202
-
203
-
204
-
205
-
206
-
207
-
208
-
209
-
210
-
211
-
212
-
213
-
214
-
215
-
216
-
217
-
218
-
219
-
220
-
221
-
222
-
223
-
224
-
225
-
226
-
227
-
228
-
229
-
230
-
231
-
232
-
233
-
234
-
235
-
236
-
237
-
238
-
239
-
240
-
241
-
242
-
243
-
244
-
245
-
246
-
247
-
248
-
249
-
250
-
251
-
252
-
253
-
254
-
255
-
256
-
257
-
258
-
259
-
260
-
261
-
262
-
263
-
264
-
265
-
266
-
267
-
268
-
269
-
270
-
271
-
272
-
273
-
274
-
275
-
276
-
277
-
278
-
279
-
280
-
281
-
282
-
283
-
284
-
285
-
286
-
287
-
288
-
289
-
290
-
291
-
292
-
293
-
294
-
295
-
296
-
297
-
298
-
299
-
300
-
301
-
302
-
303
-
304
-
305
-
306
-
307
-
308
-
309
-
310
-
311
-
312
-
313
-
314
-
315
-
316
-
317
-
318
-
319
-
320
-
321
-
322
-
323
-
324
-
325
-
326
-
327
-
328
-
329
-
330
-
331
-
332
-
333
-
334
-
335
-
336
-
337
-
338
-
339
-
340
-
341
-
342
-
343
-
344
-
345
-
346
-
347
-
348
-
349
-
350
-
351
-
352
-
353
-
354
-
355
-
356
-
357
-
358
-
359
-
360
-
361
-
362
-
363
-
364
-
365
-
366
-
367
-
368
-
369
-
370
-
371
-
372
-
373
-
374
-
375
-
376
-
377
-
378
-
379
-
380
-
381
-
382
-
383
-
384
-
385
-
386
-
387
-
388
-
389
-
390
-
391
-
392
-
393
-
394
-
395
-
396
-
397
-
398
-
399
-
400
-
401
-
402
-
403
-
404
-
405
-
406
 |
 |