HP Pavilion 15-aw000 Maintenance and Service Guide - Page 42
If it is necessary to disassemble the hard drive, follow these steps
 |
View all HP Pavilion 15-aw000 manuals
Add to My Manuals
Save this manual to your list of manuals |
Page 42 highlights
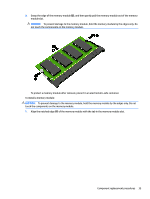
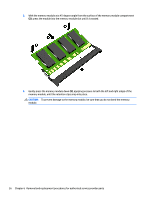
a. Battery (see Battery on page 30). b. Optical drive (see Optical drive (select products only) on page 26). Remove the hard drive: ▲ Disconnect the hard drive cable (1), slide the hard drive horizontally (2), and then lift the hard drive to remove it (3). Reverse this procedure to install the hard drive. If it is necessary to disassemble the hard drive, follow these steps: ▲ Remove the hard drive connector (1), and then remove the side brackets (2). Reverse this procedure to reassemble the hard drive. 32 Chapter 6 Removal and replacement procedures for authorized service provider parts
-
 1
1 -
2
-
3
-
4
-
5
-
6
-
7
-
8
-
9
-
10
-
11
-
12
-
13
-
14
-
15
-
16
-
17
-
18
-
19
-
20
-
21
-
22
-
23
-
24
-
25
-
26
-
27
-
28
-
29
-
30
-
31
-
32
-
33
-
34
-
35
-
36
-
 37
37 -
 38
38 -
 39
39 -
 40
40 -
 41
41 -
 42
42 -
 43
43 -
 44
44 -
 45
45 -
 46
46 -
 47
47 -
48
-
49
-
50
-
51
-
52
-
53
-
54
-
55
-
56
-
57
-
58
-
59
-
60
-
61
-
62
-
63
-
64
-
65
-
66
-
67
-
68
-
69
-
70
-
71
-
72
-
73
-
74
-
75
-
76
-
77
-
78
-
79
-
80
-
81
-
82
-
83
-
84
-
85
-
86
-
87
-
88
-
89
-
90
-
91
-
92
-
93
-
94
 |
 |

a.
Battery (see
Battery
on page
30
).
b.
Optical drive (see
Optical drive (select products only)
on page
26
).
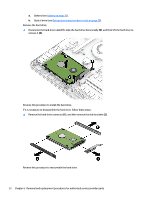
Remove the hard drive:
▲
Disconnect the hard drive cable
(1)
, slide the hard drive horizontally
(2)
, and then lift the hard drive to
remove it
(3)
.
Reverse this procedure to install the hard drive.
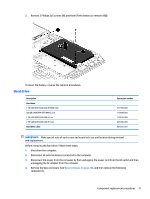
If it is necessary to disassemble the hard drive, follow these steps:
▲
Remove the hard drive connector
(1)
, and then remove the side brackets
(2)
.
Reverse this procedure to reassemble the hard drive.
32
Chapter 6
Removal and replacement procedures for authorized service provider parts