HP Pavilion 15-b100 HP Pavilion Sleekbook 15 and HP Pavilion Ultrabook 15 Main - Page 46
the display panel., and then remove the panel
 |
View all HP Pavilion 15-b100 manuals
Add to My Manuals
Save this manual to your list of manuals |
Page 46 highlights
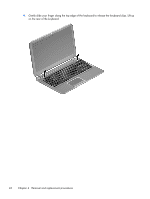
4. Remove the four Phillips screws for the display panel. 5. Move the panel toward the keyboard (1). NOTE: Support the display panel as you lean the panel forward. 6. Release the adhesive support strip (2) that secures the display panel cable connector to the display panel. 7. Disconnect the display panel cable (3) from the display panel, and then remove the panel (4). Reverse this procedure to replace the panel. 38 Chapter 4 Removal and replacement procedures
-
 1
1 -
2
-
3
-
4
-
5
-
6
-
7
-
8
-
9
-
10
-
11
-
12
-
13
-
14
-
15
-
16
-
17
-
18
-
19
-
20
-
21
-
22
-
23
-
24
-
25
-
26
-
27
-
28
-
29
-
30
-
31
-
32
-
33
-
34
-
35
-
36
-
37
-
38
-
39
-
40
-
 41
41 -
 42
42 -
 43
43 -
 44
44 -
 45
45 -
 46
46 -
 47
47 -
 48
48 -
 49
49 -
 50
50 -
 51
51 -
52
-
53
-
54
-
55
-
56
-
57
-
58
-
59
-
60
-
61
-
62
-
63
-
64
-
65
-
66
-
67
-
68
-
69
-
70
-
71
-
72
-
73
-
74
-
75
-
76
-
77
-
78
-
79
-
80
-
81
-
82
-
83
-
84
-
85
-
86
-
87
-
88
-
89
-
90
-
91
-
92
-
93
-
94
-
95
-
96
-
97
-
98
-
99
-
100
-
101
-
102
-
103
-
104
-
105
-
106
-
107
-
108
-
109
-
110
-
111
-
112
-
113
 |
 |

4.
Remove the four Phillips screws for the display panel.
5.
Move the panel toward the keyboard
(1)
.
NOTE:
Support the display panel as you lean the panel forward.
6.
Release the adhesive support strip
(2)
that secures the display panel cable connector to
the display panel.
7.
Disconnect the display panel cable
(3)
from the display panel, and then remove the panel
(4)
.
Reverse this procedure to replace the panel.
38
Chapter 4
Removal and replacement procedures