HP Pavilion PC 14-dv1000 User Guide - Page 14
Getting to know your computer, Right-side components and their descriptions, continued
 |
View all HP Pavilion PC 14-dv1000 manuals
Add to My Manuals
Save this manual to your list of manuals |
Page 14 highlights
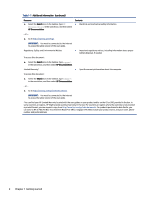
Table 2-1 Right-side components and their descriptions (continued) Component Description ● Blinking amber: The AC adapter is disconnected and the battery has reached a low battery level. ● Amber: The AC adapter is connected and the battery is charging. ● Off: The battery is not charging. (3) Power connector Connects an AC adapter. (4) microSD™ memory card reader (select products Reads optional memory cards that enable you to store, manage, only) share, or access information. To insert a card: 1. Hold the card label-side up, with connectors facing the computer. 2. Insert the card into the memory card reader, and then press in on the card until it is firmly seated. To remove a card: ▲ Press in on the card, and then remove it from the memory card reader. (5) USB Type-C® power connector and SuperSpeed Connects an AC adapter that has a USB Type-C connector, 10 Gbps port with DisplayPort output supplying power to the computer and, if needed, charging the computer battery. - and - Connects a USB device, provides high-speed data transfer, and (for select products) charges small devices (such as a smartphone) when the computer is on or in Sleep mode. NOTE: Use a standard USB Type-C charging cable or cable adapter (purchased separately) when charging a small external device. - and - Connects a display device that has a USB Type-C connector, providing DisplayPort™ output. (6) HDMI port Connects an optional video or audio device, such as a high definition television, any compatible digital or audio component, or a high-speed High-Definition Multimedia Interface (HDMI) device. (7) Security cable slot Attaches an optional security cable to the computer. NOTE: The security cable is designed to act as a deterrent, but it might not prevent the computer from being mishandled or stolen. 4 Chapter 2 Getting to know your computer
-
 1
1 -
2
-
3
-
4
-
5
-
6
-
7
-
8
-
 9
9 -
 10
10 -
 11
11 -
 12
12 -
 13
13 -
 14
14 -
 15
15 -
 16
16 -
 17
17 -
 18
18 -
 19
19 -
20
-
21
-
22
-
23
-
24
-
25
-
26
-
27
-
28
-
29
-
30
-
31
-
32
-
33
-
34
-
35
-
36
-
37
-
38
-
39
-
40
-
41
-
42
-
43
-
44
-
45
-
46
-
47
-
48
-
49
-
50
-
51
-
52
-
53
-
54
-
55
-
56
-
57
-
58
-
59
-
60
-
61
-
62
-
63
-
64
-
65
-
66
-
67
-
68
-
69
-
70
-
71
-
72
-
73
-
74
-
75
-
76
-
77
-
78
-
79
-
80
-
81
 |
 |
