HP Pavilion TouchSmart 11-e040ca HP Pavilion TouchSmart 11 Notebook PC - Maint - Page 38
hard drive., that secure the hard drive bracket to
 |
View all HP Pavilion TouchSmart 11-e040ca manuals
Add to My Manuals
Save this manual to your list of manuals |
Page 38 highlights
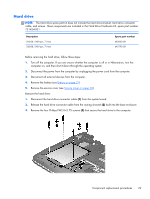
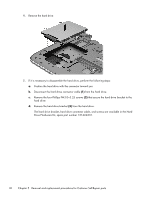
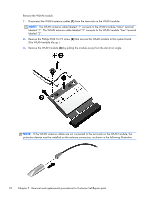
4. Remove the hard drive. 5. If it is necessary to disassemble the hard drive, perform the following steps: a. Position the hard drive with the connector toward you. b. Disconnect the hard drive connector cable (1) from the hard drive. c. Remove the four Phillips PM3.0×3.25 screws (2) that secure the hard drive bracket to the hard drive. d. Remove the hard drive bracket (3) from the hard drive. The hard drive bracket, hard drive connector cable, and screws are available in the Hard Drive Hardware Kit, spare part number 731424-001. 30 Chapter 5 Removal and replacement procedures for Customer Self-Repair parts
-
 1
1 -
2
-
3
-
4
-
5
-
6
-
7
-
8
-
9
-
10
-
11
-
12
-
13
-
14
-
15
-
16
-
17
-
18
-
19
-
20
-
21
-
22
-
23
-
24
-
25
-
26
-
27
-
28
-
29
-
30
-
31
-
32
-
 33
33 -
 34
34 -
 35
35 -
 36
36 -
 37
37 -
 38
38 -
 39
39 -
 40
40 -
 41
41 -
 42
42 -
 43
43 -
44
-
45
-
46
-
47
-
48
-
49
-
50
-
51
-
52
-
53
-
54
-
55
-
56
-
57
-
58
-
59
-
60
-
61
-
62
-
63
-
64
-
65
-
66
-
67
-
68
-
69
-
70
-
71
-
72
-
73
-
74
-
75
-
76
-
77
-
78
-
79
-
80
-
81
-
82
-
83
-
84
-
85
 |
 |

4.
Remove the hard drive.
5.
If it is necessary to disassemble the hard drive, perform the following steps:
a.
Position the hard drive with the connector toward you.
b.
Disconnect the hard drive connector cable
(1)
from the hard drive.
c.
Remove the four Phillips PM3.0×3.25 screws
(2)
that secure the hard drive bracket to the
hard drive.
d.
Remove the hard drive bracket
(3)
from the hard drive.
The hard drive bracket, hard drive connector cable, and screws are available in the Hard
Drive Hardware Kit, spare part number 731424-001.
30
Chapter 5
Removal and replacement procedures for Customer Self-Repair parts