HP Pavilion TouchSmart 15-n300 Maintenance and Service Guide - Page 57
and pull the bezel, Reverse this procedure to reassemble and install the optical drive.
 |
View all HP Pavilion TouchSmart 15-n300 manuals
Add to My Manuals
Save this manual to your list of manuals |
Page 57 highlights
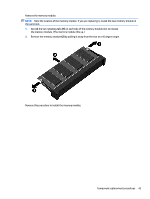
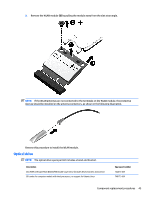
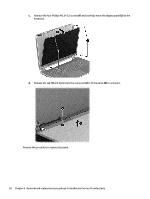
2. Use an unbent paperclip and press in gently on the paper clip (1) and release from the tab (2) until the disc tray releases. Tilt the tray (3) and pull the bezel (4) to remove it. Reverse this procedure to reassemble and install the optical drive. Component replacement procedures 47
-
 1
1 -
2
-
3
-
4
-
5
-
6
-
7
-
8
-
9
-
10
-
11
-
12
-
13
-
14
-
15
-
16
-
17
-
18
-
19
-
20
-
21
-
22
-
23
-
24
-
25
-
26
-
27
-
28
-
29
-
30
-
31
-
32
-
33
-
34
-
35
-
36
-
37
-
38
-
39
-
40
-
41
-
42
-
43
-
44
-
45
-
46
-
47
-
48
-
49
-
50
-
51
-
 52
52 -
 53
53 -
 54
54 -
 55
55 -
 56
56 -
 57
57 -
 58
58 -
 59
59 -
 60
60 -
 61
61 -
 62
62 -
63
-
64
-
65
-
66
-
67
-
68
-
69
-
70
-
71
-
72
-
73
-
74
-
75
-
76
-
77
-
78
-
79
-
80
-
81
-
82
-
83
-
84
-
85
-
86
-
87
-
88
-
89
-
90
-
91
-
92
-
93
-
94
-
95
-
96
-
97
-
98
-
99
-
100
-
101
-
102
-
103
-
104
-
105
-
106
-
107
-
108
-
109
-
110
-
111
-
112
-
113
-
114
-
115
-
116
-
117
-
118
-
119
-
120
-
121
-
122
-
123
-
124
 |
 |

2.
Use an unbent paperclip and press in gently on the paper clip
(1)
and release from the tab
(2)
until the
disc tray releases. Tilt the tray
(3)
and pull the bezel
(4)
to remove it.
Reverse this procedure to reassemble and install the optical drive.
Component replacement procedures
47