HP Pavilion dm4-3000 User Guide HP Notebook - Windows 7 - Page 31
Connecting to an existing WLAN, Setting up a new WLAN network, Connect, Open Network and Sharing
 |
View all HP Pavilion dm4-3000 manuals
Add to My Manuals
Save this manual to your list of manuals |
Page 31 highlights
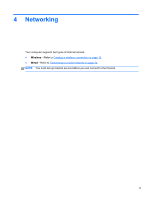
Connecting to an existing WLAN To connect to an existing WLAN: 1. Be sure that the WLAN device is on. (Refer to Turning wireless devices on or off on page 20.) 2. Click the network icon in the notification area, at the far right of the taskbar. 3. Select your WLAN from the list. 4. Click Connect. If the network is a security-enabled WLAN, you are prompted to enter a network security code. Type the code, and then click OK to complete the connection. NOTE: If no WLANs are listed, you are out of range of a wireless router or access point. NOTE: If you do not see the WLAN you want to connect to, click Open Network and Sharing Center, and then click Set up a new connection or network. A list of options is displayed. You can choose to manually search for and connect to a network or to create a new network connection. After the connection is made, you can place the mouse pointer over the network icon in the notification area, at the far right of the taskbar, to verify the name and status of the connection. NOTE: The functional range (how far your wireless signals travel) depends on WLAN implementation, router manufacturer, and interference from other electronic devices or structural barriers such as walls and floors. Setting up a new WLAN network Required equipment: ● A broadband modem (either DSL or cable) (1) and high-speed Internet service purchased from an Internet service provider (ISP) ● A wireless router (purchased separately) (2) ● Your new wireless computer (3) NOTE: Some modems have a built-in wireless router. Check with your ISP to determine what type of modem you have. The illustration shows an example of a completed WLAN network installation that is connected to the Internet. As your network grows, additional wireless and wired computers can be connected to the network to access the Internet. Using a WLAN 21
-
 1
1 -
2
-
3
-
4
-
5
-
6
-
7
-
8
-
9
-
10
-
11
-
12
-
13
-
14
-
15
-
16
-
17
-
18
-
19
-
20
-
21
-
22
-
23
-
24
-
25
-
 26
26 -
 27
27 -
 28
28 -
 29
29 -
 30
30 -
 31
31 -
 32
32 -
 33
33 -
 34
34 -
 35
35 -
 36
36 -
37
-
38
-
39
-
40
-
41
-
42
-
43
-
44
-
45
-
46
-
47
-
48
-
49
-
50
-
51
-
52
-
53
-
54
-
55
-
56
-
57
-
58
-
59
-
60
-
61
-
62
-
63
-
64
-
65
-
66
-
67
-
68
-
69
-
70
-
71
-
72
-
73
-
74
-
75
-
76
-
77
-
78
-
79
-
80
-
81
-
82
-
83
-
84
-
85
-
86
-
87
-
88
-
89
-
90
-
91
-
92
-
93
-
94
-
95
-
96
-
97
-
98
-
99
-
100
-
101
-
102
-
103
-
104
-
105
-
106
-
107
-
108
-
109
-
110
-
111
-
112
-
113
-
114
-
115
-
116
-
117
-
118
-
119
-
120
-
121
 |
 |