HP Pavilion zt1200 HP Pavilion zt1000/xz300 and Omnibook xt1500 Series Noteboo - Page 32
Using the BIOS Configuration Utility
 |
View all HP Pavilion zt1200 manuals
Add to My Manuals
Save this manual to your list of manuals |
Page 32 highlights
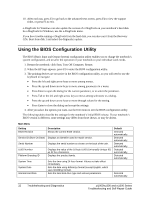
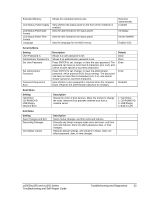
10. After each run, press F2 to go back to the advanced tests screen, press F4 to view the support ticket, or press F3 to exit. e-DiagTools for Windows can also update the version of e-DiagTools on your notebook's hard disk. In e-DiagTools for Windows, use the e-DiagTools menu. If you have trouble running e-DiagTools from the hard disk, you can also run it from the Recovery CDs. Boot from disk 1 and select the diagnostics option. Using the BIOS Configuration Utility The BIOS (Basic Input and Output System) configuration utility enables you to change the notebook's system configuration, and to tailor the operation of your notebook to your individual work needs. 1. Restart the notebook: click Start, Turn Off Computer, Restart. 2. When the HP logo appears, press F2 to enter the BIOS configuration utility. 3. The pointing devices are not active in the BIOS configuration utility, so you will need to use the keyboard to navigate: • Press the left and right arrow keys to move among menus. • Press the up and down arrow keys to move among parameters in a menu. • Press Enter to open the dialog for the current parameter, or to select the parameter. • Press Tab or the left and right arrow keys to move among selections in a dialog. • Press the up and down arrow keys to move through values for the setting. • Press Enter to close the dialog and accept the settings. 4. After you select the options you want, use the Exit menu to exit the BIOS configuration utility. The following tables describe the settings for the notebook's initial BIOS release. If your notebook's BIOS version is different, some settings may differ from those shown, or may be absent. Main Menu Setting BIOS Revision Service ID (Born On Date) Serial Number UUID Number Platform Branding ID System Time System Date Internal Hard Disk Description Shows the current BIOS version. Displays an identifier used for repair service. Displays the serial number as shown on the back of the unit. Displays the value of the 16-byte UUID (Universally Unique ID) as 32 hex characters. Displays the product family. Sets the time using 24-hour format. Values set take effect immediately. Sets the date using dd/mm/yy format (except English, which uses mm/dd/yy format). Sets the hard disk drive type and various parameters. Default Detected automatically. Detected automatically. Detected automatically. Detected automatically. Detected automatically. Detected automatically. 32 Troubleshooting and Diagnostics zt1000/xz300 and xt1500 Series Troubleshooting and Self-Repair Guide
-
 1
1 -
2
-
3
-
4
-
5
-
6
-
7
-
8
-
9
-
10
-
11
-
12
-
13
-
14
-
15
-
16
-
17
-
18
-
19
-
20
-
21
-
22
-
23
-
24
-
25
-
26
-
 27
27 -
 28
28 -
 29
29 -
 30
30 -
 31
31 -
 32
32 -
 33
33 -
 34
34 -
 35
35 -
 36
36 -
 37
37 -
38
-
39
-
40
-
41
-
42
-
43
-
44
-
45
-
46
-
47
-
48
-
49
-
50
-
51
-
52
-
53
-
54
-
55
-
56
 |
 |