HP Pavilion zt1200 HP Pavilion zt1000/xz300 and Omnibook xt1500 Series Noteboo - Page 40
Removing the Hard Disk Drive
 |
View all HP Pavilion zt1200 manuals
Add to My Manuals
Save this manual to your list of manuals |
Page 40 highlights
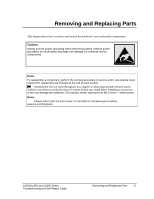
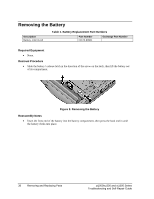
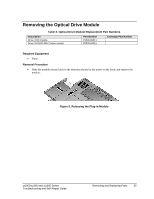
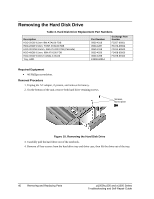
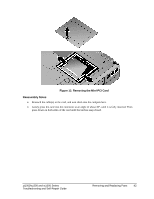
Removing the Hard Disk Drive Table 3. Hard Disk Drive Replacement Part Numbers Description HDD-20GB 9.5mm IBM ATA100 FDB HDD-20GB 9.5mm, TOSH ATA100 FDB HDD-30.0GB 9.5mm, IBM ATA100 FDB (Cascade) HDD-40GB 9.5mm, IBM ATA100 FDB HDD-40GB 9.5mm,Toshiba ATA100 Tray, HDD Part Number 0950-4318 0950-4287 0950-4319 0950-4320 0950-4288 F3398-60914 Exchange Part Number F3257-69501 F3476-69002 F3414-69500 F3428-69500 F3378-69102 Required Equipment • #0 Phillips screwdriver. Removal Procedure 1. Unplug the AC adapter, if present, and remove the battery. 2. On the bottom of the unit, remove both hard drive retaining screws. Screws, M2.5×4mm Figure 10. Removing the Hard Disk Drive 3. Carefully pull the hard drive out of the notebook. 4. Remove all four screws from the hard drive tray and drive case, then lift the drive out of the tray. 40 Removing and Replacing Parts zt1000/xz300 and xt1500 Series Troubleshooting and Self-Repair Guide
-
 1
1 -
2
-
3
-
4
-
5
-
6
-
7
-
8
-
9
-
10
-
11
-
12
-
13
-
14
-
15
-
16
-
17
-
18
-
19
-
20
-
21
-
22
-
23
-
24
-
25
-
26
-
27
-
28
-
29
-
30
-
31
-
32
-
33
-
34
-
 35
35 -
 36
36 -
 37
37 -
 38
38 -
 39
39 -
 40
40 -
 41
41 -
 42
42 -
 43
43 -
 44
44 -
 45
45 -
46
-
47
-
48
-
49
-
50
-
51
-
52
-
53
-
54
-
55
-
56
 |
 |