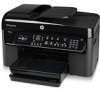
HP Photosmart Premium Fax e-All-in-One Printer - C410 User Guide - Page 13
Wireless Network Properties Connection, Wireless Setup Wizard
 |
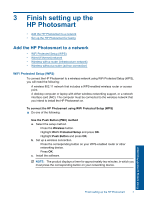
View all HP Photosmart Premium Fax e-All-in-One Printer - C410 manuals
Add to My Manuals
Save this manual to your list of manuals |
Page 13 highlights
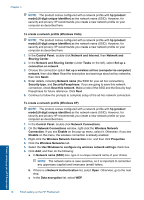
d. Make sure that the check box is not selected next to The key is provided for me automatically. If it is selected, click the check box to clear it. e. In the Network key box, type a WEP key that has exactly 5 or exactly 13 alphanumeric (ASCII) characters. For example, if you enter 5 characters, you might enter ABCDE or 12345. Or, if you enter 13 characters, you might enter ABCDEF1234567. (12345 and ABCDE are examples only. Select a combination of your choosing.) Alternatively, you can use HEX (hexadecimal) characters for the WEP key. A HEX WEP key must be 10 characters for 40 bit encryption, or 26 characters for 128 bit encryption. f. In the Confirm network key box, type the same WEP key you typed in the previous step. NOTE: You must remember the exact uppercase (capital) and lowercase (small) letters. If you enter your WEP key incorrectly on the product, the wireless connection will fail. g. Write down the WEP key exactly as you typed it, including uppercase and lowercase letters. h. Select the check box for This is a computer-to-computer (ad hoc) network; wireless access points are not used. i. Click OK to close the Wireless network properties window, and then click OK again. j. Click OK again to close the Wireless Network Properties Connection window. Using the LAN card configuration program, create a network profile that has the following values: • Network name (SSID): Mynetwork (example only) NOTE: You should create a network name that is unique and easy for you to remember. Just remember that the network name is case-sensitive. Therefore, you must remember which letters are uppercase and lowercase. • Communication mode: ad hoc • Encryption: enabled To connect to a wireless ad hoc network 1. Press the Wireless button. 2. Press the down arrow button to highlight Wireless Setup Wizard, and then press OK. This runs the Wireless Setup Wizard. The setup wizard searches for available networks, and then displays a list of detected network names (SSIDs). The infrastructure networks appear first in the list, followed by available ad hoc networks. The networks with the strongest signal appear first, the weakest appear last. 3. On the display, look for the network name you created on your computer (for example, Mynetwork). Finish setting up the HP Photosmart Add the HP Photosmart to a network 11
-
 1
1 -
2
-
3
-
4
-
5
-
6
-
7
-
 8
8 -
 9
9 -
 10
10 -
 11
11 -
 12
12 -
 13
13 -
 14
14 -
 15
15 -
 16
16 -
 17
17 -
 18
18 -
19
-
20
-
21
-
22
-
23
-
24
-
25
-
26
-
27
-
28
-
29
-
30
-
31
-
32
-
33
-
34
-
35
-
36
-
37
-
38
-
39
-
40
-
41
-
42
-
43
-
44
-
45
-
46
-
47
-
48
-
49
-
50
-
51
-
52
-
53
-
54
-
55
-
56
-
57
-
58
-
59
-
60
-
61
-
62
-
63
-
64
-
65
-
66
-
67
-
68
-
69
-
70
-
71
-
72
-
73
-
74
-
75
-
76
-
77
-
78
-
79
-
80
-
81
-
82
-
83
-
84
-
85
-
86
-
87
-
88
-
89
-
90
-
91
-
92
-
93
-
94
-
95
-
96
-
97
-
98
-
99
-
100
-
101
-
102
-
103
-
104
-
105
-
106
-
107
-
108
-
109
-
110
-
111
-
112
-
113
-
114
-
115
-
116
-
117
-
118
-
119
-
120
-
121
-
122
-
123
-
124
-
125
-
126
-
127
-
128
-
129
-
130
-
131
-
132
-
133
-
134
-
135
-
136
-
137
-
138
-
139
-
140
-
141
-
142
-
143
-
144
-
145
-
146
-
147
-
148
-
149
-
150
-
151
-
152
-
153
-
154
-
155
-
156
-
157
-
158
-
159
-
160
-
161
-
162
-
163
-
164
-
165
-
166
-
167
-
168
-
169
-
170
-
171
-
172
-
173
-
174
-
175
-
176
-
177
-
178
-
179
-
180
-
181
-
182
-
183
-
184
-
185
-
186
-
187
-
188
-
189
-
190
-
191
-
192
-
193
-
194
-
195
-
196
-
197
-
198
-
199
-
200
-
201
-
202
-
203
-
204
-
205
-
206
-
207
-
208
-
209
-
210
-
211
-
212
-
213
-
214
-
215
-
216
-
217
-
218
-
219
-
220
-
221
-
222
-
223
-
224
-
225
-
226
-
227
-
228
-
229
-
230
-
231
-
232
-
233
-
234
-
235
-
236
-
237
-
238
-
239
-
240
-
241
-
242
-
243
-
244
-
245
-
246
-
247
-
248
-
249
-
250
-
251
-
252
-
253
-
254
-
255
-
256
-
257
-
258
-
259
-
260
-
261
-
262
-
263
-
264
 |
 |