HP ProLiant BL620c OneCommand Manager Application User Manual (P004343-01A Ver - Page 154
Running a Power On Self Test (POST), Using Beaconing, Creating Diagnostic Dumps
 |
View all HP ProLiant BL620c manuals
Add to My Manuals
Save this manual to your list of manuals |
Page 154 highlights
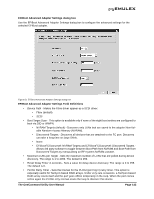
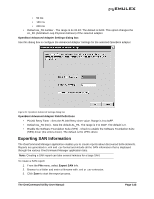
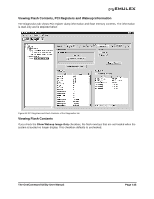
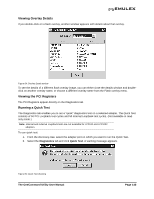
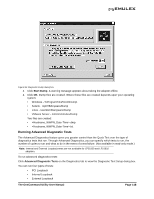
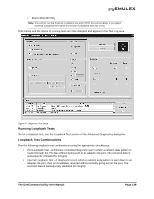
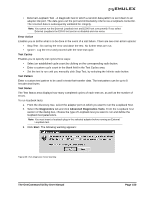
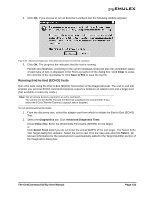
3. Click OK to run the test. The Quick Diagnostic Test window appears displaying the PCI Loopback and Internal Loopback test results. Running a Power On Self Test (POST) The POST is a firmware test normally performed on an adapter after a reset or restart. The POST does not require any configuration to run. (Not available in read-only mode.) To run the POST: 1. From the discovery-tree, select the adapter port on which you want to run the POST. 2. Select the Diagnostics tab and click Power-on Self Test (POST). A warning dialog box appears. 3. Click OK. A POST window appears displaying POST information. Using Beaconing The beaconing feature enables you to force a specific adapter's LEDs to blink in a particular sequence. The blinking pattern acts as a beacon, making it easier to locate a specific adapter among racks of other adapters. (Not available in read-only mode.) When you enable beaconing, the two LEDs blink rapidly in unison for 24 seconds, after which the LEDs report the adapter health status for 8 seconds. When the 8 seconds are up, the adapter returns to beaconing mode. This cycle repeats indefinitely until you disable this feature or you reset the adapter. Note: The beaconing buttons are disabled if the selected adapter does not support beaconing. To enable or disable beaconing: 1. From the discovery-tree, select the adapter port whose LEDs you want to set. 2. Select the Diagnostics tab and click Beacon On or Beacon Off. Creating Diagnostic Dumps The diagnostic dump feature enables you to create a "dump" file for a selected adapter. Dump files contain various information such as firmware version, driver version and so on, that is particularly useful when troubleshooting an adapter. (Not available in read-only mode.) Caution: Disruption of service can occur if a diagnostic dump is run during I/O activity. To start a diagnostic dump: 1. From the discovery-tree, select an adapter port whose diagnostic information you want to dump. 2. Select the Diagnostics tab and click Diagnostic Dump. The Diagnostic Dump dialog box appears. You can specify how many files you want to save using the Files Retained counter. Click Delete Existing Dump Files if you want to remove existing dump files from your system. The OneCommand Utility User Manual Page 147
-
 1
1 -
2
-
3
-
4
-
5
-
6
-
7
-
8
-
9
-
10
-
11
-
12
-
13
-
14
-
15
-
16
-
17
-
18
-
19
-
20
-
21
-
22
-
23
-
24
-
25
-
26
-
27
-
28
-
29
-
30
-
31
-
32
-
33
-
34
-
35
-
36
-
37
-
38
-
39
-
40
-
41
-
42
-
43
-
44
-
45
-
46
-
47
-
48
-
49
-
50
-
51
-
52
-
53
-
54
-
55
-
56
-
57
-
58
-
59
-
60
-
61
-
62
-
63
-
64
-
65
-
66
-
67
-
68
-
69
-
70
-
71
-
72
-
73
-
74
-
75
-
76
-
77
-
78
-
79
-
80
-
81
-
82
-
83
-
84
-
85
-
86
-
87
-
88
-
89
-
90
-
91
-
92
-
93
-
94
-
95
-
96
-
97
-
98
-
99
-
100
-
101
-
102
-
103
-
104
-
105
-
106
-
107
-
108
-
109
-
110
-
111
-
112
-
113
-
114
-
115
-
116
-
117
-
118
-
119
-
120
-
121
-
122
-
123
-
124
-
125
-
126
-
127
-
128
-
129
-
130
-
131
-
132
-
133
-
134
-
135
-
136
-
137
-
138
-
139
-
140
-
141
-
142
-
143
-
144
-
145
-
146
-
147
-
148
-
 149
149 -
 150
150 -
 151
151 -
 152
152 -
 153
153 -
 154
154 -
 155
155 -
 156
156 -
 157
157 -
 158
158 -
 159
159 -
160
-
161
-
162
-
163
-
164
-
165
-
166
-
167
-
168
-
169
-
170
-
171
-
172
-
173
-
174
-
175
-
176
-
177
-
178
-
179
-
180
-
181
-
182
-
183
-
184
-
185
-
186
-
187
-
188
-
189
-
190
-
191
-
192
-
193
-
194
-
195
-
196
-
197
-
198
-
199
-
200
-
201
-
202
-
203
-
204
-
205
-
206
-
207
-
208
-
209
-
210
-
211
-
212
-
213
-
214
-
215
-
216
-
217
-
218
-
219
-
220
-
221
-
222
-
223
 |
 |