HP ProLiant DL380p HP ProLiant DL380p Gen8 Server User Guide - Page 53
Hot-plug hard drive options, Installing a hot-plug SAS or SATA hard drive
 |
View all HP ProLiant DL380p manuals
Add to My Manuals
Save this manual to your list of manuals |
Page 53 highlights
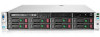
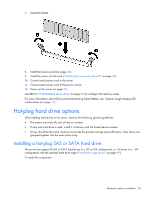
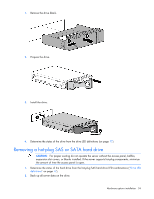
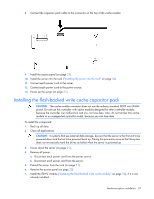
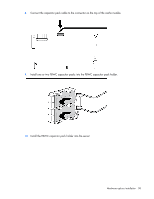
7. Install the DIMM. 8. Install the access panel (on page 23). 9. Install the server into the rack ("Installing the server into the rack" on page 36). 10. Connect each power cord to the server. 11. Connect each power cord to the power source. 12. Power up the server (on page 21). Use RBSU ("HP ROM-Based Setup Utility" on page 95) to configure the memory mode. For more information about LEDs and troubleshooting failed DIMMs, see "Systems Insight Display LED combinations (on page 11)." Hot-plug hard drive options When adding hard drives to the server, observe the following general guidelines: • The system automatically sets all device numbers. • If only one hard drive is used, install it in the bay with the lowest device number. • Drives should be the same capacity to provide the greatest storage space efficiency when drives are grouped together into the same drive array. Installing a hot-plug SAS or SATA hard drive The server can support 8 SAS or SATA hard drives in a SFF or LFF configuration, or 16 drives in a SFF configuration with the optional hard drive cage ("Hard drive cage option" on page 69). To install the component: Hardware options installation 53
-
 1
1 -
2
-
3
-
4
-
5
-
6
-
7
-
8
-
9
-
10
-
11
-
12
-
13
-
14
-
15
-
16
-
17
-
18
-
19
-
20
-
21
-
22
-
23
-
24
-
25
-
26
-
27
-
28
-
29
-
30
-
31
-
32
-
33
-
34
-
35
-
36
-
37
-
38
-
39
-
40
-
41
-
42
-
43
-
44
-
45
-
46
-
47
-
 48
48 -
 49
49 -
 50
50 -
 51
51 -
 52
52 -
 53
53 -
 54
54 -
 55
55 -
 56
56 -
 57
57 -
 58
58 -
59
-
60
-
61
-
62
-
63
-
64
-
65
-
66
-
67
-
68
-
69
-
70
-
71
-
72
-
73
-
74
-
75
-
76
-
77
-
78
-
79
-
80
-
81
-
82
-
83
-
84
-
85
-
86
-
87
-
88
-
89
-
90
-
91
-
92
-
93
-
94
-
95
-
96
-
97
-
98
-
99
-
100
-
101
-
102
-
103
-
104
-
105
-
106
-
107
-
108
-
109
-
110
-
111
-
112
-
113
-
114
-
115
-
116
-
117
-
118
-
119
-
120
-
121
-
122
-
123
-
124
-
125
-
126
-
127
-
128
 |
 |
