HP Scitex FB10000 Geffen TS Error 67022 - Page 7
Step -by-step Rising Media Flap calibration procedure, UV
 |
View all HP Scitex FB10000 manuals
Add to My Manuals
Save this manual to your list of manuals |
Page 7 highlights
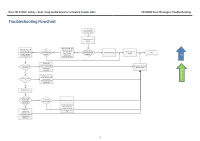
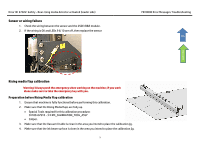
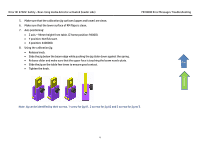
Error ID: 67022: Safety - Rear rising media detector activated (loader side) Step -by-step Rising Media Flap calibration procedure RM RM 95mm Calibration jig FB10000 Error Messages Troubleshooting 2 Top Flowchart UV LOADER SIDE 1 1. Place the first jig on the table (see paragraph 8) at the operator side below the beam edge (the beam near the UV). If the vacuum knife is on its way, move it to the middle. 2. Place the second jig (see paragraph 8) on the table at the in rear side below the beam edge (the beam near the UV). 3. Send the Z axis to 100 mm height. (Optional, do it only if you cannot pull out the jig). 4. Remove the jigs from table while drawing a sign using a marker at the spot where the the jig is placed. 5. Use a caliper to measure the jigs height and write it down. 6. Calculate the average of the 2 heights and write it down (to be used to calibrate the RM in the middle) 7
-
 1
1 -
 2
2 -
 3
3 -
 4
4 -
 5
5 -
 6
6 -
 7
7 -
 8
8 -
 9
9
 |
 |
