HP Scitex FB700 HP Scitex FB500 and FB700 Printer Series - User Guide - Page 15
Con and load media, Con media, Media Wizard - reviews
 |
View all HP Scitex FB700 manuals
Add to My Manuals
Save this manual to your list of manuals |
Page 15 highlights
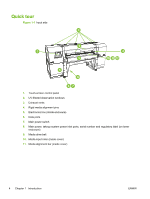
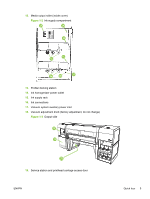
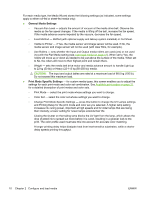
2 Configure and load media Configure media Before the printer will accept a print job, it must be configured for a specific media type. The currentlyconfigured media type, if any, is displayed on the Home page of the control panel. 1. If the control panel displays the media type you intend to load, press Load and go to Load rigid media on page 12. Otherwise, continue to the next step. 2. In the Activity Tray on the control panel, press the Media icon. The Media screen appears. See Use the control panel on page 29 for a complete description of the control panel screens and options. 3. Press Configure. The Select Media to Load menu appears. 4. Press a media name, or Create Media Type. The list of media types ends with the option Create Media Type (page down to the end of the list by pressing the page down button). ● If you press a media name, a list of settings appears for you to review. See Media Wizard on page 9 for a description of the settings. ● If you press Create Media Type, the control panel prompts you to select a standard media type to use as a starting point for the new media type settings. After you select a standard media type, the control panel prompts you for a name for the new media type, then a list of settings appears for you to review and change if necessary.Media Wizard on page 9 for a description of the settings. TIP: Start by using one of the standard media types. If you are not using a standard media type, select the standard media type that most closely matches the media you are using. Then only if necessary, create a new media type using the standard type you selected as a starting point, and adjust it as needed. 5. Review and change (for previously-created custom media types only) the media settings as needed. 6. Press Out or Proceed once or twice until the printer displays the prompt "Load media now?" 7. Press No to save your configuration and cancel the load process, or press Yes and proceed to Load rigid media on page 12 or Load roll-fed media on page 15. NOTE: When you create a custom media type on the printer, in order to print on the new media type, you must also add the new media type using Media Manager for the Onyx RIP, or EasyMedia for the Caldera RIP. Refer to the documentation for your RIP for instructions. Media Wizard To view or delete settings for an existing media type, press Media Wizard. The Media Wizard also lets you create a media type without configuring it as the currently-loaded media. ENWW Configure media 9
-
 1
1 -
2
-
3
-
4
-
5
-
6
-
7
-
8
-
9
-
 10
10 -
 11
11 -
 12
12 -
 13
13 -
 14
14 -
 15
15 -
 16
16 -
 17
17 -
 18
18 -
 19
19 -
 20
20 -
21
-
22
-
23
-
24
-
25
-
26
-
27
-
28
-
29
-
30
-
31
-
32
-
33
-
34
-
35
-
36
-
37
-
38
-
39
-
40
-
41
-
42
-
43
-
44
-
45
-
46
-
47
-
48
-
49
-
50
-
51
-
52
-
53
-
54
-
55
-
56
-
57
-
58
-
59
-
60
-
61
-
62
-
63
-
64
-
65
-
66
-
67
-
68
-
69
-
70
-
71
-
72
-
73
-
74
-
75
-
76
-
77
-
78
-
79
-
80
-
81
-
82
-
83
-
84
-
85
-
86
-
87
-
88
-
89
-
90
-
91
-
92
-
93
-
94
-
95
-
96
-
97
-
98
-
99
-
100
-
101
-
102
 |
 |
