HP Scitex FB700 HP Scitex FB500 and FB700 Printer Series - User Guide - Page 87
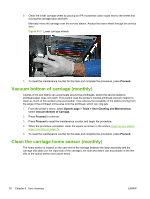
Drain waste from service station (quarterly), Clean the media thickness sensor roller (quarterly)
 |
View all HP Scitex FB700 manuals
Add to My Manuals
Save this manual to your list of manuals |
Page 87 highlights
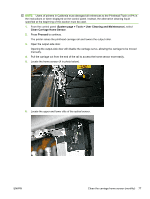
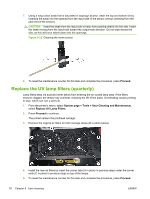
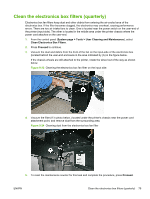
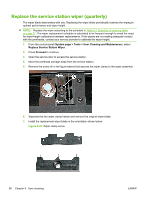
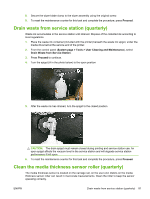
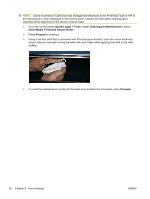
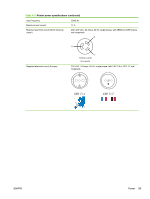
8. Secure the wiper blade clamp to the wiper assembly using the original screw. 9. To reset the maintenance counter for this task and complete the procedure, press Proceed. Drain waste from service station (quarterly) Waste ink accumulates in the service station until drained. Dispose of the collected ink according to local regulations. 1. Place the waste ink container (included with the printer) beneath the waste ink spigot, under the media drive belt at the service end of the printer. 2. From the control panel (System page > Tools > User Cleaning and Maintenance), select Drain Waste from Service Station. 3. Press Proceed to continue. 4. Turn the spigot (A in the photo below) to the open position 5. After the waste ink has drained, turn the spigot to the closed position CAUTION: The drain spigot must remain closed during printing and service station use. An open spigot affects the vacuum level in the service station and will degrade service station performance if left open. 6. To reset the maintenance counter for this task and complete the procedure, press Proceed. Clean the media thickness sensor roller (quarterly) The media thickness sensor is located on the carriage rail, on the user end. Debris on the media thickness sensor roller can result in inaccurate measurements. Clean the roller to keep the sensor operating correctly. ENWW Drain waste from service station (quarterly) 81
-
 1
1 -
2
-
3
-
4
-
5
-
6
-
7
-
8
-
9
-
10
-
11
-
12
-
13
-
14
-
15
-
16
-
17
-
18
-
19
-
20
-
21
-
22
-
23
-
24
-
25
-
26
-
27
-
28
-
29
-
30
-
31
-
32
-
33
-
34
-
35
-
36
-
37
-
38
-
39
-
40
-
41
-
42
-
43
-
44
-
45
-
46
-
47
-
48
-
49
-
50
-
51
-
52
-
53
-
54
-
55
-
56
-
57
-
58
-
59
-
60
-
61
-
62
-
63
-
64
-
65
-
66
-
67
-
68
-
69
-
70
-
71
-
72
-
73
-
74
-
75
-
76
-
77
-
78
-
79
-
80
-
81
-
 82
82 -
 83
83 -
 84
84 -
 85
85 -
 86
86 -
 87
87 -
 88
88 -
 89
89 -
 90
90 -
 91
91 -
 92
92 -
93
-
94
-
95
-
96
-
97
-
98
-
99
-
100
-
101
-
102
 |
 |
