HP Scitex FB700 HP Scitex FB500 and FB700 Printer Series - User Guide - Page 56
Manual Jet Mapping, Proceed, Cancel, Calibrate, Manual Calibrations
 |
View all HP Scitex FB700 manuals
Add to My Manuals
Save this manual to your list of manuals |
Page 56 highlights
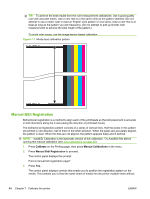
The control panel asks whether you want to print a manual head-to-head calibration page. ● If you need to print a new calibration pattern, press Proceed. The printer prints a calibration page. When the calibration page has printed, the control panel displays this prompt: Take readings from left side of pattern. ● If you have a calibration pattern from a recent print, you can use it to calibrate the heads. Press Cancel and go to the next step. (For best results, do not use a previously-printed pattern, print a new pattern.) 3. Press Proceed.. The control panel displays this message: X Direction Registration Head 2: +0 4. Examine the X direction pattern (in the left-hand group of patterns) for the current head, and determine which pattern of colored and black lines are the closest to perfectly aligned. Use a printer's loupe or magnifying glass (10x magnification or higher) if the patterns are difficult to see. 5. Press the ▲ or ▼ control panel keys repeatedly until the number next to the pattern that is closest to aligned perfectly is displayed. For example, if pattern -1 is the closest aligned, press the ▼ button to change the display to: X Direction Registration Head 2: -1 If a printhead is extremely out of alignment, there may be no pattern in alignment. Since the black vertical bars are five pixels apart, you can add +5 or -5 to a pattern number to shift the colored bars up or down by one black bar. Alternatively, you can repeatedly perform the X calibration, which will move the head in smaller increments, until the head is aligned. 6. Press Proceed. The control panel message increments the head number by one. 7. Repeat steps 4 through 6 for each of the heads. When you have entered registration values for all of the patterns, the control panel displays this message: Registration successful. Manual Jet Mapping Jets that are missing or misfiring are usually detected by the AutoJet calibration. Alternatively, you can map out jets manually using the Manual Jet Mapping function. You may want to manually map weak or misdirected jets that AutoJet does not substitute. TIP: AutoJet is the automatic version of this calibration (see AutoJet on page 45). TIP: For best results, print the prime bars and purge the printheads as necessary to ensure the maximum number of working jets. See Ink page on page 35 for instructions. 1. Press Calibrate from the Printing page, then press Manual Calibrations in the menu. 2. Press Manual Jet Mapping in the menu. The control panel displays this message: 50 Chapter 7 Calibrate the printer ENWW
-
 1
1 -
2
-
3
-
4
-
5
-
6
-
7
-
8
-
9
-
10
-
11
-
12
-
13
-
14
-
15
-
16
-
17
-
18
-
19
-
20
-
21
-
22
-
23
-
24
-
25
-
26
-
27
-
28
-
29
-
30
-
31
-
32
-
33
-
34
-
35
-
36
-
37
-
38
-
39
-
40
-
41
-
42
-
43
-
44
-
45
-
46
-
47
-
48
-
49
-
50
-
 51
51 -
 52
52 -
 53
53 -
 54
54 -
 55
55 -
 56
56 -
 57
57 -
 58
58 -
 59
59 -
 60
60 -
 61
61 -
62
-
63
-
64
-
65
-
66
-
67
-
68
-
69
-
70
-
71
-
72
-
73
-
74
-
75
-
76
-
77
-
78
-
79
-
80
-
81
-
82
-
83
-
84
-
85
-
86
-
87
-
88
-
89
-
90
-
91
-
92
-
93
-
94
-
95
-
96
-
97
-
98
-
99
-
100
-
101
-
102
 |
 |
