HP Server Console 0x2x16 HP IP Console Switch with Virtual Media User Guide - Page 68
Console switch serial management, Establishing LAN connections
 |
View all HP Server Console 0x2x16 manuals
Add to My Manuals
Save this manual to your list of manuals |
Page 68 highlights
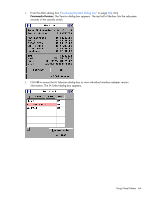
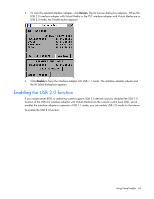
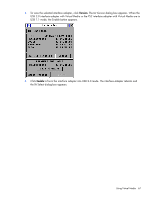
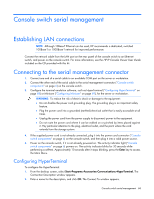
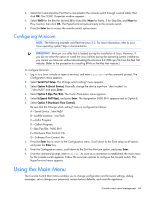
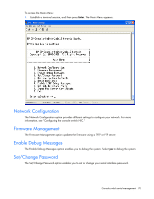
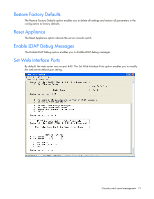
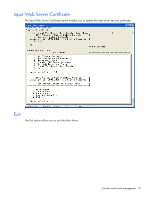
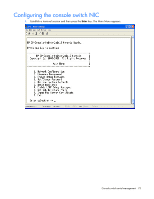
Console switch serial management Establishing LAN connections NOTE: Although 10Base-T Ethernet can be used, HP recommends a dedicated, switched 100Base-T or 1000Base-T network for improved performance. Connect the network cable from the LAN port on the rear panel of the console switch to an Ethernet switch, and power on the console switch. For more information, see the HP IP Console Viewer User Guide included on the CD provided with this kit. Connecting to the serial management connector 1. Connect one end of a serial cable to an available COM port on the server or workstation. 2. Connect the other end of the serial cable to the serial management connector ("Console switch components" on page 6) on the console switch. 3. Configure the terminal emulation software, such as HyperTerminal ("Configuring HyperTerminal" on page 68) or Minicom ("Configuring Minicom" on page 69), for the server or workstation. WARNING: To reduce the risk of electric shock or damage to the equipment: • Do not disable the power cord grounding plug. The grounding plug is an important safety feature. • Plug the power cord into a grounded (earthed) electrical outlet that is easily accessible at all times. • Unplug the power cord from the power supply to disconnect power to the equipment. • Do not route the power cord where it can be walked on or pinched by items placed against it. Pay particular attention to the plug, electrical outlet, and the point where the cord extends from the storage system. 4. If the supplied power cord is not already connected, plug it into the power cord connector ("Console switch components" on page 6) on the console switch, and then plug it into a valid power source. 5. Power on the console switch, if it is not already powered on. The activity indicator light ("Console switch components" on page 6) powers on. The activity indicator blinks for 30 seconds while performing a self-test. Approximately 10 seconds after it stops blinking, press the Enter key to access the Main Menu. Configuring HyperTerminal To configure the HyperTerminal: 1. From the desktop screen, select Start>Programs>Accessories>Communications>HyperTerminal. The Connection Description window appears. 2. Enter a name for the description, and click OK. The Connect To window appears. Console switch serial management 68
-
 1
1 -
2
-
3
-
4
-
5
-
6
-
7
-
8
-
9
-
10
-
11
-
12
-
13
-
14
-
15
-
16
-
17
-
18
-
19
-
20
-
21
-
22
-
23
-
24
-
25
-
26
-
27
-
28
-
29
-
30
-
31
-
32
-
33
-
34
-
35
-
36
-
37
-
38
-
39
-
40
-
41
-
42
-
43
-
44
-
45
-
46
-
47
-
48
-
49
-
50
-
51
-
52
-
53
-
54
-
55
-
56
-
57
-
58
-
59
-
60
-
61
-
62
-
 63
63 -
 64
64 -
 65
65 -
 66
66 -
 67
67 -
 68
68 -
 69
69 -
 70
70 -
 71
71 -
 72
72 -
 73
73 -
74
-
75
-
76
-
77
-
78
-
79
-
80
-
81
-
82
-
83
-
84
-
85
-
86
-
87
-
88
-
89
-
90
-
91
-
92
-
93
-
94
-
95
-
96
-
97
-
98
-
99
-
100
-
101
-
102
-
103
-
104
-
105
 |
 |
