HP T5735 Troubleshooting Guide: HP t5730 and t5735 Thin Client
HP T5735 - Compaq Thin Client Manual
 |
UPC - 883585606238
View all HP T5735 manuals
Add to My Manuals
Save this manual to your list of manuals |
HP T5735 manual content summary:
- HP T5735 | Troubleshooting Guide: HP t5730 and t5735 Thin Client - Page 1
Troubleshooting Guide HP t5730/t5730w and t5735 Thin Client - HP T5735 | Troubleshooting Guide: HP t5730 and t5735 Thin Client - Page 2
. Microsoft and Windows are trademarks of Microsoft Corporation in the U.S. and other countries. The only warranties for HP products and services are set forth written consent of Hewlett-Packard Company. Troubleshooting Guide Thin Client Second Edition (May 2009) Document Part Number: 482313-002 - HP T5735 | Troubleshooting Guide: HP t5730 and t5735 Thin Client - Page 3
About This Book WARNING! Text set off in this manner indicates that failure to follow directions could result in bodily harm or loss of life. CAUTION: Text set off in this manner indicates that failure to follow directions could result in damage to equipment or loss of information. NOTE: Text set - HP T5735 | Troubleshooting Guide: HP t5730 and t5735 Thin Client - Page 4
iv About This Book - HP T5735 | Troubleshooting Guide: HP t5730 and t5735 Thin Client - Page 5
...5 Serial Number Location ...6 Installing the USB Device ...9 Replacing Thin Client HP Quick Release ...13 Supported Mounting Options 15 Non-supported Mounting Option 17 4 BIOS Settings, (F10) Utility Using the BIOS Settings ...18 Changing BIOS Settings from the repset utility 18 Changing BIOS - HP T5735 | Troubleshooting Guide: HP t5730 and t5735 Thin Client - Page 6
Standard CMOS Features 20 Setup Utility-Advanced BIOS Features 20 Setup Utility-Integrated Peripherals 21 Setup Utility-Power Management Setup 22 Setup Utility-Utility Task Actions 22 5 Diagnostics and Troubleshooting LEDs ...23 Power-On Sequence ...24 Power-On Diagnostic Tests ...24 Beep Codes - HP T5735 | Troubleshooting Guide: HP t5730 and t5735 Thin Client - Page 7
Index ...40 vii - HP T5735 | Troubleshooting Guide: HP t5730 and t5735 Thin Client - Page 8
viii - HP T5735 | Troubleshooting Guide: HP t5730 and t5735 Thin Client - Page 9
deployment and management using Altiris Deployment Solution Operating systems The t5730/t5730w thin client models use the Microsoft Windows XP Embedded (XPe) or Windows Embedded Standard (WES) operating system. The t5735 Linux thin client offers an extensible Linux image built upon Debian. Product - HP T5735 | Troubleshooting Guide: HP t5730 and t5735 Thin Client - Page 10
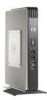
) Top Components (5) Power LED (6) Line-out (headphone) audio connector (7) Universal serial bus (USB) connectors (2) (1) Wireless antenna* (2) Secure USB compartment (3) Cable lock slot *Available on some models. Refer to the model-specific QuickSpecs at http://www.hp.com for details - HP T5735 | Troubleshooting Guide: HP t5730 and t5735 Thin Client - Page 11
Wireless antenna connector* (2) Secure USB compartment ports (2) (3) Cable lock slot *Available on some models. Refer to the model-specific QuickSpecs at http://www.hp.com for details. The wireless antenna allows you to send and receive wireless signals to communicate with wireless local area - HP T5735 | Troubleshooting Guide: HP t5730 and t5735 Thin Client - Page 12
connectors (2) (8) Power connector For more information, see the model-specific QuickSpecs at http://h18004.www1.hp.com/products/quickspecs/ QuickSpecs_Archives/QuickSpecs_Archives.html. Installing the Antenna (Wireless Models) ▲ Screw the antenna in place on top of the thin client. CAUTION: To - HP T5735 | Troubleshooting Guide: HP t5730 and t5735 Thin Client - Page 13
Installing the Rubber Feet To install the rubber feet: 1. Locate the holes in the corners of the left side of the thin client. 2. Remove the feet from their backing. 3. Align the feet with their holes and press them in securely. Installing the Stand To install the stand: 1. Turn - HP T5735 | Troubleshooting Guide: HP t5730 and t5735 Thin Client - Page 14
) toward the front of the unit and lift the stand off the unit (2). Serial Number Location Every thin client includes a unique serial number located as shown in the following illustration. Have this number available when contacting HP customer service for assistance. 6 Chapter 1 Product Description - HP T5735 | Troubleshooting Guide: HP t5730 and t5735 Thin Client - Page 15
Hardware Installation Sequence To ensure the proper installation thin client hardware components: 1. Back up any data, if necessary. 2. If the thin client is powered on: a. Turn the unit and any other attached devices off. b. Disconnect the power cord from the wall outlet. c. Disconnect any external - HP T5735 | Troubleshooting Guide: HP t5730 and t5735 Thin Client - Page 16
any external devices and power cords. 10. Turn on the monitor, the thin client, and any devices you want to test. 11. Load any necessary drivers. NOTE: You can download select hardware drivers from HP at http://www.hp.com/country/us/eng/ support.html. 12. Reconfigure the thin client, if necessary - HP T5735 | Troubleshooting Guide: HP t5730 and t5735 Thin Client - Page 17
the rear (screw side) of the cover, and then lifting the cover off the unit (3). Installing the USB Device Before beginning the replacement process, review General Hardware Installation Sequence on page 7 for procedures you should follow before and after installing or replacing hardware. ▲ Insert - HP T5735 | Troubleshooting Guide: HP t5730 and t5735 Thin Client - Page 18
Side Cover Removing the Side Access Panel and Metal Side Cover WARNING! Before removing the side access panel, ensure that the thin client is turned off and the power cord is disconnected from the electrical outlet. To remove the access panel: 1. Remove the secure compartment cover (1). For more - HP T5735 | Troubleshooting Guide: HP t5730 and t5735 Thin Client - Page 19
NOTE: Do not remove the metal side cover when installing a PCI Expansion Module. You must remove the metal side cover to access internal components such as the battery or the memory. 1. Remove the four screws that secure the metal side cover to the chassis (1). 2. Lift the metal side cover, front - HP T5735 | Troubleshooting Guide: HP t5730 and t5735 Thin Client - Page 20
the replacement process, review General Hardware Installation Sequence on page 7 for procedures you should follow before and after installing or replacing hardware. WARNING! Before removing the side access panel, ensure that the thin client is turned off and the power cord is disconnected from - HP T5735 | Troubleshooting Guide: HP t5730 and t5735 Thin Client - Page 21
The HP Compaq t5730/t5735 thin client incorporates four mounting points on each side of the unit. These mounting points follow the VESA (Video Electronics Standards Association) standard, which provides industry-standard mounting interfaces for Flat Displays (FDs), such as flat panel monitors, flat - HP T5735 | Troubleshooting Guide: HP t5730 and t5735 Thin Client - Page 22
shown in the following illustration. Figure 3-2 Connecting the HP Quick Release to the thin client 2. Using four screws included in the mounting device kit, attach the other side of the HP Quick Release to the device to which you will mount the thin client. Make sure the release lever points upward - HP T5735 | Troubleshooting Guide: HP t5730 and t5735 Thin Client - Page 23
of the mounting device and the rounded opening on the other side face upward. Supported Mounting Options The following illustrations demonstrate some of the supported and not supported mounting options for the mounting bracket. ● You can mount a thin client between a flat panel monitor and the wall - HP T5735 | Troubleshooting Guide: HP t5730 and t5735 Thin Client - Page 24
Figure 3-6 Thin client mounted on back of monitor stand ● You can mount the thin client on a wall. Figure 3-7 Thin client mounted on wall ● You can mount the thin client under a desk. Figure 3-8 Thin client mounted under desk 16 Chapter 3 Mounting the Thin Client - HP T5735 | Troubleshooting Guide: HP t5730 and t5735 Thin Client - Page 25
-supported manner could result in failure of the HP Quick Release and damage to the thin client and/or other equipment. Do not mount the thin client on a flat panel monitor stand, between the panel and the stand. Figure 3-9 Unsupported mounting position-thin client between stand and monitor HP Quick - HP T5735 | Troubleshooting Guide: HP t5730 and t5735 Thin Client - Page 26
Boot Device Boot Up NumLock F12 Boot Integrated Audio Network Controller Serial Port 1 Serial Port 2 Parallel Port PWRON After PWR-Fail Wake-on-LAN BIOS Wake Up Asset Tag No Setup Password Power-On Password Parallel Mode ECP Mode Use DMA USB Controller Secure USB Ports External USB Ports Default - HP T5735 | Troubleshooting Guide: HP t5730 and t5735 Thin Client - Page 27
you do not press F10 at the appropriate time, you must restart the thin client and again press F10 when the F10=Setup message displays in the task BIOS Features, Integrated Peripherals, Power Management Setup The Task Actions are: Load Factory Defaults, Set Administrative Password, Set User Password - HP T5735 | Troubleshooting Guide: HP t5730 and t5735 Thin Client - Page 28
Enabled 1st Boot Device Select Boot Device Priority. Default is USB. 2nd Boot Device Select Boot Device Priority. Default is ATA Flash. 3rd Boot Device Select Boot Device Priority. Default is Network. Boot Up Numlock Status Select power on state for Numlock. 20 Chapter 4 BIOS Settings, (F10 - HP T5735 | Troubleshooting Guide: HP t5730 and t5735 Thin Client - Page 29
parallel port base IO port address and IRQ. Default is 378/IRQ7. Parallel Mode Select parallel port transfer mode of Standard, EPP, ECP, or ECP/EPP. Default is ECP/EPP. ECP Mode Use DMA Select DMA channel of 1 or 3 if parallel is operated in ECP mode. Default is 3. Using the BIOS Settings 21 - HP T5735 | Troubleshooting Guide: HP t5730 and t5735 Thin Client - Page 30
Task Actions Heading Table Load Factory Defaults Select Yes or No (Y/N) Set Administrator Password Allows you to set, change, and disable the administrator password. Set User Password Allows you to set, change, and disable the user password. NOTE: When the user password is set, it prevents - HP T5735 | Troubleshooting Guide: HP t5730 and t5735 Thin Client - Page 31
the RJ-45 connector on the top, rear panel of the thin client. The LEDs are visible when the connector is installed. Blinking green indicates network activity, and amber indicates a 100MB speed connection. IDE LED is Off When the unit is powered on and the flash activity light is off, then there - HP T5735 | Troubleshooting Guide: HP t5730 and t5735 Thin Client - Page 32
memory controller. 2. Initializes VGA software. 3. Initializes and configures all PCI devices. 4. Initializes the video to a known state. 5. Initializes USB devices to a known state. 6. Performs power device Tests for proper NAND flash device ID present 24 Chapter 5 Diagnostics and Troubleshooting - HP T5735 | Troubleshooting Guide: HP t5730 and t5735 Thin Client - Page 33
Keyboard error or no keyboard present Memory Test The user may press Esc to skip the full memory test. Cannot find or initialize the hard drive controller or the drive. Make sure the controller is installed correctly. If no hard drives are installed, be sure the Hard Drive selection in Setup is set - HP T5735 | Troubleshooting Guide: HP t5730 and t5735 Thin Client - Page 34
. Table 5-4 Power-On Troubleshooting Issue Procedures The thin client unit is experiencing operating Ensure that the following connectors are securely plugged into the thin client unit: problems. ● Power connector ● Keyboard ● Mouse ● Network RJ-45 connector ● Monitor The thin client unit - HP T5735 | Troubleshooting Guide: HP t5730 and t5735 Thin Client - Page 35
it with a working monitor and repeat testing. 3. Re-image the thin client unit and power on the monitor again. 4. Test the thin client unit on a known working monitor. If the monitor does not display video, replace the thin client unit. Diskless (No-Flash) Unit Troubleshooting This section is - HP T5735 | Troubleshooting Guide: HP t5730 and t5735 Thin Client - Page 36
in a Linux environment go to step 3. 2. If you are running in an MS RIS PXE environment press the F12 key to activate the network service boot as cycle. 3. If you are running in a Linux environment an error message will appear on the screen if there is no Client IP. ERROR: Non-system disk or disk - HP T5735 | Troubleshooting Guide: HP t5730 and t5735 Thin Client - Page 37
2000 Professional or Microsoft Windows XP Professional ● One or more HP Compaq t5000 Series Thin Clients ● CD-R or CD-RW drive (if using the ISO Image option) ● 512-MB USB flash device for Windows XP Embedded/Windows Embedded Standard (WES) (if using the USB format) or Linux. This restore method - HP T5735 | Troubleshooting Guide: HP t5730 and t5735 Thin Client - Page 38
have saved any user-created data from the flash drive. During the first restart of the thin client following the restore process, it may take approximately 15 minutes to unbundle the software before the Windows Desktop is displayed. Creating an ISO Image 1. Click ISO Image. 2. When prompted, enter - HP T5735 | Troubleshooting Guide: HP t5730 and t5735 Thin Client - Page 39
image restore process on the thin client. Unpacking the Image and Tools for Deployment 1. Click Deployment. 2. When prompted, select the destination directory for the imaging tools and image to Configuring a PXE Server on page 35 for instructions about setting up a PXE Server using Microsoft RIS. - HP T5735 | Troubleshooting Guide: HP t5730 and t5735 Thin Client - Page 40
Specifications Table A-1 HP Compaq t5730/t5730w/t5735 Thin Client and number of options installed. ** The operating temperature range when the thin client is attached to a flat panel using the HP Quick ) 9144 m 30,000 ft Power Supply Operating Voltage Range 100-240 VAC 100-240 VAC Rated Line - HP T5735 | Troubleshooting Guide: HP t5730 and t5735 Thin Client - Page 41
Table A-1 HP Compaq t5730/t5730w/t5735 Thin Client (continued) Power Output (maximum) 50 W Rated Output Current (maximum) 4.16 A Output Voltage +12 V DC 50 W 4.16 A +12 V DC 33 - HP T5735 | Troubleshooting Guide: HP t5730 and t5735 Thin Client - Page 42
device. 2. Ensure that IBR.exe (Image Restore) and Flash.dd are stored in the same directory on the server. (e.g., c:\program files\altiris\express\deployment server\images name for the job that you will use to deploy the original thin client image. 5. Click the name of the new job. 6. Near the - HP T5735 | Troubleshooting Guide: HP t5730 and t5735 Thin Client - Page 43
RIS PXE Server must be equipped with two or more hard drives. Remote Installation Services and Windows 2000 Server cannot be installed on the same drive; nor will RIS work on a double partition of Windows 2000 Server. You must first format the drive on which RIS is installed using NTFS. Installing - HP T5735 | Troubleshooting Guide: HP t5730 and t5735 Thin Client - Page 44
Use the default option to have RIS install on second hard drive (D:\ or E:\). 1. Click Start > Run. 2. Type Risetup.exe and click Next. 3. Click Next. 4. Select Respond to client computers requesting service. 5. Click Next. 6. Insert the Windows 2000 Professional CD into the CD-ROM drive and enter - HP T5735 | Troubleshooting Guide: HP t5730 and t5735 Thin Client - Page 45
Microsoft Web site for instructions about creating a network bootable diskette.) For More Information HP Compaq t5000 Series Documentation (including white papers discussing software deployment methods): http://welcome.hp.com/country/us/en/support.html. Type your model number into the for product - HP T5735 | Troubleshooting Guide: HP t5730 and t5735 Thin Client - Page 46
Driver Downloads. 3. In the For Product box, type the thin client model number, and then click the arrow. 4. Under Select Operating System, select the operating system for your thin client. 5. Under BIOS, click the Download button next to the BIOS you want to download. 6. Download to your hard drive - HP T5735 | Troubleshooting Guide: HP t5730 and t5735 Thin Client - Page 47
To update the system BIOS on the Thin Client t5000 Series, download the Thin Client t5000 Series Softpaq (for the product being updated) from the HP Web site at: http://www.hp.com/, select Software and Driver Downloads then enter the model number of your thin client product. The Softpaq contains - HP T5735 | Troubleshooting Guide: HP t5730 and t5735 Thin Client - Page 48
on wall 15 mounting thin client 13 O operating systems 1 options installing 7 supported 7 USB device 9 P POST error messages 25 power and IDE flash activity LEDs 23 power button 2 power connector location 4 power output specifications 33 power supply specifications 32 power-on diagnostic tests 24 - HP T5735 | Troubleshooting Guide: HP t5730 and t5735 Thin Client - Page 49
33 power supply 32 rated output current 33 relative humidity 32 temperature 32 thin client 32 weight 32 stand installing 5 removing 5 supported mounting options 15 T temperature specifications 32 top components 2 troubleshooting 26 U unsupported mounting option 17 updating a BIOS 39 USB devices
-
 1
1 -
 2
2 -
 3
3 -
 4
4 -
 5
5 -
 6
6 -
 7
7 -
8
-
9
-
10
-
11
-
12
-
13
-
14
-
15
-
16
-
17
-
18
-
19
-
20
-
21
-
22
-
23
-
24
-
25
-
26
-
27
-
28
-
29
-
30
-
31
-
32
-
33
-
34
-
35
-
36
-
37
-
38
-
39
-
40
-
41
-
42
-
43
-
44
-
45
-
46
-
47
-
48
-
49
 |
 |

Troubleshooting Guide
HP t5730/t5730w and t5735 Thin Client