HP T5735 Troubleshooting Guide: HP t5730 and t5735 Thin Client - Page 27
Changing BIOS Settings Using the F10 Utility, F10=Setup, Exit Setup & Save, Exit without Saving - administrator password
 |
UPC - 883585606238
View all HP T5735 manuals
Add to My Manuals
Save this manual to your list of manuals |
Page 27 highlights
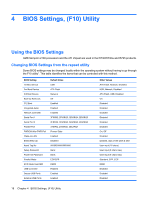
Halt On Security Option USB Keyboard Support USB Mouse Support All, but Keyboard Setup Enabled Disabled No Errors Always Disabled Enabled NOTE: Settings that can be controlled from the operating system with repset can also be controlled remotely by sending the client an Altiris job that uses the repset tool to apply the setting changes. Changing BIOS Settings Using the F10 Utility 1. Turn on or restart the thin client. 2. As soon as the thin client is turned on, press F10 when the "press F10" prompt appears on the screen to enter the Setup utility. NOTE: If you do not press F10 at the appropriate time, you must restart the thin client and again press F10 when the F10=Setup message displays in the task bar at the bottom of the screen. When the F10 POST Screen display is set to zero seconds, it may be necessary to press and hold F10 on the keyboard, then power on the thin client. 3. The Setup Utility screen is divided into five menu headings and five task actions. The Menu Headings are: System Information, Standard CMOS Features, Advanced BIOS Features, Integrated Peripherals, Power Management Setup The Task Actions are: Load Factory Defaults, Set Administrative Password, Set User Password, Save & Exit Setup, Exit without Saving Use the arrow keys (up and down or left and right) to select the appropriate heading, then press Enter. To return to the Setup Utility menu, press Esc key. 4. To apply and save changes, select Exit Setup & Save. If you have made changes that you do not want applied, select Exit without Saving. To reset to original factory settings, select Load Factory Defaults. CAUTION: Do NOT turn the thin client power Off while the ROM is saving the Setup (F10) changes because the CMOS could become corrupted. It is safe to turn off the computer only after exiting the F10 Setup screen. Table 4-1 Setup (F10) Utility Main Menu Heading Table System Information Setup Utility-System Information on page 20 Standard CMOS Features Setup Utility-Standard CMOS Features on page 20 Advanced BIOS Features Setup Utility-Advanced BIOS Features on page 20 Integrated Peripherals Setup Utility-Integrated Peripherals on page 21 Power Management Setup Setup Utility-Power Management Setup on page 22 Using the BIOS Settings 19
-
 1
1 -
2
-
3
-
4
-
5
-
6
-
7
-
8
-
9
-
10
-
11
-
12
-
13
-
14
-
15
-
16
-
17
-
18
-
19
-
20
-
21
-
 22
22 -
 23
23 -
 24
24 -
 25
25 -
 26
26 -
 27
27 -
 28
28 -
 29
29 -
 30
30 -
 31
31 -
 32
32 -
33
-
34
-
35
-
36
-
37
-
38
-
39
-
40
-
41
-
42
-
43
-
44
-
45
-
46
-
47
-
48
-
49
 |
 |
