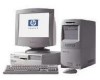
HP VL600 HP Vectra VL600, 3 COM Etherlink III ISA 10BT Ethernet Adapter (3C50 - Page 16
With the 3Com Etherlink 10 ISA 3C509 Adapter listed in the Network
 |
View all HP VL600 manuals
Add to My Manuals
Save this manual to your list of manuals |
Page 16 highlights
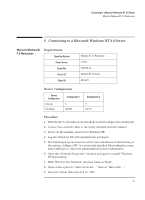
Connecting to a Microsoft Windows NT 4.0 Server Microsoft Windows NT 4.0 Workstation 10 With "3Com Etherlink 10 ISA (3C509) Adapter" highlighted, click on "OK". 11 With the "3Com Etherlink 10 ISA (3C509) Adapter" listed in the "Network Adapters:" window, click on "Next". 12 Select all the applicable network protocols and click on "Next". 13 At the "Network Services:" prompt, accept the default settings and click on "Next". 14 Complete the network card installation by clicking on "Next". 15 Type in the path to your Windows NT files and click "Continue". 16 Accept the "Type" as "ISA" and "Number" as "0" and click on "OK". 17 If TCPIP was one of the protocols selected, you will be prompted for some TCPIP information. Your Network Administrator can provide you with this information. 18 Accept the default entries at the "Show Bindings for:" windows and click on "Next". 19 When "Windows NT is now ready to start the network..." window appears, click on "Next". 20 Specify your Computer Name, Workgroup or Domain Name and click on Next". 21 Click on "Finish" when the "Network has been installed on this computer" message appears. 22 Remove the driver disk and select "No" when prompted to restart your computer. 23 From the "Programs" menu, run the "3COM NIC DOCTOR". Make sure that the current resources match the settings specified under the Device Configuration section of this instruction. 24 After verifying the resources, reboot the system. 25 Log onto Windows NT Workstation with administrator privileges and reinstall the current service pack. 14
-
 1
1 -
2
-
3
-
4
-
5
-
6
-
7
-
8
-
9
-
10
-
 11
11 -
 12
12 -
 13
13 -
 14
14 -
 15
15 -
 16
16 -
 17
17 -
 18
18 -
 19
19 -
 20
20 -
 21
21 -
22
-
23
-
24
-
25
-
26
-
27
-
28
-
29
-
30
-
31
-
32
 |
 |