HP Vectra XE310 hp vectra xe310, upgrade guide - Page 16
Replacing a Processor
 |
View all HP Vectra XE310 manuals
Add to My Manuals
Save this manual to your list of manuals |
Page 16 highlights
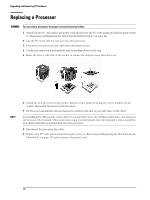
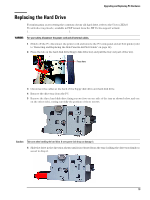
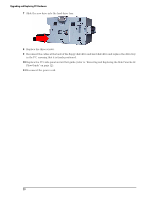
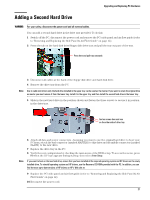
Upgrading and Replacing PC Hardware Replacing a Processor WARNING For your safety, disconnect the power cord and all external cables. 1 Switch off the PC, disconnect the power cord and remove the PC's side panel and air flow guide (refer to "Removing and Replacing the Side Panel & Air Flow Guide" on page 12). 2 Lay the PC on its side for easy access to the processor. 3 Disconnect the processor fan cable from the system board. 4 Unclip and remove the heatsink/fan unit by pushing down on the clip. 5 Raise the lever to the side of the socket to release the old processor, then lift it out. NOTE 6 Install the new processor in the socket, with its corner markers facing the corner markers on the socket, then lower the lever to lock it in place. 7 Fit the new heatsink/fan unit and fasten its retention clip first on one side then on the other. If reinstalling the old heatsink, ensure that you completely remove the old thermal interface material from the bottom of the heatsink. This can be done using your thumbnail. Once the heatsink is clean, install the new thermal interface provided with the new processor. 8 Reconnect the processor fan cable. 9 Replace the PC's side panel and air flow guide (refer to "Removing and Replacing the Side Panel & Air Flow Guide" on page 12) and reconnect the power cord. 16
-
 1
1 -
2
-
3
-
4
-
5
-
6
-
7
-
8
-
9
-
10
-
 11
11 -
 12
12 -
 13
13 -
 14
14 -
 15
15 -
 16
16 -
 17
17 -
 18
18 -
 19
19 -
 20
20 -
 21
21 -
22
-
23
-
24
-
25
-
26
-
27
-
28
 |
 |
