HP Vectra XE310 hp vectra xe310, upgrade guide - Page 17
Replacing the Floppy Drive, Slide the floppy drive out through the front of the tray.
 |
View all HP Vectra XE310 manuals
Add to My Manuals
Save this manual to your list of manuals |
Page 17 highlights
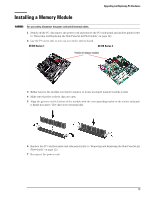
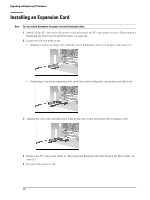
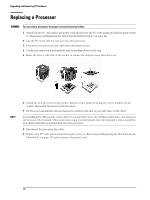
Upgrading and Replacing PC Hardware Replacing the Floppy Drive WARNING For your safety, disconnect the power cord and all external cables. 1 Switch off the PC, disconnect the power cord and remove the PC's side panel and air flow guide (refer to "Removing and Replacing the Side Panel & Air Flow Guide" on page 12). 2 Press the tab on the hard disk drive/floppy disk drive tray and pull the tray out part of the way. Press here 3 Disconnect all cables at the back of the floppy disk drive and hard disk drive. 4 Remove the drive tray from the PC. 5 Remove the two floppy drive fixing screws (one on either side of the drive tray), noting carefully the position of these screws. 6 Slide the floppy drive out through the front of the tray. 17
-
 1
1 -
2
-
3
-
4
-
5
-
6
-
7
-
8
-
9
-
10
-
11
-
 12
12 -
 13
13 -
 14
14 -
 15
15 -
 16
16 -
 17
17 -
 18
18 -
 19
19 -
 20
20 -
 21
21 -
 22
22 -
23
-
24
-
25
-
26
-
27
-
28
 |
 |

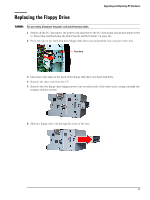
Upgrading and Replacing PC Hardware
Replacing the Floppy Drive±
WARNING
For your safety, disconnect the power cord and all external cables.
1
Switch off the PC, disconnect the power cord and remove the PC’s side panel and air flow guide (refer
to “Removing and Replacing the Side Panel & Air Flow Guide” on page 12).
2
Press the tab on the hard disk drive/floppy disk drive tray and pull the tray out part of the way.
Press here
3
Disconnect all cables at the back of the floppy disk drive and hard disk drive.
4
Remove the drive tray from the PC.
5
Remove the two floppy drive fixing screws (one on either side of the drive tray), noting carefully the
position of these screws.
6
Slide the floppy drive out through the front of the tray.
17±