HP Vectra XE310 hp vectra xe310, upgrade guide - Page 19
Replacing the Hard Drive
 |
View all HP Vectra XE310 manuals
Add to My Manuals
Save this manual to your list of manuals |
Page 19 highlights
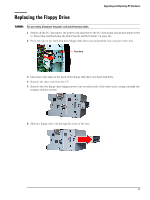
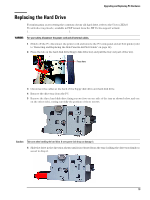
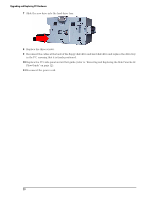
Upgrading and Replacing PC Hardware Replacing the Hard Drive For information on recovering the contents of your old hard drive, refer to the Vectra XE310 Troubleshooting Guide, available in PDF format from the HP Vectra support website (www.hp.com/go/vectrasupport). WARNING For your safety, disconnect the power cord and all external cables. 1 Switch off the PC, disconnect the power cord and remove the PC's side panel and air flow guide (refer to "Removing and Replacing the Side Panel & Air Flow Guide" on page 12). 2 Press the tab on the hard disk drive/floppy disk drive tray and pull the tray out part of the way. Press here 3 Disconnect the cables at the back of the floppy disk drive and hard disk drive. 4 Remove the drive tray from the PC. 5 Remove the three hard disk drive fixing screws (two on one side of the tray as shown below, and one on the other side), noting carefully the position of these screws. Caution Take care when handling the hard drive. A one-quarter inch drop can damage it. 6 Slide the drive in the direction shown until it is released from the tray, holding the drive tray firmly so as not to drop it. 19
-
 1
1 -
2
-
3
-
4
-
5
-
6
-
7
-
8
-
9
-
10
-
11
-
12
-
13
-
 14
14 -
 15
15 -
 16
16 -
 17
17 -
 18
18 -
 19
19 -
 20
20 -
 21
21 -
 22
22 -
 23
23 -
 24
24 -
25
-
26
-
27
-
28
 |
 |
