HP Vectra XU 5/XX HP Vectra XU PC Series - Setting Up Guide - Page 32
Upgrading the Matrox Video Adapter Board Memory, To install video memory modules
 |
View all HP Vectra XU 5/XX manuals
Add to My Manuals
Save this manual to your list of manuals |
Page 32 highlights
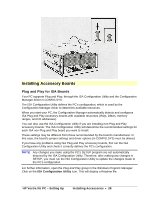
If your PC has a Matrox video adapter board, it has 2 MB of video memory (which can be upgraded to 4 MB). It can display: • 16.7 million colors, at up to 800 x 600 pixels and up to 120 Hz • 64 thousand colors, at up to 1152 x 882 pixels and up to 100 Hz • 256 colors, at up to 1600 x 1200 pixels and up to 66 Hz. (Refer to Some of the Available Video Resolutions, at the beginning of for more details of the resolutions.) You can change the Matrox video adapter board's display resolution and color depth, using the Display and Colors sections in the MGA Control Panel in Windows. You cannot change the board's refresh rates and display resolutions in SETUP. (Refer to Configuring the Matrox Video Adapter Board in "Configuring Your PC".) Upgrading the Matrox Video Adapter Board Memory If your PC has a Matrox video adapter board, the 2 MB video memory can be upgraded to 4 MB. The MGA software will automatically recognize the new memory upgrade. Your PC can then display: • 16.7 million colors, at up to 1152 x 882 pixels and up to 60 Hz • 64 thousand colors at up to 1600 x 1200 pixels and up to 66 Hz. (Refer to Some of the Available Video Resolutions, at the beginning of "Technical Information" for more details of the resolutions.) CAUTION Static electricity can damage electronic components. Turn all equipment OFF. Avoid wearing wool or polyester and don't let your clothes touch the accessory. To equalize the static electricity, rest the accessory bag on top of the power supply while you are removing the accessory from the bag. Handle the accessory as little as possible and with care. To install video memory modules: 1. Remove the screw securing the Matrox video adapter board. Put the screw to one side. Note which slot the board is in, usually the PCI/ISA combination slot. 2. Carefully remove the board from its slot, holding the board at each end by its top edge. Do not bend the board. 3. With its components facing up, place the board on a clean, flat, solid surface. Handle the board by its edges. 4. Position a video memory module over a socket, aligning the dot on the module with the "cut" corner on the socket. Carefully press the module into its socket. Repeat the procedure for each module. You must install all 8 modules to have 4 MB of video memory. 5. Position the video memory upgrade module over the 2 MB RAM socket, with its components facing downwards, as shown in the diagram. Slowly and evenly press the upgrade module into place. HP Vectra XU PC - Setting Up Installing Accessories • 32
-
 1
1 -
2
-
3
-
4
-
5
-
6
-
7
-
8
-
9
-
10
-
11
-
12
-
13
-
14
-
15
-
16
-
17
-
18
-
19
-
20
-
21
-
22
-
23
-
24
-
25
-
26
-
 27
27 -
 28
28 -
 29
29 -
 30
30 -
 31
31 -
 32
32 -
 33
33 -
 34
34 -
 35
35 -
 36
36 -
 37
37 -
38
-
39
-
40
-
41
-
42
-
43
-
44
-
45
-
46
-
47
-
48
-
49
-
50
-
51
-
52
-
53
-
54
-
55
-
56
-
57
-
58
-
59
-
60
-
61
-
62
-
63
-
64
-
65
-
66
-
67
-
68
-
69
-
70
-
71
-
72
-
73
-
74
-
75
-
76
-
77
 |
 |